
Deployment of a Kubernetes Cluster via Terraform
This guide demonstrates the automated deployment of a Kubernetes cluster in the Peerobyte cloud using our prepared Terraform configuration. This configuration:
- creates a virtual network and router;
- configures a security group with the required ports;
- deploys and configures control (master) and worker nodes according to the profile you choose;
- (optionally) installs the Kubernetes Dashboard.
Prerequisites
- Peerobyte account
You must have a registered account in the Peerobyte control panel. For detailed registration instructions, see “Creating an Account”. - “Cloud Infrastructure” service ready
The Peerobyte “Cloud Infrastructure” service must be ordered and ready. You will receive an email notification and an in-panel notice when it’s ready. For ordering instructions, see “How to Order Cloud Infrastructure”. - Sufficient project quotas
Ensure your project has enough free quota. You can view available resources in Horizon under Home → Quota Overview. If insufficient, contact Peerobyte support. - Terraform installed
On the machine from which you’ll manage deployment, install Terraform version 1.0 or later. See “Installing Terraform”. - Key pair in the project
You must have a key pair in your OpenStack project, with the private key available locally. To add a key pair via Horizon, see “Quick Start in Cloud Infrastructure: I. Adding a Key Pair”. - Free subnet 172.16.254.0/24
Your project must have the 172.16.254.0/24 subnet free. If it’s in use, you have two options:- In main.tf, replace all occurrences of the prefix 172.16.254. with another free subnet prefix (e.g. 172.16.253.). See main.tf below for details.
- Create a separate project for the new cluster with a free subnet.
What does the deployment code include?
We’ve placed everything needed for an automated, full-fledged Kubernetes cluster deployment in a GitHub repo. This includes Terraform configurations (HCL) and Cloud-Init templates that let you define all key cluster parameters—from Kubernetes/CRI-O versions and sizes to VM and disk types.
In this section we’ll cover: configurable parameters; infrastructure components that will be deployed; cluster-opened ports; output data during cluster creation; deployment configuration elements.
Configurable parameters
You can adjust the following cluster parameters by editing rraform.tfvars:
- Cluster size – the profile (cluster_profile) automatically defines the number of control (master) and worker nodes and their disk sizes.
Profile Masters Workers Disk size (GB) small 1 2 20 medium 2 3 30 large 3 6 50
- Component versions — Kubernetes (kubernetes_version) and CRI-O (crio_version).
- Web UI — enable or disable Kubernetes Dashboard (enable_dashboard).
- Instance types (flavors) — flavors for masters (master_flavor) and workers (worker_flavor), defining vCPU and RAM.
- Disk type — storage type (volume_type): All-Flash or Hybrid.
- SSH access — key pair (keypair) for managing VMs.
- OS image — VM image (image_name) and default user (default_os_user).
- External network — external network ID (external_network_id) for router attachment and external IP (optional).
Created components
When applying the Terraform configuration, the following resources are created automatically:
- Network — virtual network, subnet, and router.
- Security group — firewall rules for cluster access.
- VMs — master and worker nodes.
Open ports
By default, the security group (k8s-secgroup) allows:
- 22/TCP — SSH access;
- 6443/TCP — Kubernetes API-server;
- 30000–32767/TCP — NodePort services;
- ICMP — ping.
Within the cluster subnet:
- All TCP and UDP — inter-component communication;
- 2379–2380/TCP — etcd;
- 53/UDP, 53/TCP — DNS;
- 10250/TCP — Kubelet API;
- 10259/TCP — kube-scheduler;
- 10257/TCP — kube-controller-manager;
- 10256/TCP — kube-proxy (health/metrics);
- 4443/TCP — metrics-server;
- 65414/UDP — Flannel VXLAN.
Note: The detailed rules are shown for clarity and potential tightening, although “all TCP/UDP inside subnet” already covers them.
Output data
After successful deployment, Terraform prints:
- IP addresses of master nodes;
- IP addresses of worker nodes.
Deployment configuration elements
- terraform.tfvars — user-set cluster parameters (edit for custom settings).
- README.md — project description: capabilities, requirements, structure, profiles, and a brief step-by-step.
- main.tf — authenticates to OpenStack, creates network, subnet, router, security group; deploys masters and workers with static IPs; configures VMs and runs Cloud-Init templates.
- outputs.tf — defines output parameters, e.g. node IPs.
- variables.tf — all input variables: auth, network & compute settings, cluster profile, storage and version settings.
- Cloud-Init templates — user-data files for VM bootstrap:
- master-main.sh.tpl — initial setup of the first master: install CRI-O & Kubernetes, configure sysctl & disable swap, kubeadm init, deploy Flannel CNI, copy admin.conf.
- master-default.sh.tpl — additional masters: same stack, enable IP forwarding & sysctls, kubeadm join to control-plane.
- worker.sh.tpl — worker preparation & join: install CRI-O & Kubernetes, set sysctls, kubeadm join.
I. Cluster Deployment Procedure
- Download the project
Clone the GitHub repo into a folder on the machine from which you’ll manage the cluster via Terraform. If Terraform isn’t installed yet, install it per “Installing Terraform”. - Obtain authentication parameters
Get auth parameters for Terraform as described in “Authentication in Cloud Infrastructure via Terraform”. - Open terraform.tfvars
Edit terraform.tfvars in a plain-text UTF-8 editor (e.g. VS Code, Notepad++, Vim, Nano). Avoid rich-text editors like Word. - Enter authentication data
Enter the authentication data obtained in step 2 into the opened terraform.tfvars:
         ##########################################
# OpenStack authentication (IaaS access)
# Authorize access to your OpenStack project
##########################################
auth_url    = "<OS_AUTH_URL>"
tenant_name = "<OS_PROJECT_NAME>"
user        = "<OS_USERNAME>"
password    = "<PASSWORD>"
domain      = "<OS_USER_DOMAIN_NAME>"
...
Take, <OS_PROJECT_NAME>, <OS_USERNAME>, <OS_USER_DOMAIN_NAME> from your OpenRC file.
If <OS_AUTH_URL> contains /v3//v3/, leave only one /v3/.
Get <PASSWORD> from the “Cloud Infrastructure” panel (use Click to copy or reveal with ******).
Example:
         ##########################################
# OpenStack authentication (IaaS access)
# Authorize access to your OpenStack project
##########################################
auth_url    = "https://cli.peerobyte.com:5000/v3/"
tenant_name = "my-project-31-715-715"
user        = "ruofcmvh"
password    = "8bw12nZuK9"
domain      = "my-domain-31-715-715-1746522363"
...
Security note: Storing passwords in Terraform code is insecure. Instead, export as an environment variable:
export TF_VAR_password=<your_password>
Then comment out the password line in terraform.tfvars:
#password = "<PASSWORD>" - Select cluster profile
In terraform.tfvars, specify the cluster profile:
         ...
##########################################
# Cluster profile# Defines the size of the cluster: number of master and worker nodes
# and the disk volume size for each node.
# Values are set via local.profiles in main.tf
# Available profiles: small, medium, large
##########################################
cluster_profile = "<cluster_profile>"
...
Choose based on required masters, workers, and disk size:
<cluster_profile> Masters Workers Disk (GB) small 1 2 20 medium 2 3 30 large 3 6 50
Example:... ########################################## # Cluster profile# Defines the size of the cluster: number of master and worker nodes # and the disk volume size for each node. # Values are set via local.profiles in main.tf # Available profiles: small, medium, large ########################################## cluster_profile = "medium" ...
- Choose component versions
In terraform.tfvars, specify the versions of Kubernetes and CRI-O:
         ...
##########################################
# Kubernetes component versions
##########################################
kubernetes_version = "<kubernetes_version>"
crio_version       = "<crio_version>"
...
To list available Kubernetes tags:
         curl -s "https://api.github.com/repos/kubernetes/kubernetes/tags?per_page=100" \
  | grep -oP '"name": "\Kv[0-9]+\.[0-9]+\.[0-9]+' \
  | sed 's/^v//' \
  | sort -u
To list CRI-O releases:
         curl -s "https://github.com/cri-o/cri-o/releases" \
| grep -oP 'href="/cri-o/cri-o/releases/tag/v\K[0-9]+.[0-9]+.[0-9]+' \
| sort -V -u
Recommendations:
- Prefer the latest patch in your minor series for fixes and security.
- Upgrade minor versions (X.Y→X.(Y+1)) only when needed or near EOL—wait 2–4 weeks post-release and test.
- Match CRI-O minor with Kubernetes and use the latest patch.
Example:... ########################################## # Kubernetes component versions ########################################## kubernetes_version = "1.33.2" crio_version = "1.33.2" ...
- Configure node flavors
In terraform.tfvars, specify the flavours of the master and workers:... ########################################## # Virtual machine flavors (CPU/RAM sizes) # These are flavor names defined in your OpenStack project # Minimum recommendation for Kubernetes: # - masters: 2 vCPU / 4 GB RAM # - workers: 2 vCPU / 4–8 GB RAM ########################################## master_flavor = "<master_flavor>" worker_flavor = "<worker_flavor>" ...List available flavors in Horizon (Compute → Flavors) or via CLI:
openstack flavor listDepending on the actual load, choose instance configurations (flavor), in which there are two or more virtual processor cores, also 4 or more gigabytes of RAM.
We recommend:Profile Master Nodes Qty Master Node Resources Worker Nodes Qty Worker Node Resources Approximate Average Number of Pods per Cluster* small 1 2 vCPU /
4 GB2 2 vCPU /
8 GB40 medium 2 4 vCPU /
8 GB3 4 vCPU /
16 GB120 large 3 8 vCPU /
16 GB6 8 vCPU /
32 GB480 * - Based on 10 pods per 1 vCPU and 5 pods per 1 GB RAM. The nominal number of pods may be different for your load.
Example:
         ...
##########################################
# Virtual machine flavors (CPU/RAM sizes)
# These are flavor names defined in your OpenStack project
# Minimum recommendation for Kubernetes:
# - masters: 2 vCPU / 4 GB RAM
# - workers: 2 vCPU / 4–8 GB RAM
##########################################
master_flavor = "de2.c.medium"
worker_flavor = "de2.c.medium"
...
- Select disk type
In terraform.tfvars, specify the type of virtual machine disks:... ########################################## # VM disk volume type# Available options: # - "All-Flash-Datastore" (default) # - "Hybrid-Datastore" ########################################## volume_type = "<volume_type>" ...Use the OpenStack CLI to list available disk types for <volume_type>:
openstack volume type listWe recommend using All-Flash-Datastore.
Example:
         ...
##########################################
# VM disk volume type# Available options:
# - "All-Flash-Datastore" (default)
# - "Hybrid-Datastore"
##########################################
volume_type = "All-Flash-Datastore"
...
- Select image
In terraform.tfvars, specify the image name for the cluster node VMs:... ########################################## # Image name used to create VM instances # Must match an image available in your OpenStack project ########################################## image_name = "<image_name>" ...To find available images for <image_name>, use Horizon UI (Compute → Images) or OpenStack CLI:
openstack image listWe recommend using Debian_12_x64 for cluster nodes, as this image has been tested by us in a Kubernetes cluster environment.
For example:... ########################################## # Image name used to create VM instances # Must match an image available in your OpenStack project ########################################## image_name = "Debian_12_x64" ...
- Set default OS user
In terraform.tfvars, specify the default user for the operating system whose image was selected in the previous step:...########################################### Default OS username# Must match the default user for the image (e.g. 'debian', 'ubuntu')##########################################default_os_user = "<default_os_user>"... Images of popular Linux distributions usually contain a pre-created system user, for example:
- Ubuntu — default user: ubuntu;
- Debian — default user: debian;
- CentOS — default user: centos (or cloud-user in some builds);
- Fedora — default user: fedora.
Important: The default username must exactly match the one in the image — otherwise, the virtual machine cannot be configured automatically.
Example:
...########################################### Default OS username# Must match the default user for the image (e.g. 'debian', 'ubuntu')##########################################default_os_user = "debian"...
- Specify key pair
In terraform.tfvars, specify an existing key pair from your project to manage cluster VMs:...########################################### SSH keypair name in OpenStack# This must be an existing keypair in your OpenStack project##########################################keypair = "<keypair>"... To list available key pairs for <keypair>, use Horizon UI (Compute → Key Pairs) or OpenStack CLI:
openstack keypair list Example:
...########################################### SSH keypair name in OpenStack# This must be an existing keypair in your OpenStack project##########################################keypair = "k8s_main"...
- Specify external network
In terraform.tfvars, specify the ID of an existing external network in your project for cluster node connectivity:...########################################### External network ID used to connect the router# This is your OpenStack provider's public/external network# If this value is invalid or causes issues — contact support##########################################external_network_id = "<external_network_id>"... To list external network IDs for <external_network_id>, use Horizon UI (Network → Networks → External Networks) or OpenStack CLI:
openstack network list --external Example:
...########################################### External network ID used to connect the router# This is your OpenStack provider's public/external network# If this value is invalid or causes issues — contact support##########################################external_network_id = "35f22b46-ec84-4a43-ba2c-ac865bd2c22a"...
- Enable/disable Dashboard
In terraform.tfvars, specify if you want to install Kubernetes Dashboard on the cluster's control node:
| ...########################################### Enable Kubernetes Dashboard (true/false)# Enables web UI on the cluster##########################################enable_dashboard = "<dashboard_status>"... |
Replace <dashboard_status> with:
- true — to install Kubernetes Dashboard,
- false — to skip installation.
Note: One Dashboard replica uses ~0.1–0.2 vCPU and 128–512 MB RAM (≈ 1–2 standard pods)..
Example:
| ...########################################### Enable Kubernetes Dashboard (true/false)# Enables web UI on the cluster##########################################enable_dashboard = "true" |
- Save changes
Save your edits to terraform.tfvars. - Initialize Terraform
Go to the directory where the cluster deployment configuration is saved and run the command:
| terraform init |
- Format and validate
Execute the commands:
| terraform fmt -checkterraform validate |
If you see the message "Success! The configuration is valid," the configuration is correct, and you can proceed to the next step.
If errors occur, fix them as indicated and retry the validation.
- (Optional) Preview planned changes
To review all infrastructure changes Terraform is about to make without actually applying them, run:
| terraform plan |
- Apply infrastructure changes
To start the cluster deployment, run:
| terraform apply |
Confirm when prompted:
| Do you want to perform these actions? Terraform will perform the actions described above. Only 'yes' will be accepted to approve. Enter a value: |
Type yes and press Enter.
After completion, you’ll see something like:
| Apply complete! Resources: 36 added, 0 changed, 0 destroyed. |
This means the cluster was successfully deployed.
II. Connecting to the Kubernetes Dashboard
Our setup assumes masters are in a private network behind a load balancer, VPN, or bastion for security and resilience. To access the Dashboard directly, assign a floating IP to one master. Then you can SSH in, generate a token, and log in.
To connect, follow these steps:
- Assign a floating IP
Connect a floating IP to the master node via the Horizon control panel, following the instructions: “Attaching a Floating IP Address” or via Terraform, following the instructions: ”Allocating a Floating IP to an Instance”. - (Optional) Restrict key permissions
If your private key was created through Horizon, it may be too permissive.
Restrict it:
- Windows:
Run the command as an administrator:
| icacls "<path_to_private_key>" /inheritance:r /grant:r "<username>:(R,W)" |
Where:
<path_to_private_key> — Path to the private key file (part of the key pair specified during cluster creation).
<username> — Name of the system user who will use the private key to connect to the master node.
Example:
| icacls "D:\test\kubernetes\test_key.pem" /inheritance:r /grant:r "test_user:(R,W)" |
- Linux / macOS:
Run the following command in the terminal:
| chmod 600 <path_to_private_key> |
Where:
<path_to_private_key> — Path and filename of the private key associated with the key pair specified during cluster creation.
Example:
| chmod 600 test_key.pem |
- SSH to master
Connect to the master node via SSH using the command:
| ssh <os_user>@<master_IP> -i <path_to_key> |
Where:
<username> — Default OS username.
<master_node_IP> — IP address of the cluster’s master node.
-i — Specifies that the connection will use a private key, whose path is provided below.
<path_to_key> — Path and filename of the key.
Example:
| ssh [email protected] -i test_key.pem |
- Generate Dashboard token
On the master node, generate and display a Kubernetes Dashboard token using the command:
| kubectl -n kubernetes-dashboard create token admin-user |
Copy the displayed token.
- Open Dashboard in browser
Visit:
| https://<master_IP>:30007 |
Where:
<master_IP> — IP address of the cluster master node.
Example:
| https://192.0.2.10:30007 |
The Kubernetes Dashboard authorisation page will open.
- Log in
Select Token as the authentication method, paste the token obtained in step 4 into the Enter token field, and click Sign In.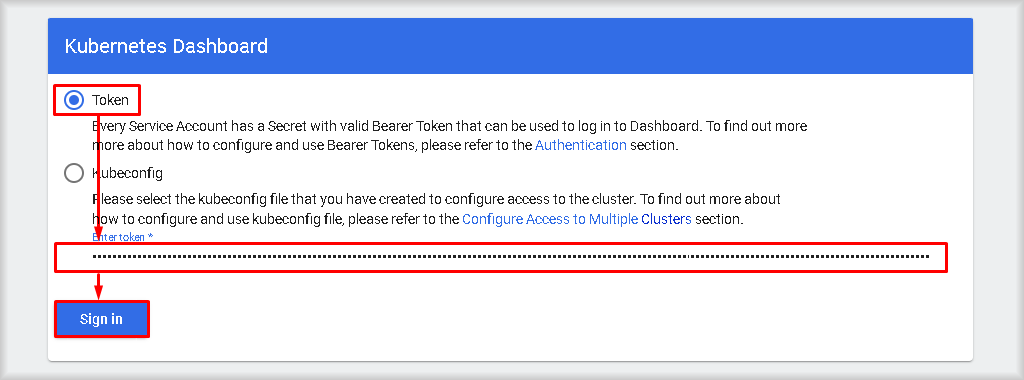
You will be logged into the Kubernetes Dashboard.
III. Verification of Deployment
Check deployment status in Kubernetes Dashboard or via SSH to the master node.
Via Dashboard
- Navigate to Cluster > Nodes.
- Verify the total number of nodes per type matches your selected cluster_profile.
- Check each node:
- Status: Ready
- CPU capacity (cores): Must match the chosen flavor for the node type.
- Memory capacity (bytes): memory capacity should match your flavor, noting Kubernetes reserves some RAM.
Via terminal
- List nodes and their status/versions:
| kubectl get nodes |
- List nodes with CPU & memory capacities and allocatables:
| kubectl get nodes -o custom-columns="NAME:.metadata.name,CPU(Cap):.status.capacity.cpu,CPU(Alloc):.status.allocatable.cpu,MEM(Cap):.status.capacity.memory,MEM(Alloc):.status.allocatable.memory" |
What’s next?
See the official Kubernetes documentation [here] for further guidance.