Creating an Account
In this section, we will explain how to create a Peerobyte account using an email address and password, as well as how to register using a Google account.
In addition to creating an account, you will need to verify your email address and phone number and provide the minimum information required by law to identify you or the organization you represent. This information is necessary for billing and payment processing.
Prerequisites
- You must have a valid email address and phone number that you can access.
- You must be over 18 years old.
- If you are registering on behalf of an organization, you must be authorized to represent its interests.
- If you wish to use a Google account for authentication, you must have one.
I. Creating a Peerobyte Account Using a Google Account
One of the available registration methods is to create an account using Google as a third-party authentication provider.
To register using Google, follow these steps:
- Sign in to the Google account you plan to use for authentication, if you haven’t already.
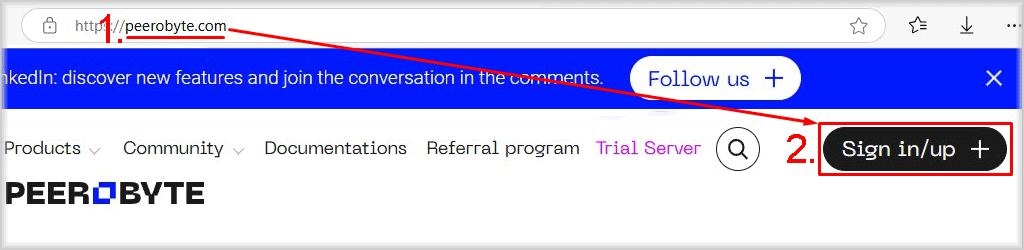
- Go to peerobyte.com.
- Click the “Sign in/up +” button located in the top right corner of the Peerobyte homepage.


An “Sign In/up” window will open.
- Click the “G” button.
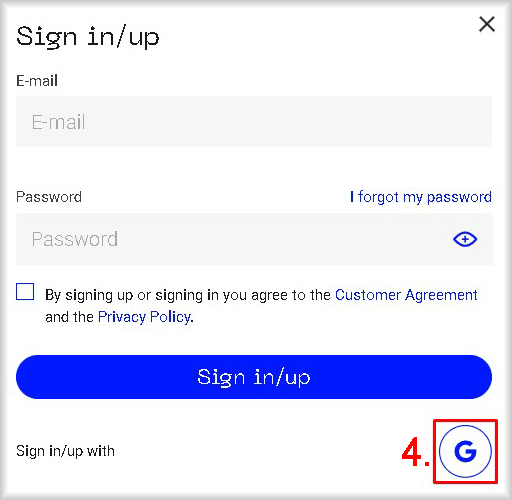
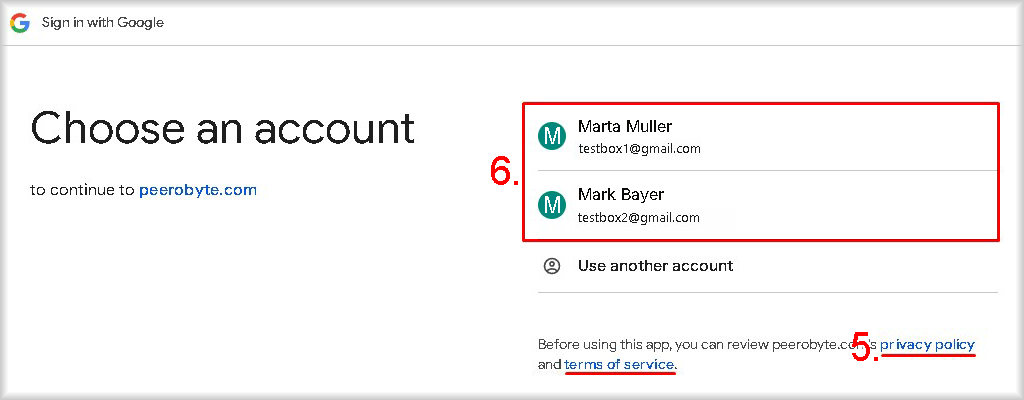
A window to select your Google account will open. - Read the documents: “Privacy Policy”, “Terms of Service”, and all their appendices (links to these documents are provided within them). To view a document, click its title.
Important: If you do not agree with any of the terms in the documents above, stop the registration process and leave the site.
- Select one of the Google accounts from the list that you want to use to create your Peerobyte account.
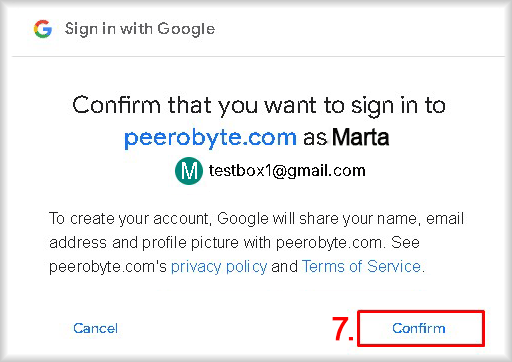
Your chosen Google account will be linked to your new Peerobyte account, and a confirmation window will open. - Click the “Confirm” button to confirm your intention to link your Google account to your Peerobyte account.
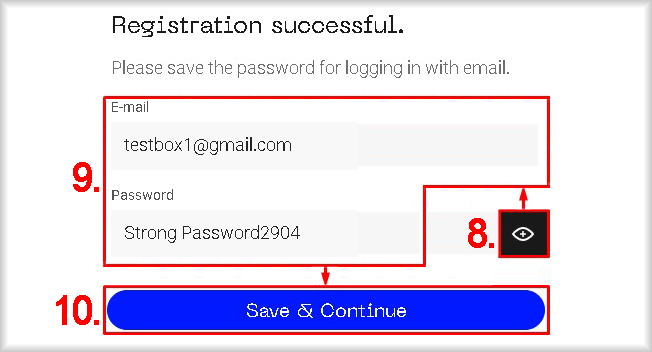
Your Google account will be linked to your new Peerobyte account, and a window displaying your login credentials (email and password) will open.
- Click the “eye” icon button to display your password.
- Save the “E-mail” and “Password” values in a secure place. You can use them to access your Peerobyte account if you lose access to your Google account or decide to unlink it from your Peerobyte account.
You may enter your own password in the “Password” field.
This password must:
- Contain at least 8 characters (12 characters recommended);
- Include both uppercase and lowercase letters;
- Contain numbers.
It is not recommended to use a password that you use for other online services.
- Click the “Save & Continue” button.
Your Peerobyte account will be created and linked to your Google account. Next, you need to fill in your account information – see Section III for instructions. A verification email will also be sent to the email address linked to your Google account. The verification process is described in Section IV of these instructions.
II. Creating an Account Using an Email Address and Password
You can register a Peerobyte account using an email address and password.
To register your account, follow these steps:
- Go to peerobyte.com.
- Click the “Sign in/up +” button located in the top right corner of the Peerobyte homepage.
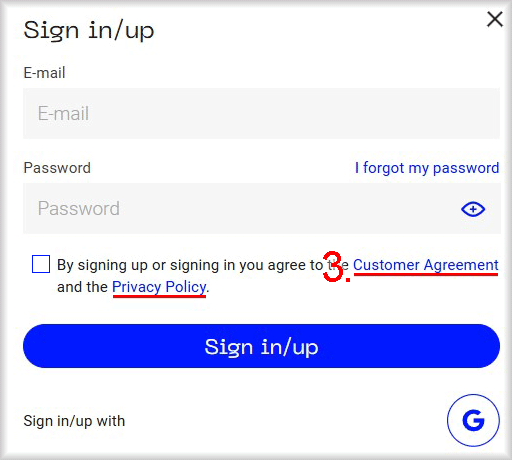
A “Sign In/up” window will open.
- Read the documents that govern the interaction between Peerobyte and its clients, users, and third parties: “Customer Agreement” and “Privacy Policy”, along with their appendices. To view a document, click its title.
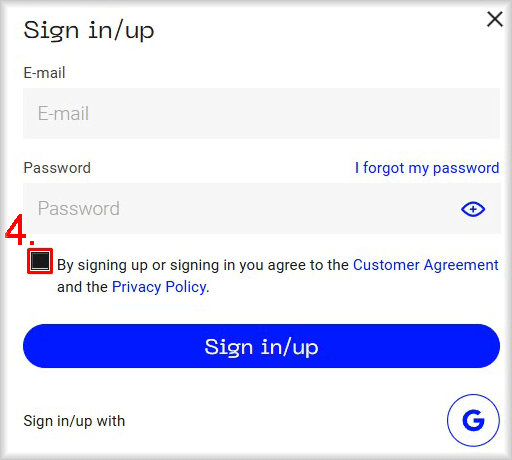
Important: If you do not agree with any of the terms in these documents, stop the registration process and leave the site. - Check the box “By signing up or signing in you agree to the Customer Agreement and the Privacy Policy” if you have read the documents and agree to their terms.
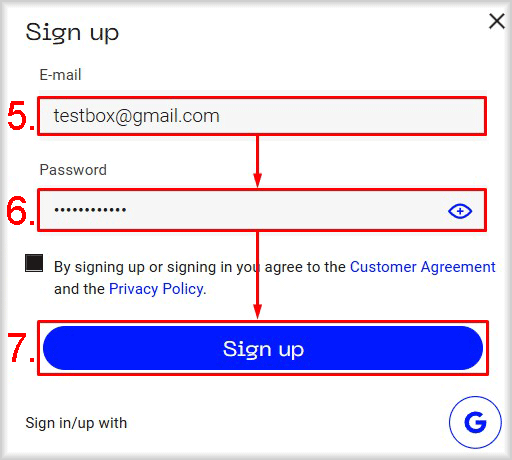
- Enter your email address in the “E-mail” field.
- Create a password and enter it in the “Password” field.
The password must:
- Contain at least 8 characters (12 characters recommended);
- Include both uppercase and lowercase letters;
- Contain numbers.
It is not recommended to use a password that you use for other online services.
To show or hide the characters of your password, click the “eye” icon button located to the right of the “Password” field.
- Click the “Sign Up” button.
After your Peerobyte account is created, you will need to fill in your account details – see Section III for more information. In addition, a verification email will be sent to the email address linked to your Google account, and the verification process is described in Section IV of these instructions.
III. Filling in Your Account Information
In this section, we will explain how to provide the minimum required information needed to order Peerobyte services, as well as how to verify the phone number linked to your account.
Fill in your account information by following these steps:
- Click the “Account >” button in the top right corner of the Peerobyte website.
After clicking, a menu of available account options will open.
- Click the “Control Panel” option in the dropdown menu.
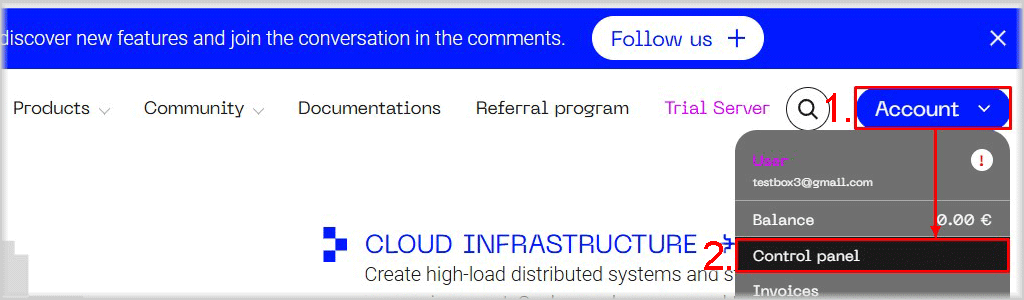
You will be taken to the account information page.
- Select your “Account Type” from the list:
- “Individual Account” – if you plan to use Peerobyte services for personal purposes.
- “Business Account” – if you represent an organization.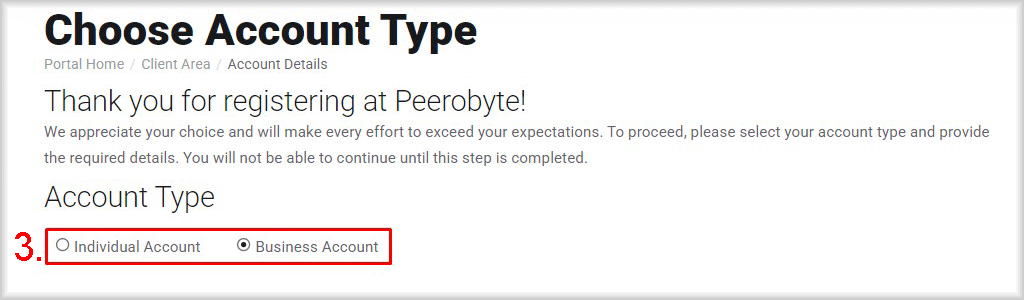
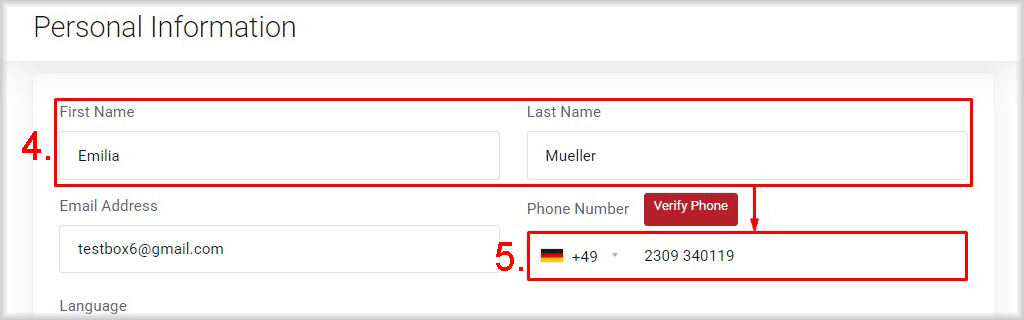
- Enter the first and last name of the account owner in the “First Name” and “Last Name” fields.
Be sure to enter your real first and last name – the use of pseudonyms, fictitious names, or nicknames is not allowed.
- Enter the account owner’s phone number by selecting the country code from the list and typing the rest of the number in the “Phone Number” field.
- If you selected “Business Account”, enter the name of the company you represent.
- Enter the address:
- If you represent a company – enter the company’s location address.
- If the account is used for personal purposes – enter your home address.
To do this, fill in the “Address 1”, “City”, and “Zip Code” fields, and select the appropriate values from the “Country” and “State/Region” lists.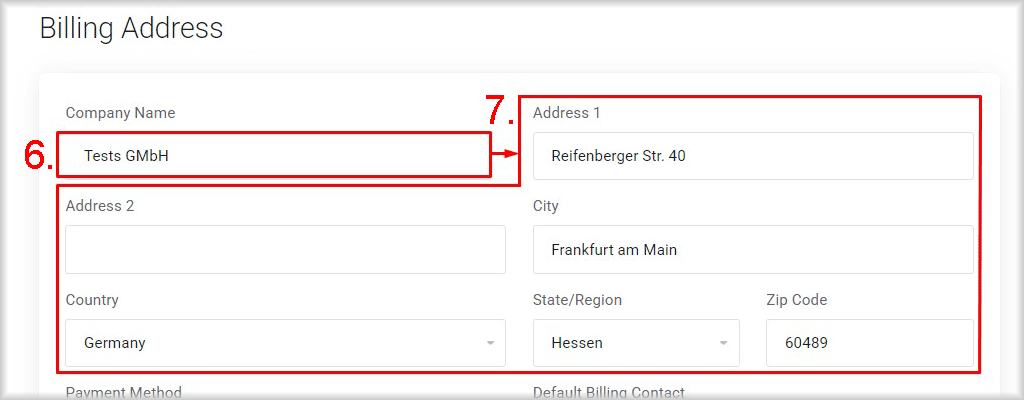
- Click the “Save Changes” button.

The information you entered will be saved, and you will be redirected to the phone number verification page.
- Click the “Start Verification” button.
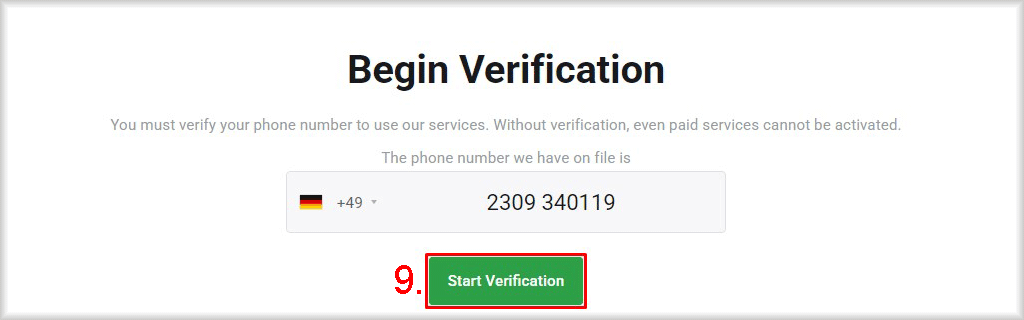
An SMS with a verification code will be sent to the provided phone number, and you will be taken to the code entry page.
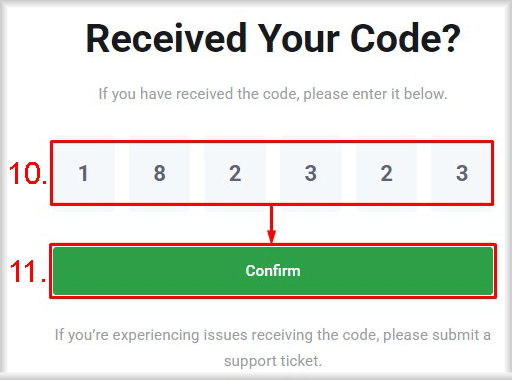
- Enter the six-digit verification code received by SMS.
- Click the “Confirm” button.
If the phone number is successfully verified, the message “Verification Successful” will be displayed.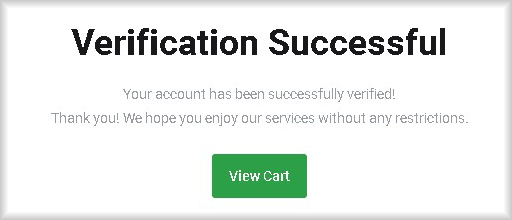
Now, to order Peerobyte services and products, you only need to verify the email address linked to your account. Instructions for this are provided in Section IV of these instructions.
If the verification code is entered incorrectly:
If you enter the verification code incorrectly, you will be redirected to the “Incorrect Code!” page. On that page, click the “Go Back” link to try verifying your number again.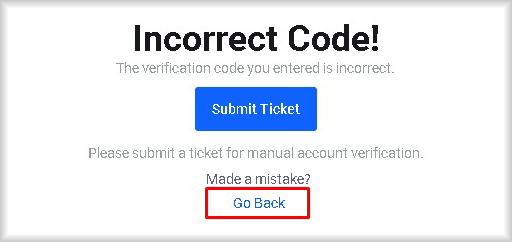
You will then be taken to the “Begin Verification” page.
In the “Begin Verification” window, click the “I've Received the Code” button.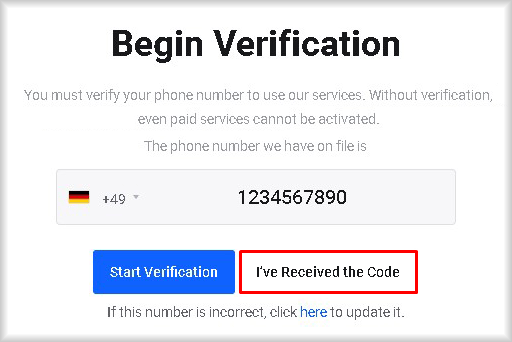
You will be taken to the “Received Your Code?” page, where you can re-enter the SMS verification code.
If you are sure that the code is correct, but the system still redirects you to the “Incorrect Code!” page, please contact our support team by creating a Ticket.
If the SMS with the verification code does not arrive within 10 minutes:
If you do not receive the SMS with the verification code within 5–10 minutes, make sure that:
- Your phone has access to the mobile network and can receive SMS messages.
- The phone number is entered correctly.
To check the provided phone number, click the “Go Back” link on the code entry page.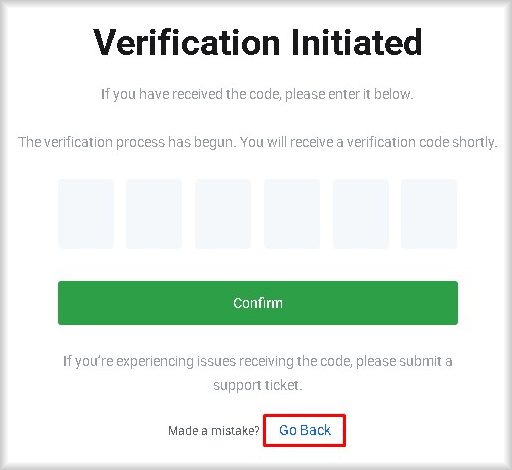
After that, you will return to the “Begin Verification” page.
Check the accuracy of the entered phone number:
- If the number is correct, contact our support team by creating a Ticket and follow their instructions.
- If the number is incorrect, click the “here” link to go to the phone number editing page.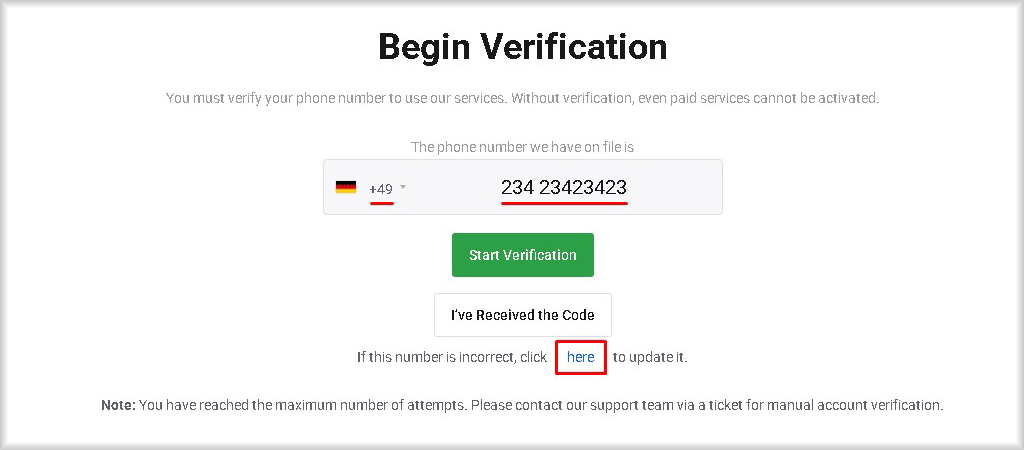
Correct any errors in the phone number by selecting the correct country code from the list and typing the rest of the number manually. Then click the “Update Number” button.
The phone number linked to your account will be updated, and you will be redirected to the “Begin Verification” page, where you can retry the verification process starting from step 9.
If you have made too many verification attempts:
If you are redirected to the “Too many attempts!” page, it means you have exceeded the verification attempt limit.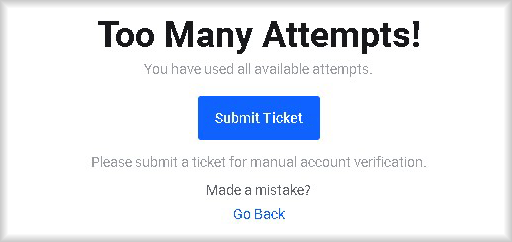
In this case, please contact our support team for further instructions by creating a Ticket.
IV. Verifying Your Email Address
Verifying the email address linked to your account is a mandatory step in creating your account. In this section, we will show you how to verify your email address by following these steps:
- Sign in to the email account provided during your Peerobyte registration.
- Open the email sent from Peerobyte.
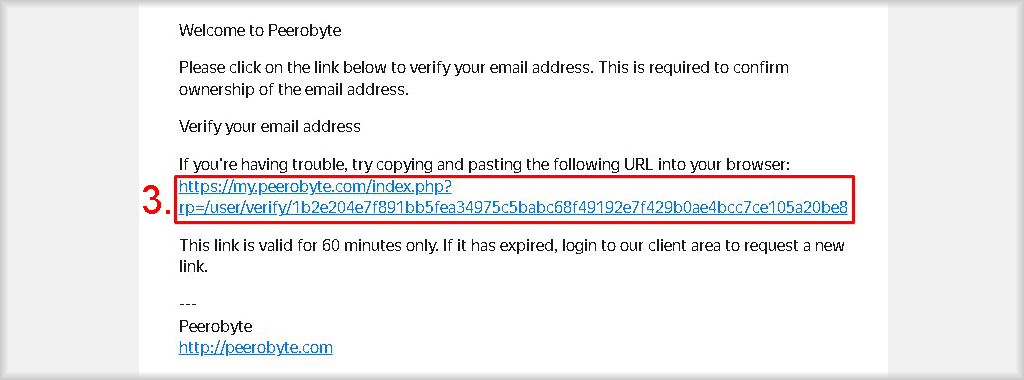
- In the email, click the link to verify your email address. If the hyperlink does not work for any reason, copy the link from the email and paste it into your browser’s address bar.
If your email is successfully verified, you will be redirected to the Peerobyte control panel, where the message “Your email address has been verified” will be displayed.
If you see the message “Your email verification has expired”:
This means that you did not verify your email address within the allotted 60 minutes.
In that case, click the “Resend Verification Email” button in the Peerobyte control panel.
A new verification email will be sent to the email address provided during registration.
What’s Next?
After your account is registered and your information is confirmed, and both your phone number and email address have been verified, you can, for example:
- Get a free trial version of a virtual machine. See the “Getting a Free Trial of a Virtual Machine” instructions for details.
- Order a virtual machine. The ordering process is described in the “How to Order a Virtual Machine” instructions.
- Learn how to use the virtual machine control panel. For this, refer to the “Virtual Machine Control Panel” instructions.
- Enable two-factor authentication (2FA) for your account. See the “Enabling 2FA on Your Account” instructions for details.