How to Order a Virtual Machine
In this guide, we describe the procedure for ordering a virtual machine (VDS/VPS) from Peerobyte.
I. Complete the prerequisites
To order a virtual machine (VM), you must meet the following requirements:
- You must have an account in the Peerobyte control panel. You can find out how to register an account in the guide: "Creating an Account".
- You must be able to pay for the service using a bank card.
- You must sign in to your Peerobyte account on the Peerobyte website:
a. If 2FA (two-factor authentication) is not enabled, follow the sign-in guide "Signing in to the Control Panel".
b. If 2FA is enabled, follow the guide "2FA Signing in to the Control Panel".
II. Go to the virtual machine configurator
You can open the virtual machine configurator in the following ways:
From the "Dashboard"
- Go to the "Dashboard" page by selecting the relevant item in the main menu.
- In the "Place a New Order" section, find the "Virtual Machines" block and click "Deploy".
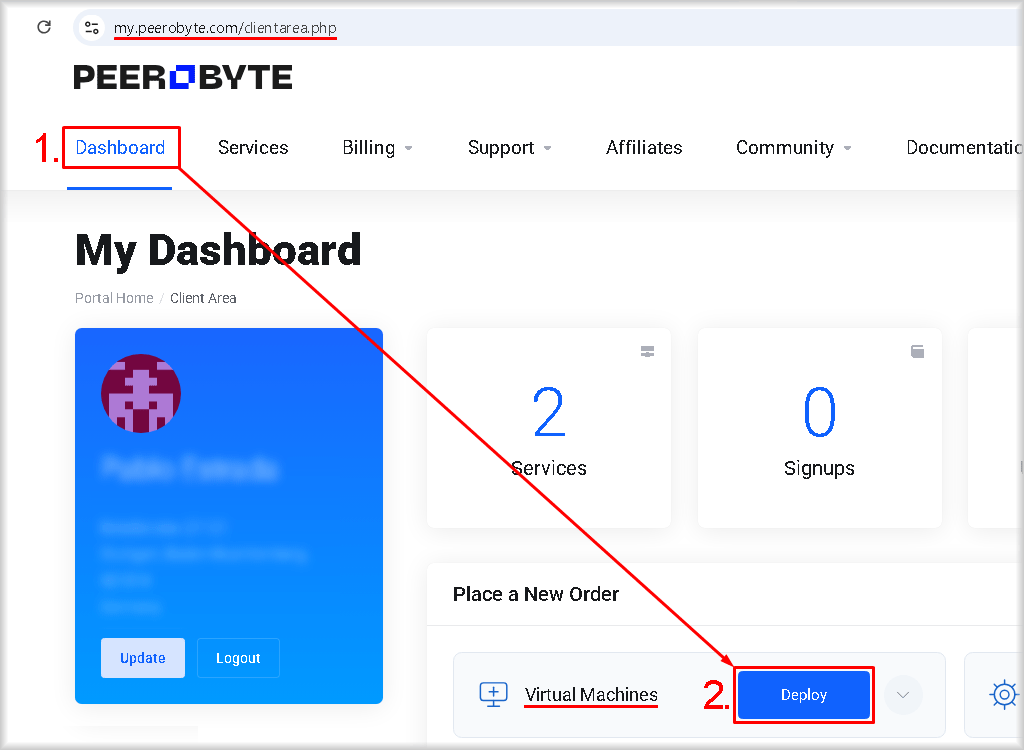
You will be taken to the "Virtual Machines" configurator page.
From the main menu
- Select "New order" in the main menu.
The list of products available to order will open. - Select "Virtual Machine".
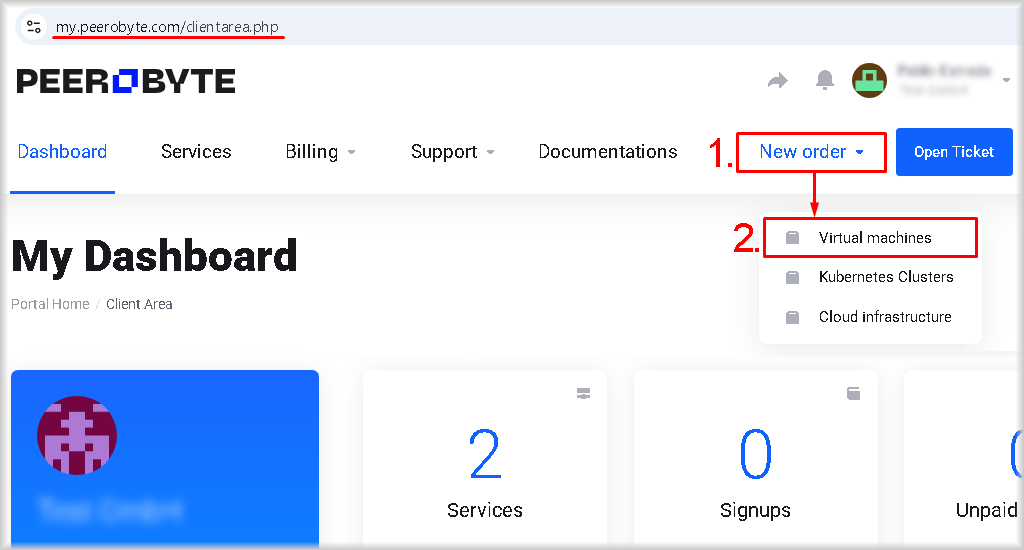
You will be taken to the "Virtual Machines" page.
III. Select the virtual machine configuration
- Choose the data centre location.
To select the region where the virtual machine will be deployed, open the "Region" list, then select the country and city.
We recommend choosing Germany (Frankfurt) for the virtual machine location, where the most favourable prices are available. The procedure for selecting this region is shown in the illustration below.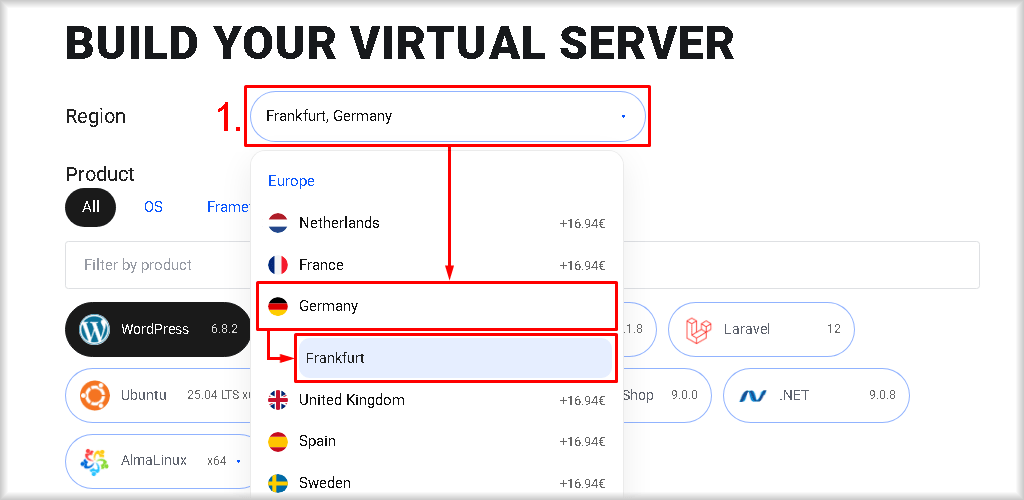
- Choose the VM image.
In the "Product" section, select a virtual machine image by clicking its name. Then, if required, select the version of the operating system or software stack.
The image selection process, using Debian as an example, will look like this: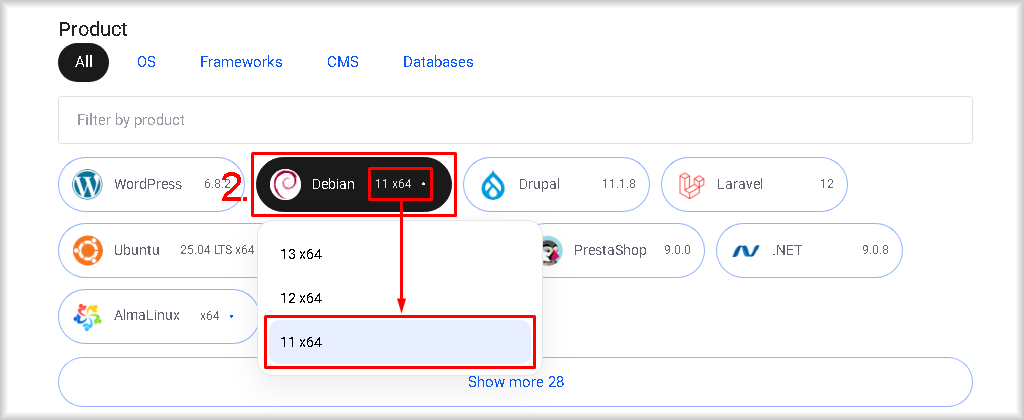
For easier searching, use:- Select the image type: "OS", "Frameworks", "CMS", "Databases" to narrow down the options. Select "All" to show all options.
- Use the "Filter by product" filter to search for an image using a keyword phrase.
- Use the "Show more" button to show more options.
- Select the vCPU resource allocation mode.
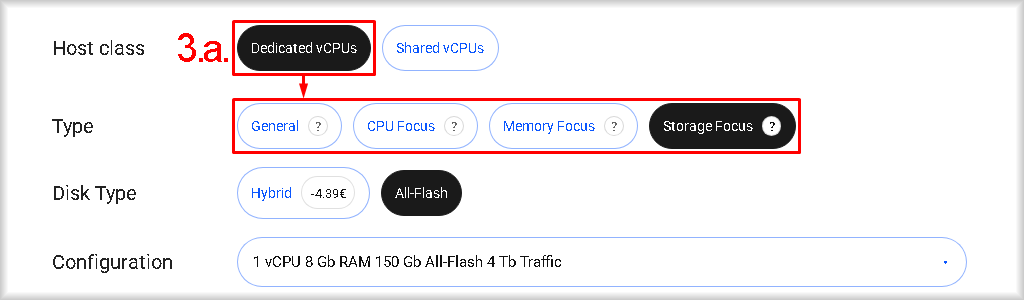
In the "Host class" block, choose whether the compute power of the VM cores will be shared with other users:- “Dedicated vCPUs” — virtual cores are reserved for your VM and are not shared with other VMs.
If you selected this option, then in the "Type" block select the VM specialisation based on its resource needs:- "General" – a balanced set of resources that suits most tasks.
- "CPU Focus" – these VMs use a vCPU-to-RAM ratio of 1:2 (for example, 1 vCPU per 2 GB RAM). They are ideal for compute-heavy applications, such as high-load web servers.
- "Memory Focus" – these VMs use a vCPU-to-RAM ratio of 1:8 (for example, 1 vCPU per 8 GB RAM). They are best for memory-heavy tasks, such as in-memory databases (Redis/Memcached), large-scale caching, or real-time analytics.
- "Storage Focus" – these plans prioritise larger storage volumes and also use a vCPU-to-RAM ratio of 1:8. They are ideal for large databases and processing large volumes of data.
- “Shared vCPUs” – virtual cores that are shared between multiple virtual machines. When you select this type, in the "Type" field you must set the minimum guaranteed performance level: the share of core time that will be allocated to your machine even when the cluster it runs on is under high load. The following values are available:
- "vCPU 10%" – at least 10% of core time is guaranteed;
- "vCPU 20%" – at least 20% of core time is guaranteed;
- "vCPU 50%" – at least 50% of core time is guaranteed.
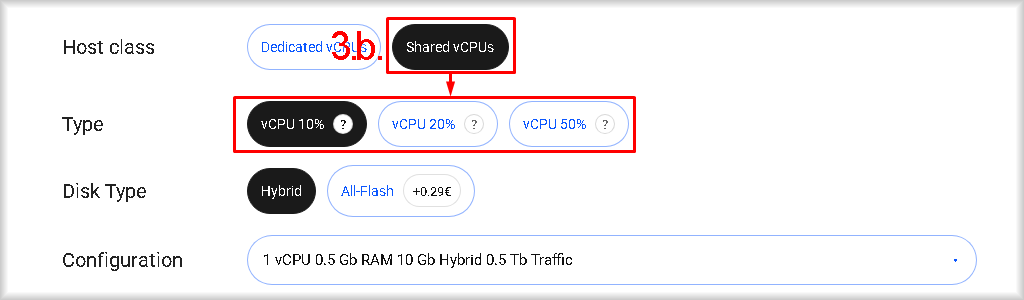
Depending on your selection of "Host class" and "Type", the virtual machine configurations available in the "Configuration" list will change.
- “Dedicated vCPUs” — virtual cores are reserved for your VM and are not shared with other VMs.
- Choose the disk type.
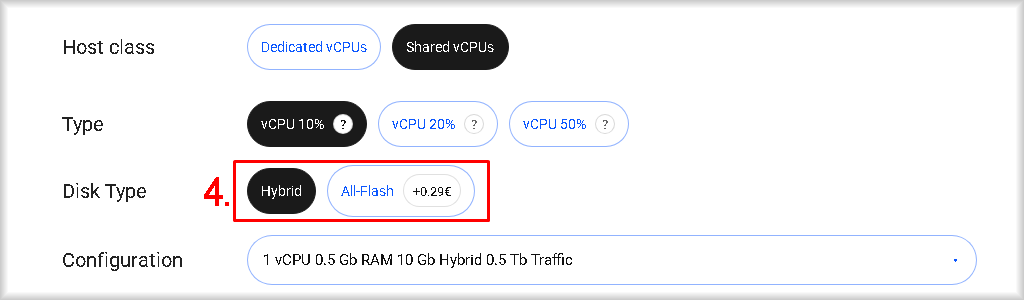
Make the selection in the "Disc Type" block from the following options:- “Hybrid” – a combined type: frequently used data is stored on fast SSDs, and rarely requested data is stored on larger and more affordable HDDs. This is an optimal balance between performance and cost.
- “All-Flash” – SSD-only storage. It provides maximum read and write speed, minimal latency, and the best disk responsiveness.
- Choose the virtual machine configuration.
Based on your tasks and resource requirements, select a suitable configuration from the "Configuration" list.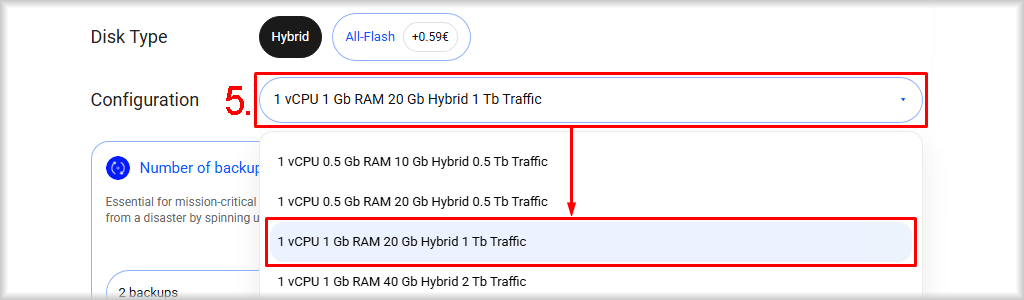
The available configurations are strongly affected by the choice you made in step 3. Therefore, if the required configuration is not in the list, try changing "Host class" and "Type".
- Choose additional options.
You can add the following add-ons to the virtual machine:- Backups – backups allow you to easily restore the system after a failure by launching a new virtual machine from the saved image. We recommend using backups.
- Snapshots – snapshots capture the exact state of your system at a specific point in time. This lets you quickly roll back or clone the system for testing and recovery, with minimal downtime.
- Public IP – if required, assign an IPv4 address to your instance. You can assign multiple IPv4 addresses.
- DDoS Protection – an extra layer of protection that ensures stable operation and uninterrupted access to the system even in the case of targeted "distributed denial of service" attacks.
To enable the required option, turn on the toggle in the top-right corner of its block (when enabled it will turn black), and then, where possible and required, select the option parameters. The illustration below shows enabling the "Backups" option and selecting its parameter.
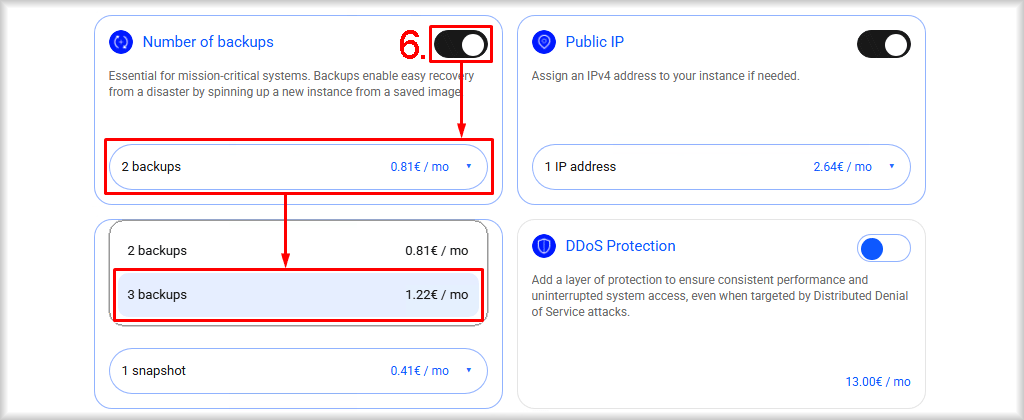
- Confirm the order.
Check that the selected virtual machine configuration is correct and, if required, change it. Then click "Order for…".
You can reduce the monthly cost of the virtual machine if you select a billing period of 3, 6, or 12 months (the list is available above the "Order for…" button) and pay it in advance.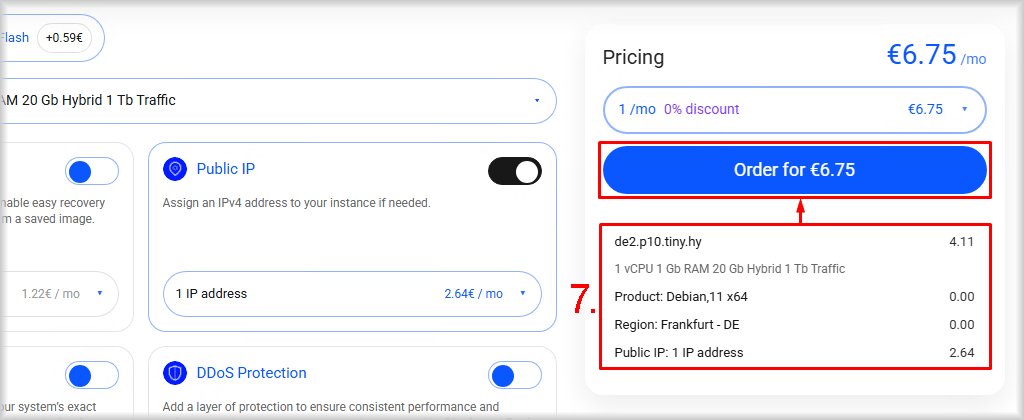
If your Peerobyte account balance has enough funds to pay for the order, the specified amount will be charged automatically after you click "Order for…", and you will be redirected to the Peerobyte services control panel. If the account balance does not have enough funds, you will be redirected to the "Checkout" page to pay the invoice.
IV. Pay for the order
Payment by bank card
On the "Checkout" page, fill in the "Card Number", "Expiry Date", "CVV/CVC2" fields with your bank card details and click "Make payment".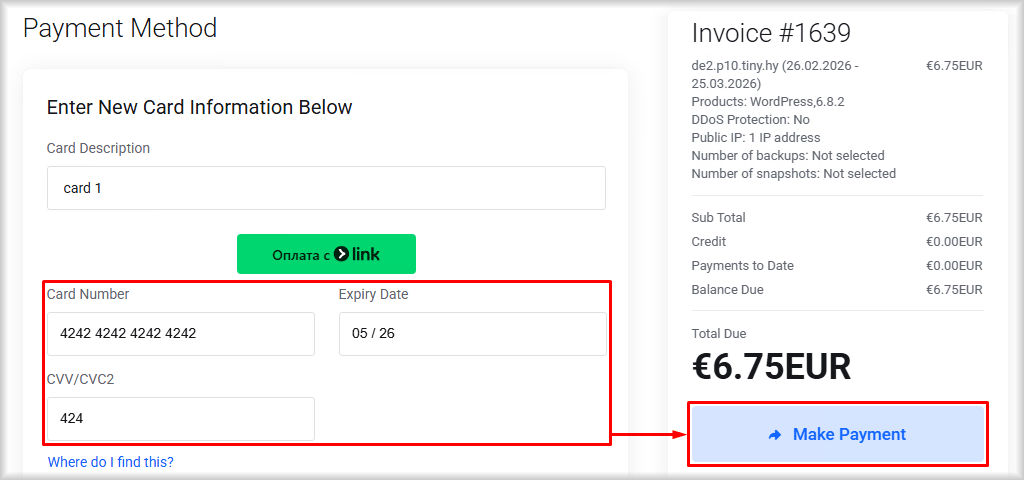
The amount shown in the "Total Due" field will be charged to your card. Automatic charging will also be enabled at the end of each subsequent billing period, and it will continue until you stop using the service. You will then be redirected to the Peerobyte services control panel, and you will receive an email confirming that the virtual machine has been ordered successfully.
Payment by bank transfer, PayPal, or SEPA
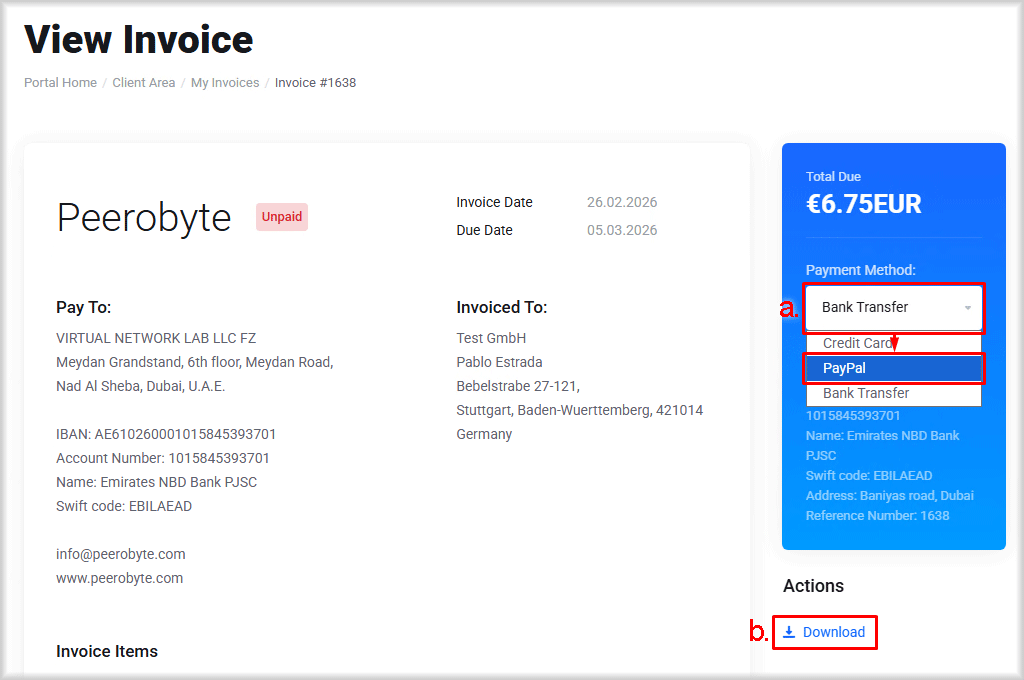
You can also pay for a virtual machine by bank transfer, using a PayPal account, or via SEPA. To do this, click "My Invoices".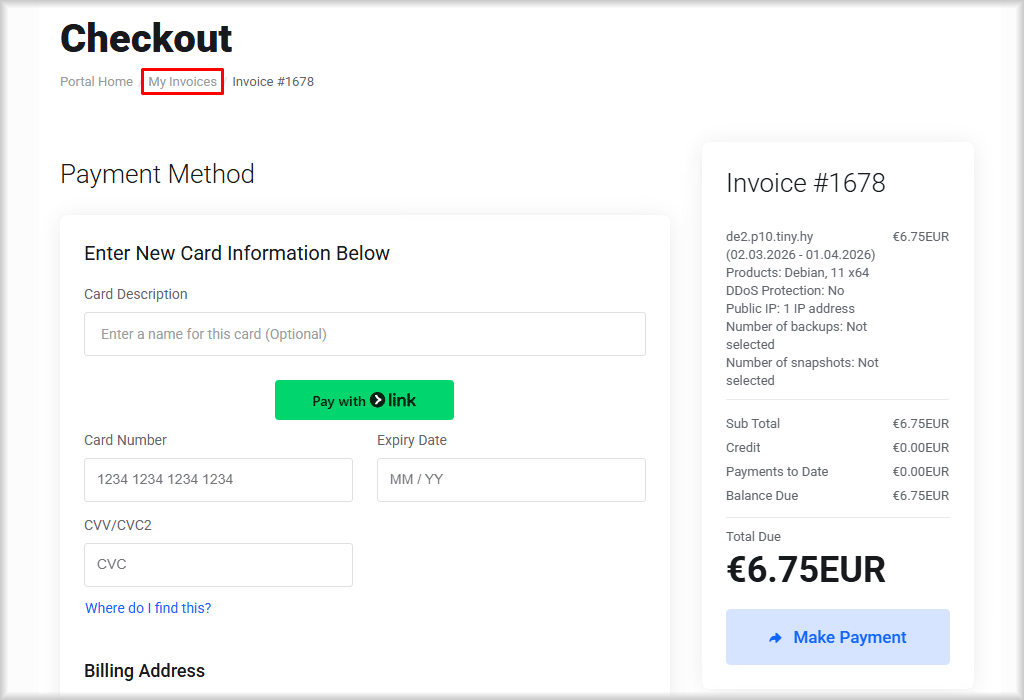
Depending on your preferred payment method, select:
- PayPal or SEPA - From the "Payment Method" list, select "PayPal" and click the "Pay Now" button. Then, in the window that opens, select "Pay with PayPal" or "Pay with SEPA".
- Bank Transfer - Click "Download", save the invoice, and pay it by bank transfer.
V. What next?
After the virtual machine is ready to use (status "Active"), you will be able to:
- Manage the state of the virtual machine.
Management is done through the control panel. A description of available operations is provided in the guide: “Virtual Machine Control Panel”. - Set up backups.
Backup management is done through the control panel interface. The setup and restore procedure is described in the guide: “Virtual Machine Backup Management”. - Connect to the virtual machine.
For instructions on how to connect to a virtual machine via the web console or SSH, see: “Connecting to a Virtual Machine”.