Dedicated Server Control Panel
In this section, we'll delve into the dedicated server's control panel, identifying the range of actions it enables and the types of information that can be accessed through it.
Prerequisites
1. You must have a Peerobyte account registered according to the Instructions.
2. You must order a dedicated server according to the Instructions.
3. You should receive an email from Peerobyte stating that the dedicated server you ordered is ready for use.
Access to the Control Panel
To access the control panel of the dedicated server, follow these steps:
1. Select the Services menu item.
The My Products & Services window will open.
2. Click on the dedicated server to which you want to gain control panel access.
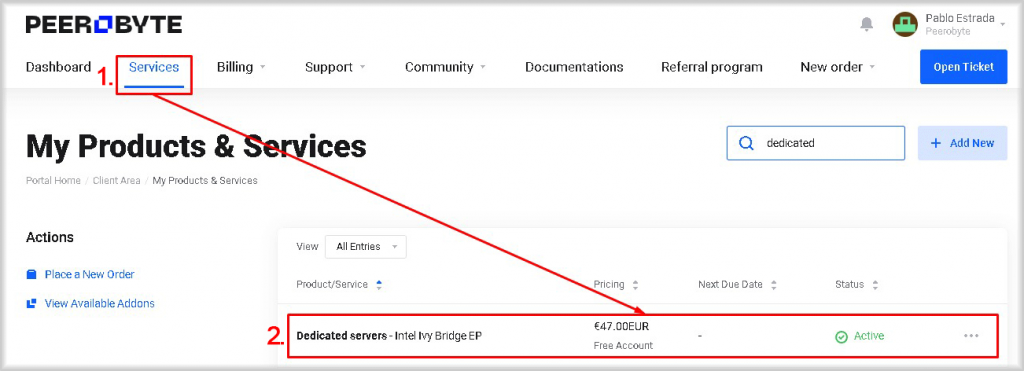
The control panel for the dedicated server will open.
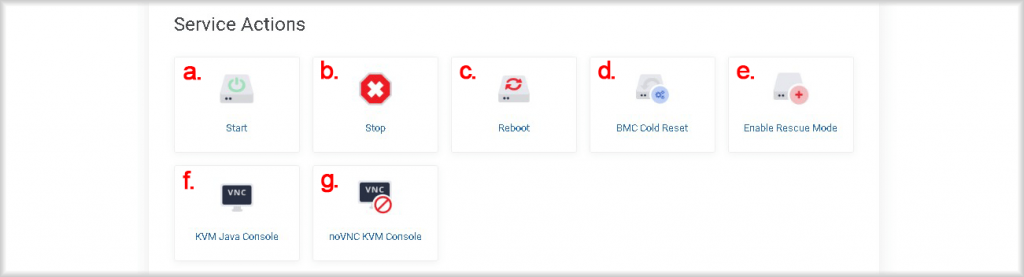
1. Service Actions
In the Service Actions section, you can perform the following operations on the dedicated server:
a. Start - Starts a dedicated server.
When you click the Start button, a window will open where you need to confirm your intention to start the dedicated server by clicking the Start button. After clicking the Start button, the dedicated server will be turned on and its operating system will start loading.
b. Stop - Shuts down the dedicated server.
When you click the Stop button, a window will open in which you should confirm your intention to stop the server by clicking the Stop button. After clicking the Stop button, the dedicated server will shut down.
c. Reboot - Will perform a soft (warm) reboot of the dedicated server.
When you click the Reboot button, a window will open where you need to confirm your intention to reboot the dedicated server by clicking the Reboot button. After pressing the Reboot button, the operating system of the dedicated server will receive a signal to reboot.
d. BMC Cold Reset - Will perform a hard (cold) reboot of the BMC on the server.
When you click the BMC Cold Reset button, a window opens where you must confirm your intention to reset the BMC of the dedicated server by clicking the Confirm button.
e. Rescue - Restarts the dedicated server in rescue mode.
When you click the Rescue button, a window will open where you need to confirm your intention to launch the dedicated server in rescue mode by clicking the Rescue button. After pressing the Rescue button, the dedicated server will be restarted in rescue mode and its status will become Rescue.
In rescue mode, the dedicated server boots from the initial image it was built on, but the file system of the dedicated server to be rescued will also be accessible. In this mode, you can repair the dedicated server if something went wrong, for example, if the file system is corrupted, and the server cannot be started in normal mode.
When launching the dedicated server in rescue mode, a new Root password will be generated, and the machine will have the same network configuration as the dedicated server being rescued.
To exit rescue mode, a server reboot must be performed.
f. KVM Java Console - Starts the KVM Java Console.
When you click on the KVM Java Console button, a Java applet is launched that will automatically connect to your dedicated server. With the KVM Java Console you can install and manage the operating system on the server, configure the BIOS, perform status diagnostics and troubleshooting.
KVM Java Console will be available to you if you selected this option when ordering a dedicated server. To connect via KVM Java Console, you need to install Java on your device.
g. noVNC KVM Console - Starts the noVNC KVM Console.
Using this console, you can install and manage the operating system on the server, configure the BIOS, perform status diagnostics, and troubleshoot the server.
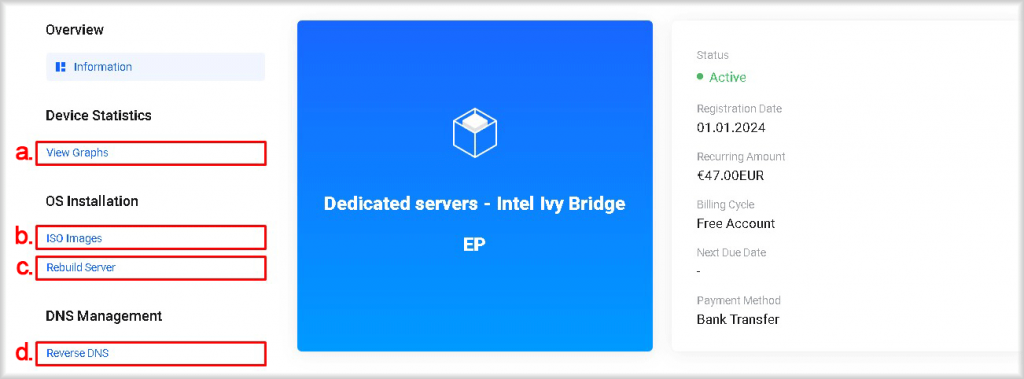
2. Management Actions
The following action is available on the control panel:
a. View graphs - Displays graphs of traffic usage.
It displays the outgoing, incoming and the sum of outgoing and incoming traffic of the dedicated server. To change the displayed period, click the button with a symbol of a pencil (Scope), then from the Period list of the opened window select the time period for which you want to display the traffic information and click Save Changes.
b. ICO images - Позволяет указать ISO-образ для ручной установки операционной системы сервера.
Для добавления своего образа нажмите кнопку Add ISO Image, укажите в поле Name открывшегося окна наименование добавляемого образа, а в поле ISO URL укажите ссылку на ISO-образ в формате: “https:\\sitename.com\filename.iso”, затем нажмите кнопку Confirm. Образы будут автоматически смонтированы при создании сеанса noVNC в каталог «/home/iso». Доступ к ISO-образам возможен при использовании сеанса noVNC.
c. Rebuild Server - Allows you to reinstall the server operating system.
You can select an operating system from our prepared images and set server access passwords.
To reinstall the operating system, click Rebuild Server. In the window that opens, select the operating system image you want to use when installing the operating system on the server from the OS Template list, specify the data for authenticating the administrator (superuser) on the server: username in the Username field, password in the Password field, SSH login password in the Root SSH Password field, and then click the Confirm button.
You can also generate strong passwords automatically by clicking the Generate buttons. If you have used password generation, do not forget to save it in a safe place, such as a password manager.
d. Reverse DNS - Allows you to set reverse DNS.
To create reverse DNS, click the +Create button, fill in the IP Address, Hostname and CIDR fields in the opened window if you need to set the subnet mask, then click the Create button.
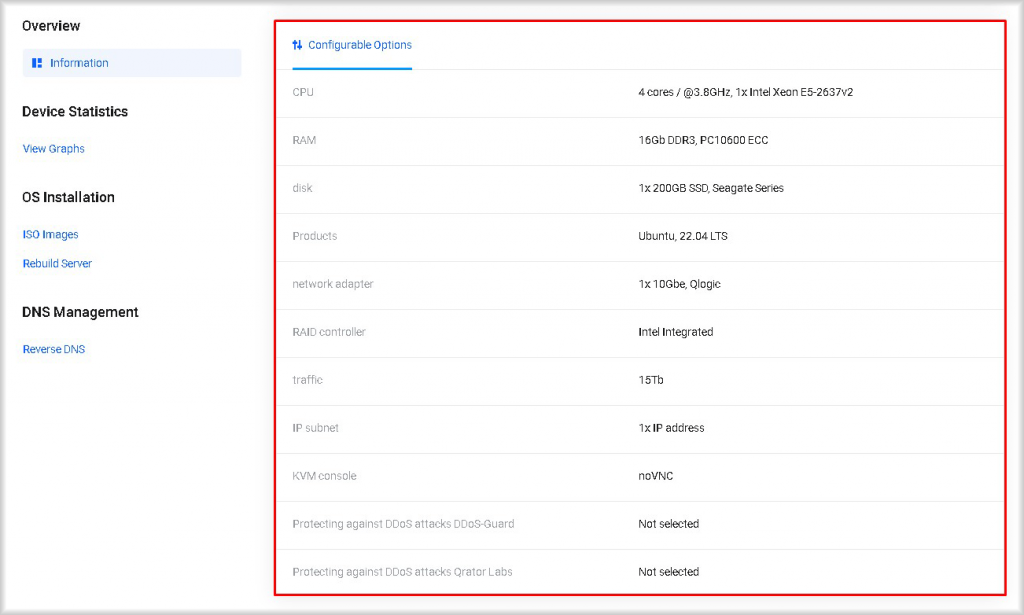
3. Information
On the dedicated server control panel, you can find the following information:
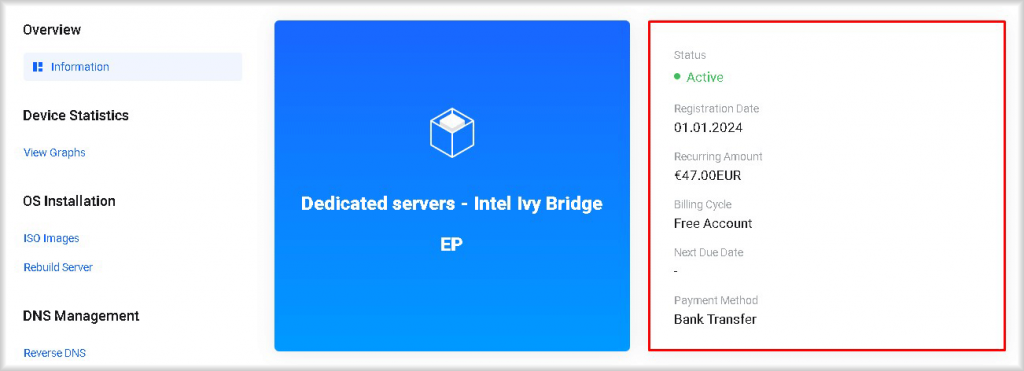
Billing Information:
Service Status:
- Active - The service is fully operational.
- Pending - The service is paused until payment is received or a decision is made by the manager.
- Completed - The provision of service has been completed by mutual agreement.
- Suspended - The provision of service is suspended due to overdue payment. If the payment is overdue for more than 14 days, the data related to the service will be deleted.
- Deleted - The service is deleted. Restoration of the service and data from this state may be possible if you promptly contact our support service through our ticket system.
- Canceled - The service is canceled. Restoration of the service and data from this state may be possible if you promptly contact our support service through our ticket system.
- Fraud - The service is suspended due to suspicions of illegal activity.
Registration Date - The date when the service began.
Recurring Amount - The amount required for the renewal of the dedicated server for the next billing period.
Billing Cycle - The billing period you have set.
Next DueDate - The date by which the next period's payment must be made to maintain server functionality.
Payment Method - The payment method you chose when obtaining the service:
- Stripe - For individuals and payment by bank card.
- Bank Transfer - For legal entities and payment through the company's bank account.
Server Configuration Details:
CPU - The number of cores, frequency, model and number of CPUs available in the dedicated server.
RAM - The amount, type, and bandwidth of RAM installed in the dedicated server.
Disk - The number, capacity, and type of hard disk or disks of the dedicated server.
Products - The operating system and its version used by the dedicated server.
Network adapter - The number of ports, bandwidth, and model of the network adapter.
RAID adapter - The Raid controller that the dedicated server is equipped with.
Traffic - Monthly traffic limit for the dedicated server.
IP Subnet - The number of IP addresses used by the dedicated server.
KVM Console - The type of console selected by the user.
Protected against DDoS attacks DDoS-Guard - The status of using DDoS-Guard DDoS protection.
Protected against DDoS attacks Qrator - The status of using protection against DDoS attacks provided by Qrator.