Windows: Connecting via iSCSI
Published
In this guide, we explain how to connect your cloud storage using the iSCSI protocol on Windows 11. These steps also work on Windows 7, Windows Server 2008, and later versions.
What You Will Learn
- How to add your device's IP address to a trusted list.
- How to get the connection details for your cloud storage.
- How to set up the iSCSI initiator.
- How to connect the cloud storage as a network drive in File Explorer (Windows Explorer).
- How to disconnect the network drive.
Requirements
- Your system must run Windows 7, Windows Server 2008 or later.
- You need a Peerobyte account (with verified email and phone). See “Creating an Account” for help.
- You must order a cloud data storage from Peerobyte. See “How to Order Cloud Data Storage” for details.
- You have received an email from Peerobyte when your cloud storage is ready.
I. Add Your IP Address and Get Connection Details
Before connecting via iSCSI, add your device's IP address to the trusted list and get the connection details.
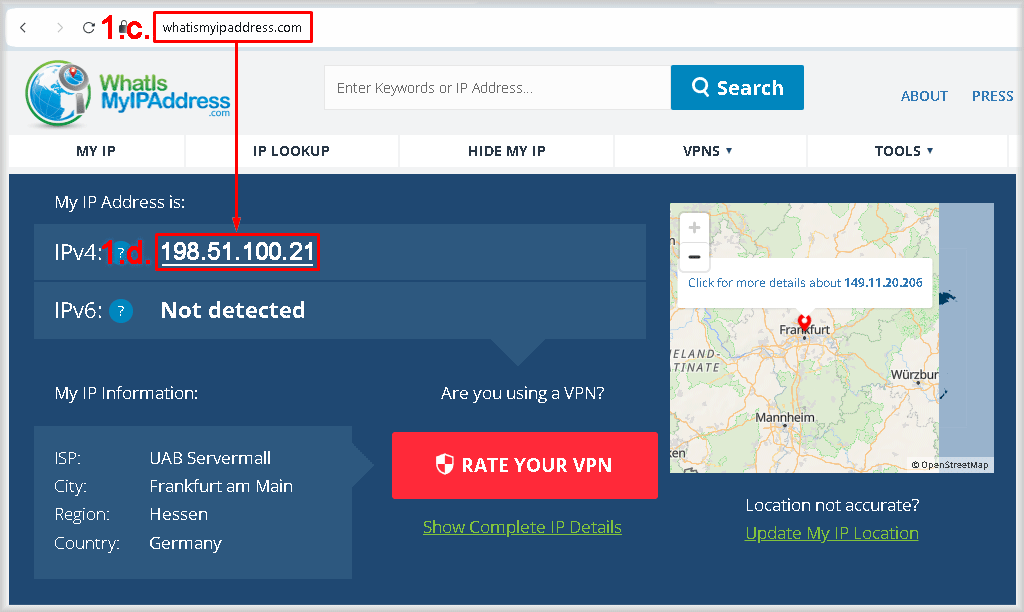
- Find Your Device's IP Address
- а. Open your web browser.
- b. If you use a VPN in your browser (and you won’t use it for the cloud storage), turn off the VPN while checking your IP address.
- c. Visit an IP checking website like WhatIsMyIP.com, IPinfo.io, MyIP.com.
- d. Write down your IP address.

- Log in to the Peerobyte Control Panel
Follow the instructions:- a. If you do not use two-factor authentication (2FA), see “Signing in to the Control Panel”.
- b. If 2FA is enabled, see “2FA Signing in to the Control Panel”.
- Choose Your Storage
- a. Click the “Services” item in the control panel’s main menu.
This opens the “My Products & Services” list. - b. Click on the storage you want to connect.
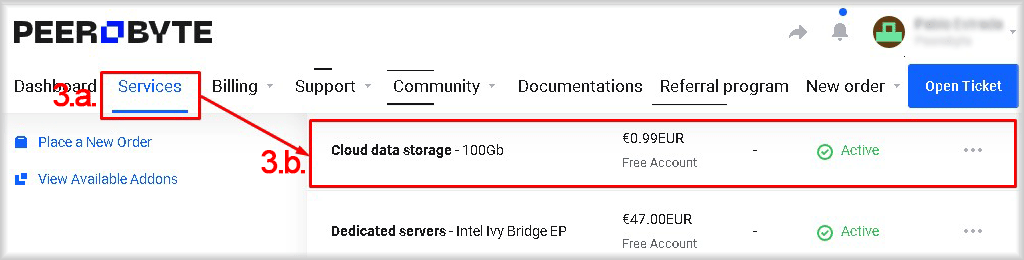
The control panel for your cloud storage will open.
- a. Click the “Services” item in the control panel’s main menu.
- Enable the iSCSI Protocol
In the “Service Management” section, check the “Status” column in the “iSCSI” row.- If it says “In Use”, go to the next step.
- If it says “Not Used”, click the “Enable” button in the iSCSI row.
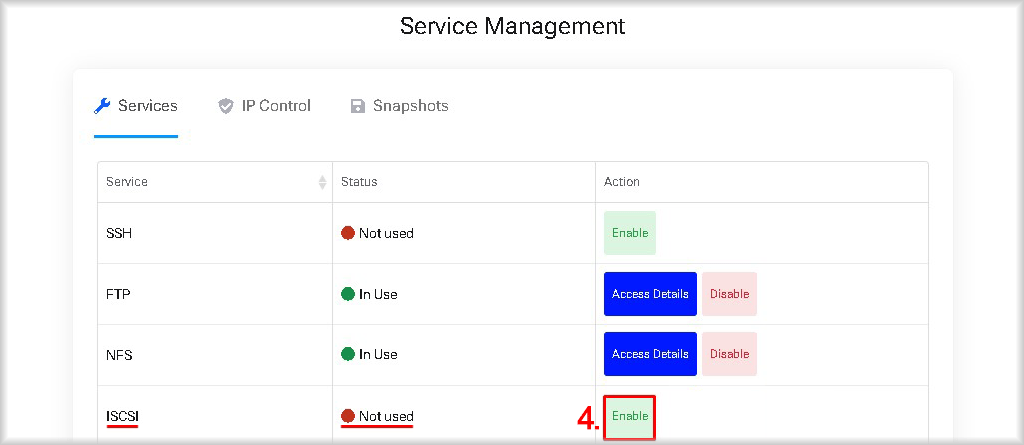
iSCSI access is now enabled.
- Add Your Device’s IP Address to the Trusted List.
By default, iSCSI access is open for all IP addresses. For extra security, you can allow only one IP address.
Note: The system allows only one trusted address. If you add a new one, the previous one is removed. To allow access from any IP, simply delete the current trusted address.
If you do not need to add a trusted IP, skip to step 6.
To add a trusted IP:- a. Go to the “IP Control” tab.
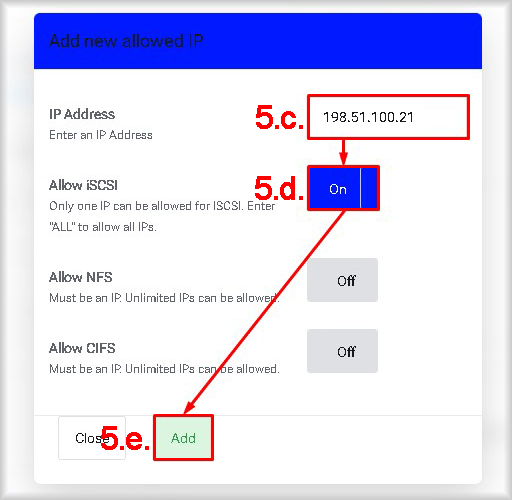
- b. Click the “+Add” button.
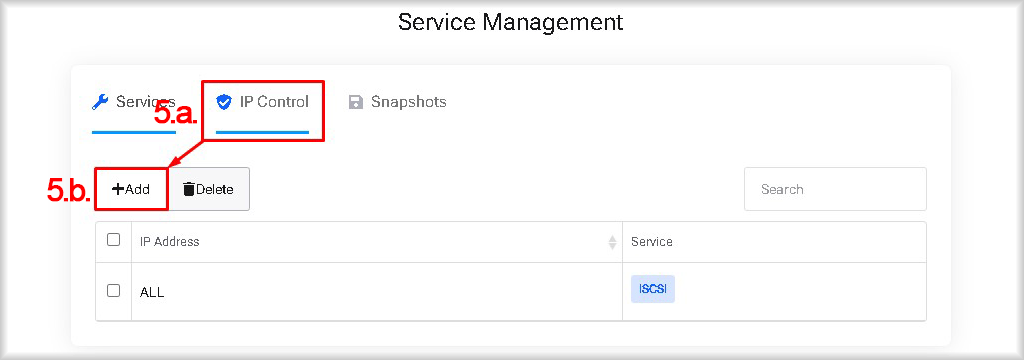
The “Add new allowed IP” window will open. - c. In the “IP Address” field, enter your device's IP address from step 1.
- d. Switch “Allow iSCSI” to “On”.
- e. Click “Add”.
Your IP address now appears in the trusted list.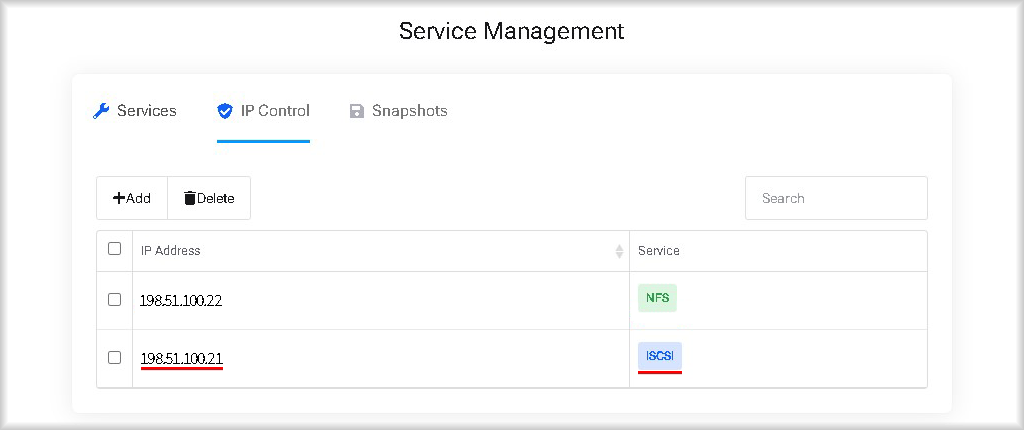
- Get the Connection Details
The details for connecting via iSCSI will be sent to your email once your storage is ready. You can also get them in two ways:- a. In the “Access Details” section under “Account information”, you will see: “Username”, “Password”, “Primary IP” (shown as “Server” in the iSCSI initiator). The default network port used by the Peerobyte datastore (“Port” in the iSCSI initiator): 3282.

- b. In the “Service Management” section, click the “Access Details” button in the “iSCSI” row.
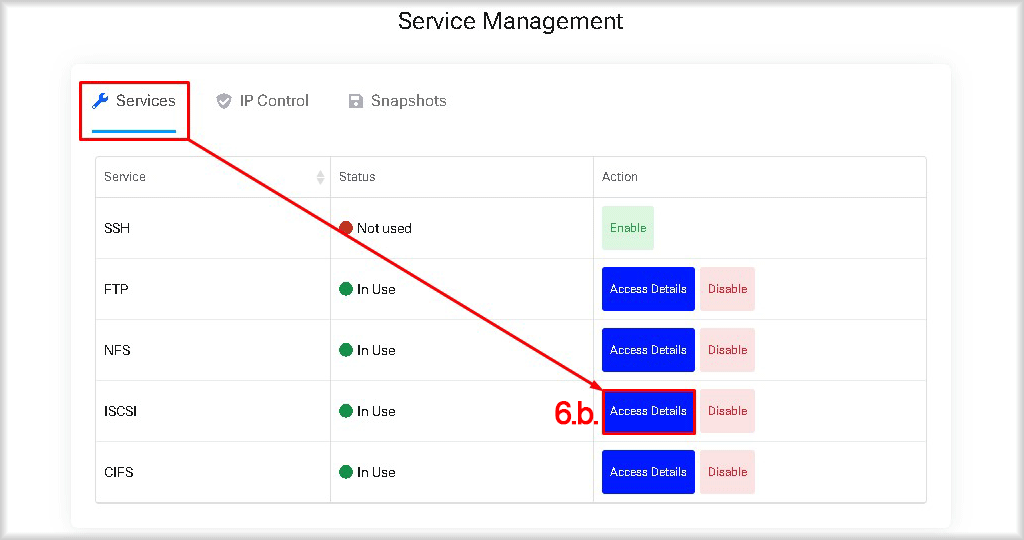
The “iSCSI Access Details” window will open, where the “Username”, “Password” fields contain the data for CHAP authentication. The “Server” field before “:” will contain the IP address of the cloud storage (“Server” in the iSCSI initiator) and after “:” will contain the network port used by the Peerobyte data storage (“Port” in the iSCSI initiator).
Copy these details; you will need them when setting up the iSCSI initiator.
- a. In the “Access Details” section under “Account information”, you will see: “Username”, “Password”, “Primary IP” (shown as “Server” in the iSCSI initiator). The default network port used by the Peerobyte datastore (“Port” in the iSCSI initiator): 3282.
II. Set Up the iSCSI Initiator
Now you will set up the iSCSI initiator.
- Launch the iSCSI Initiator
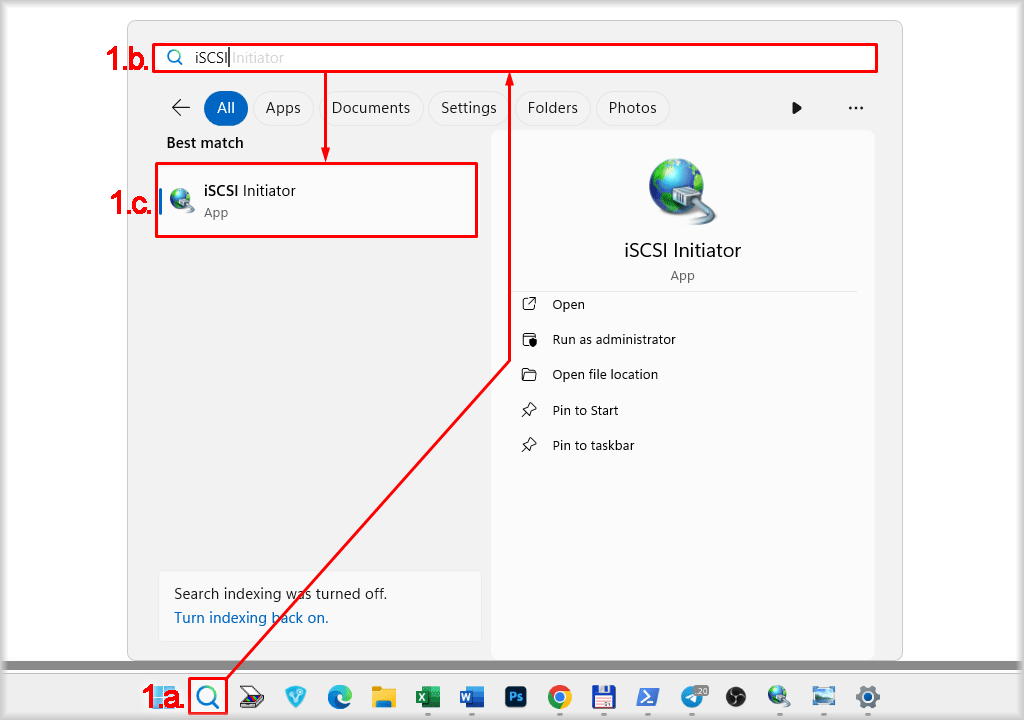
- a. Click the “Search” icon in the taskbar or press Win+S.
- b. Type “iSCSI Initiator” in the search box.
- c. Click on the “iSCSI Initiator App” from the results.
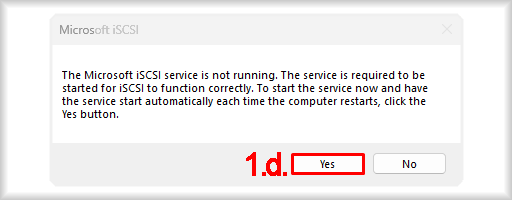
- d. If it’s your first time and the Microsoft iSCSI Service is not running, a window will appear. Click “Yes” to allow the service to start automatically.
The “iSCSI Initiator Properties” window opens.
- Discover the Storage Portal
- a. Go to the “Discovery” tab.
- b. Click “Discover Portal”.
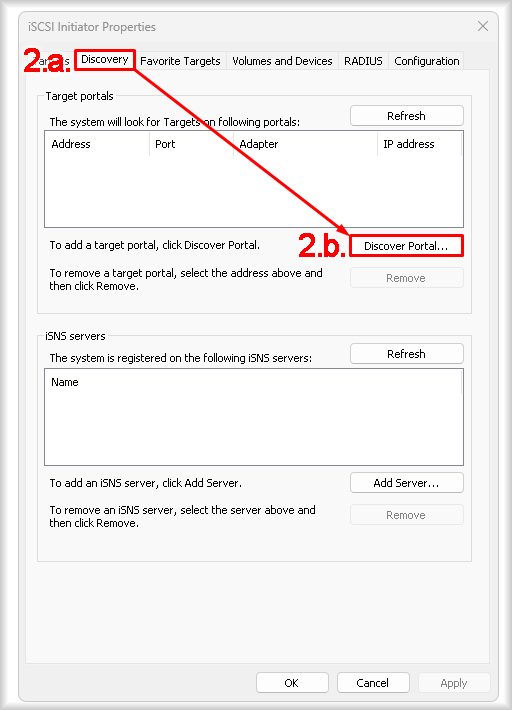
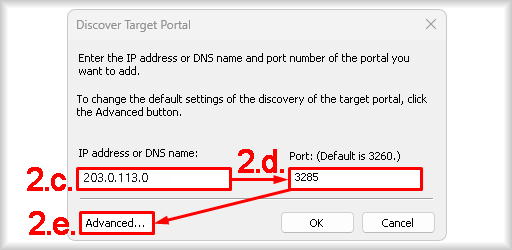
The “Discover Target Portal” window will open. - c. In the “IP address or DNS name:” field, enter the IP address of the cloud storage (from step 6 in Section I).
- d. In the “Port:” field, specify the network port of the cloud storage (from step 6 in Section I).
- e. Click “Advanced…”.
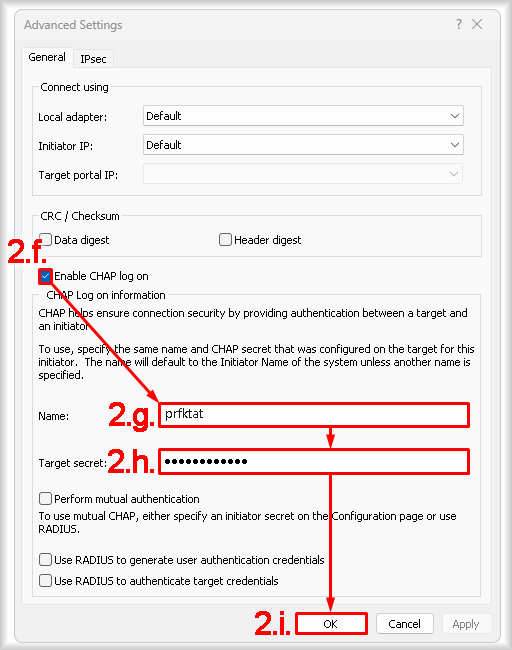
The “Advanced Settings” window will open. - f. Check “Enable CHAP log on”.
- g. In the “Name:” field, specify the value of the “Username” field from the “iSCSI connection details” page (from step 6 in Section I).
- h. In the "Target Secret:" field, enter the value of the "Password" field from the “iSCSI connection details” page (from step 6 in Section I).
- i. Click “Ok”.
You will be returned to the “Discover Target Portal” window. - j. Click “Ok” again.

You will be returned to the “iSCSI Initiator Properties” window and in the "Target Portals” section the address of the cloud datastore will be displayed.
- Connect to the Target
- a. Go to the “Targets” tab.
- b. Click “Connect”.
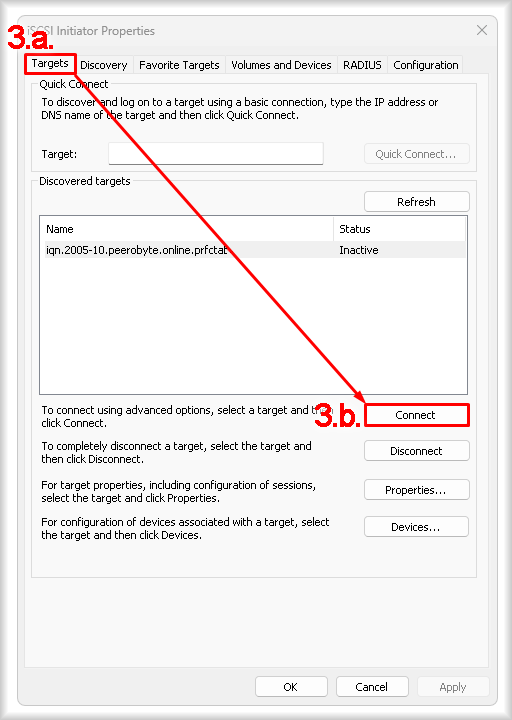
The "Connect to Target" window will open. - c. In the “Connect to Target” window сheck “Add this connection to the list of Favorite Targets” to reconnect automatically at startup.
- d. Click “Advanced… “.
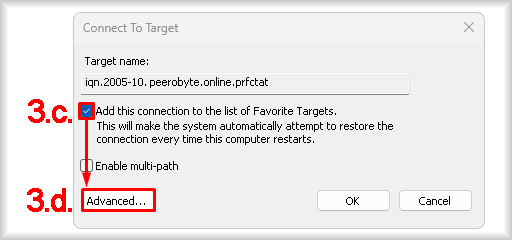
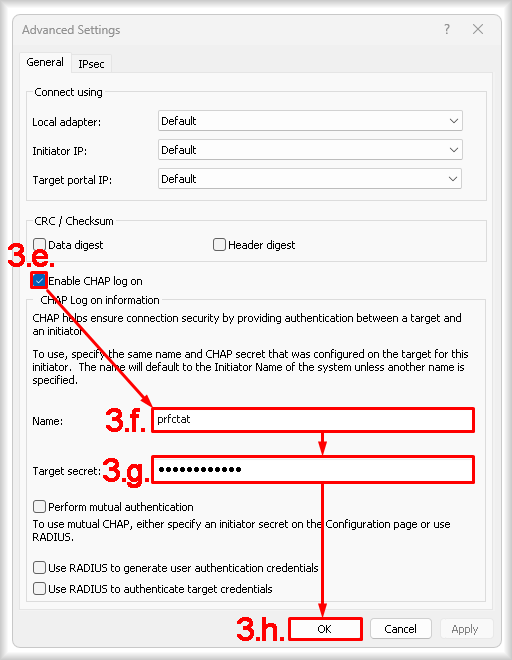
The “Advanced Settings” window will open. - e. Check “Enable CHAP log on”.
- f. In the “Name:” field, specify the value of the “Username” field from the “iSCSI connection details” page (from step 6 in Section I).
- g. In the "Target Secret:" field, enter the value of the "Password" field from the “iSCSI connection details” page (from step 6 in Section I).
- h. Click “Ok”.
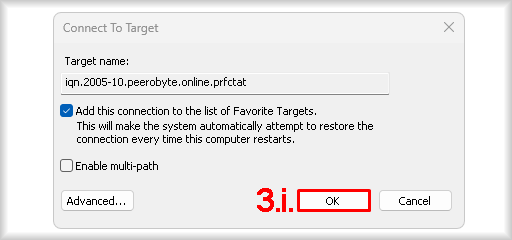
You will be returned to the “Connect to Target” window. - i. Click “Ok” again to connect.
After a successful connection, the target name will appear with a status of “Connected” in the “iSCSI Initiator Properties” window.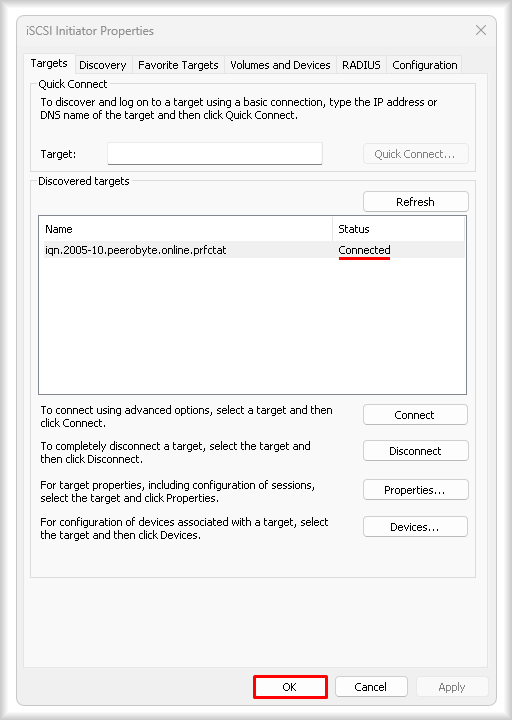
You can now proceed to connect the disk.
III. Connect the iSCSI Disk
After setting up the iSCSI initiator and connecting to the storage, attach the disk to your system.
- Open “Disk Management”
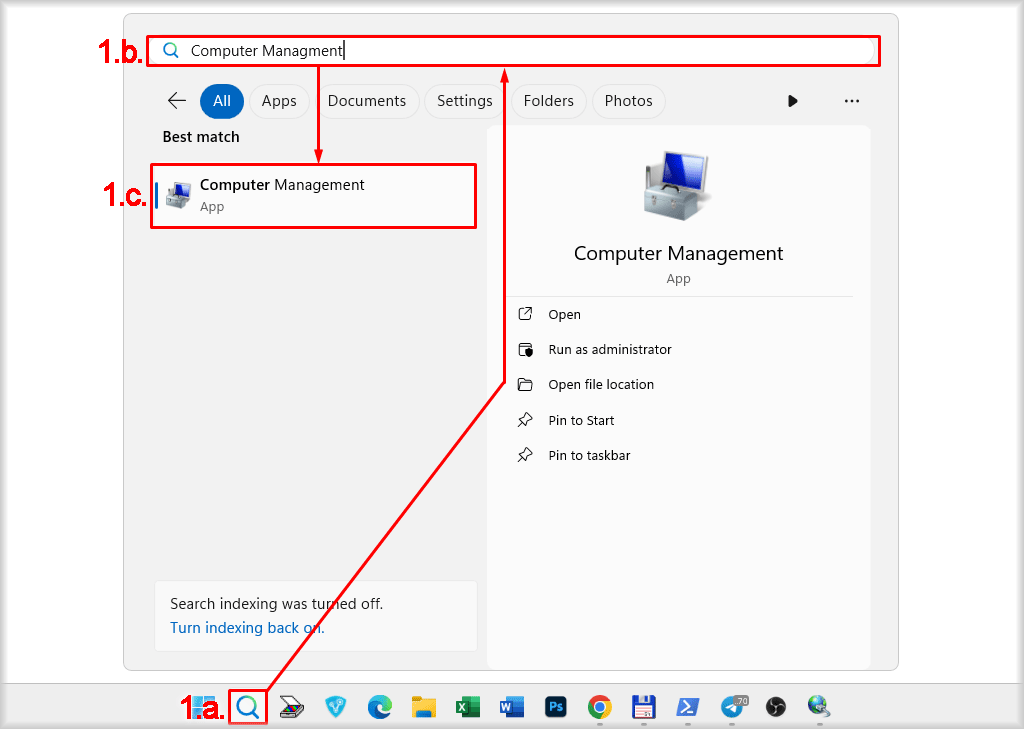
- a. Click the “Search” icon in the taskbar or press Win+S.
- b. Type “Computer Management” in the search box.
- c. Click the “Computer Management App” from the results.
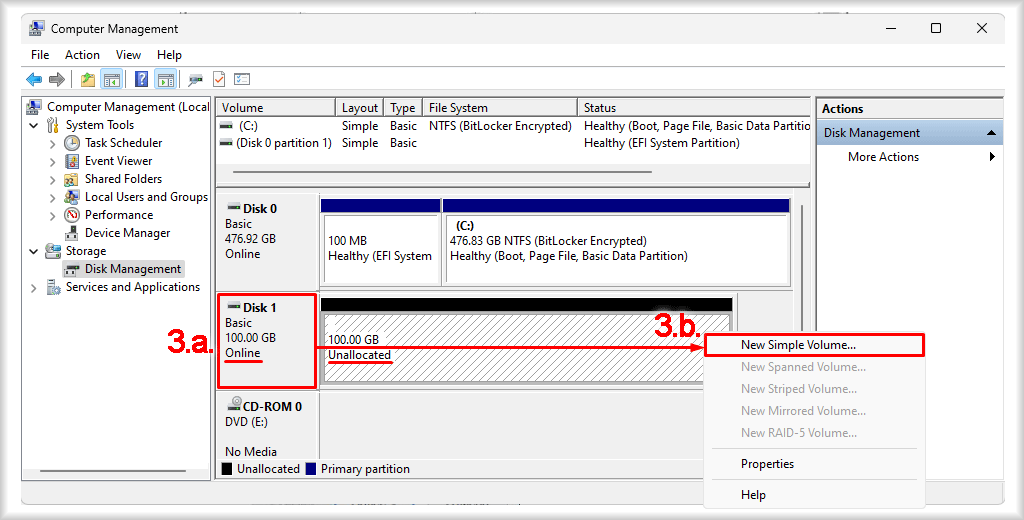
The “Computer Management” window will open. - d. In the “Computer Management” window, click Disk Management under the Storage section.
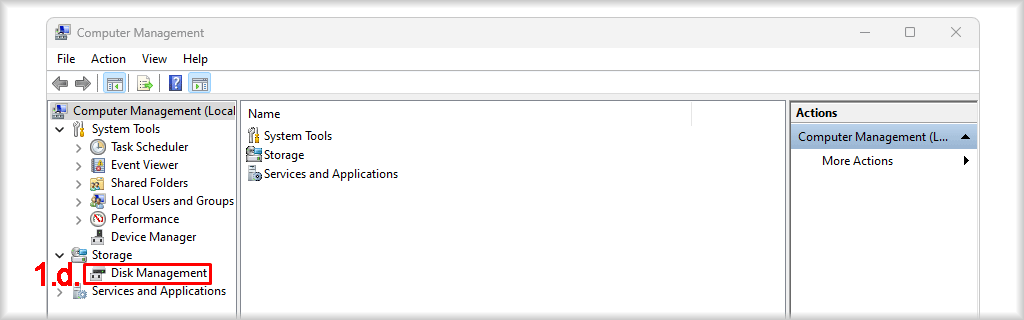
The “Disk Management” panel will open.
- Initialize the Disk
- a. Right-click on the disk that shows as “Not initialized” and “Unallocated” (its capacity should match your ordered storage).
The context menu of disk actions will appear. - b. In the context menu, select “Initialize Disk”.
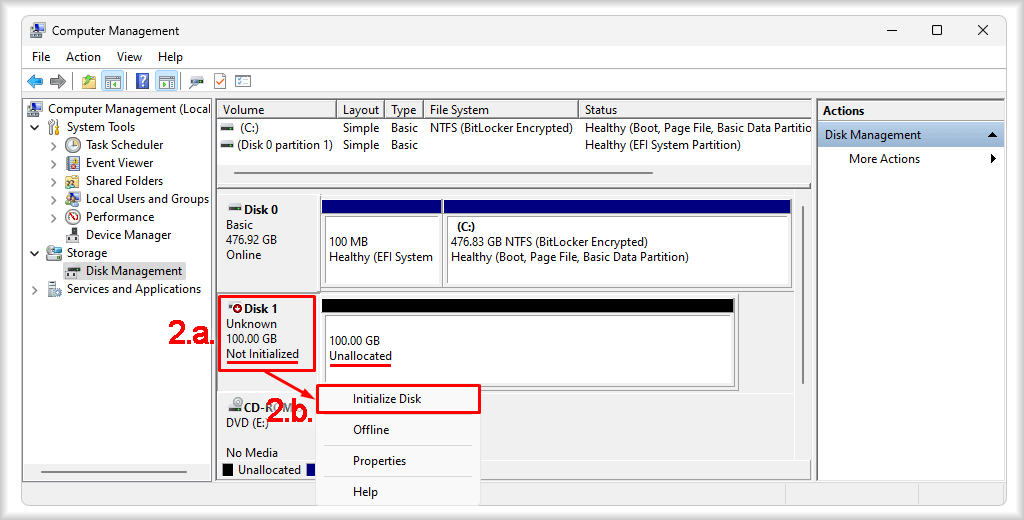
The disk status will change to “Online”.
- a. Right-click on the disk that shows as “Not initialized” and “Unallocated” (its capacity should match your ordered storage).
- Create a Volume
- a. Right-click on the drive you initialized earlier in step 2.
The context menu of disk actions will appear. - b. In the context menu, select “New Simple Volume”.
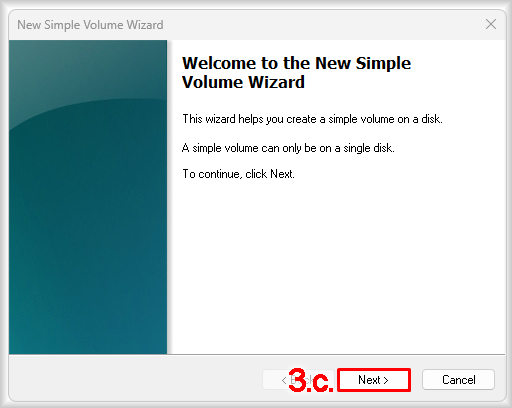
The “New Simple Volume Wizard” will start. - c. Click “Next”.
- d. If you want to split the storage into more than one logical drive, set the size for the first volume in the “Simple volume size in MB” field and click “Next”. The remaining space can be used for additional volumes. Repeat as needed.
If you want one volume to use all the space, click “Next” immediately.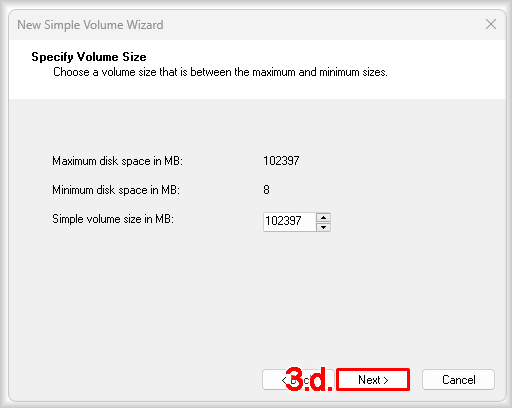
- e. You can choose a drive letter from the “Assign the following drive letter:” list or mount the storage to an empty folder by selecting “Mount in the following empty folder:” and browsing for the folder.
Click “Next”.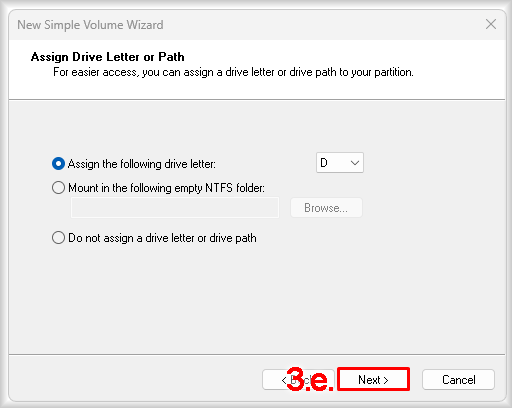
- f. If necessary, select the file system type and cluster size from the “File system” and “Allocation unit size” lists, respectively. Optionally set a disk label in the “Volume label” field.
Click “Next”.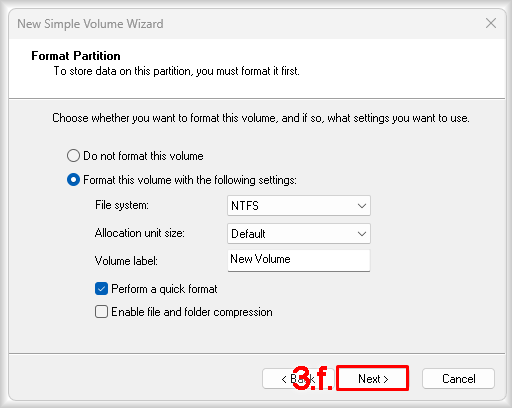
- g. Click “Finish”.
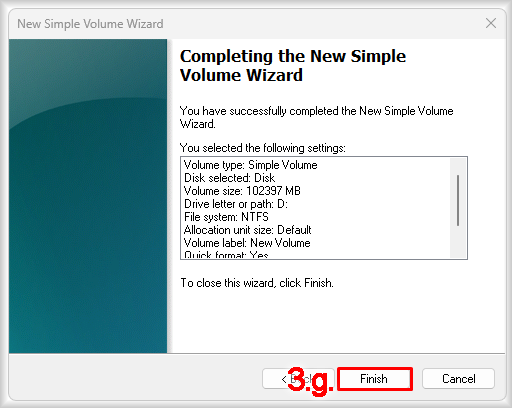
The disk will now be connected, and its status will change to “Healthy”.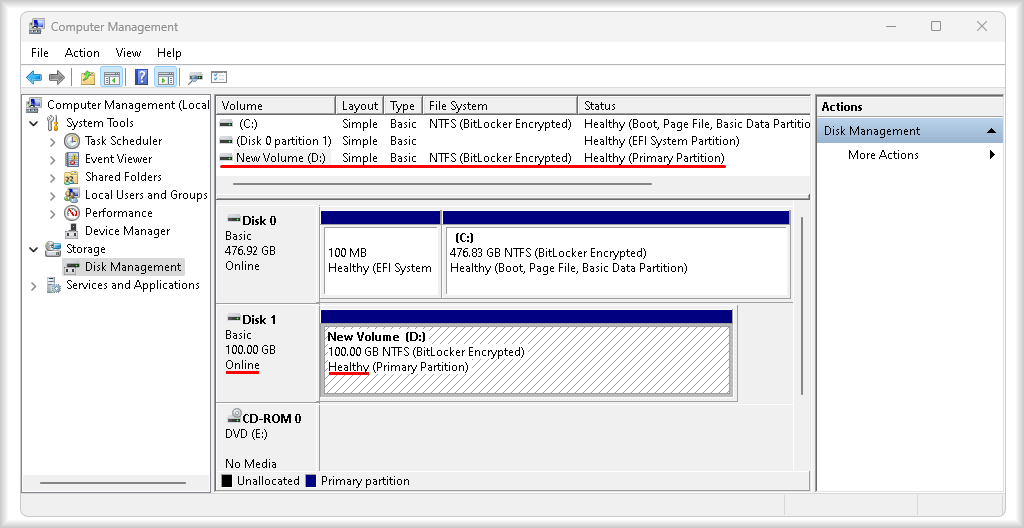
You can use it like a local disk.
- a. Right-click on the drive you initialized earlier in step 2.
IV. Disconnect the Network Drive
If you no longer need the network drive, follow these steps to disconnect it:
- Open “File Explorer” (“Windows Explorer”) by pressing Win+E.
- Right-click the network drive you want to disconnect.
- Click “Disconnect” in the menu.
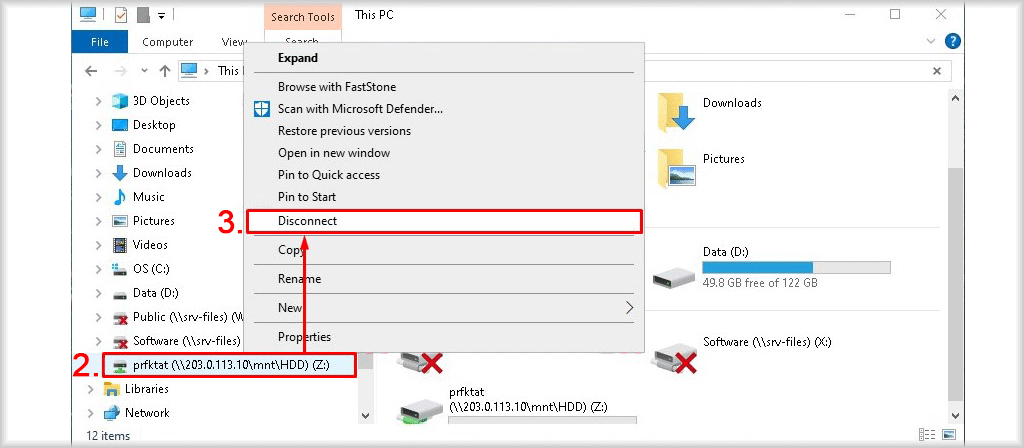
The network drive will be disconnected.