Linux: Connecting via NFS
In this guide, we will show you how to connect Peerobyte cloud storage using the NFS protocol on Linux, using Ubuntu 20.04.5 LTS as an example. In this guide you will learn how to:
- Add your device’s IP address to the trusted list.
- Obtain the connection credentials for the cloud storage.
- Install the software needed for NFS.
- Connect the cloud storage as a network drive.
- Disconnect the network drive from your system.
Prerequisites
- Your system must be running Linux. A Linux terminal must be available.
- You must have a Peerobyte account. See the “Creating an Account” guide.
- You must place an order for Peerobyte cloud data storage. The ordering procedure is described in the “How to Order Cloud Data Storage” guide.
- You must wait for an email from Peerobyte confirming that your cloud storage is ready for use.
I. Adding Your Device’s IP Address to the Trusted List and Obtaining Connection Credentials
To connect to the storage, you need to obtain the authorization and connection settings, and add the IP address of the device that will use the storage to the trusted list. It is recommended to use a static IP address to avoid having to update the IP address each time it changes.
To add your IP address to the trusted list and obtain the connection data, follow these steps:
1. Determine your device’s IP address.
If you do not know your device’s IP address, find it using one of the following commands in the terminal.
- For example, you can determine the IP address with the following command:
This command outputs a list of all the host’s IP addresses.hostname -I
The output will look similar to:
where 198.51.100.33 is the device’s IP address.netadmin@de2:~$ hostname -I 198.51.100.33 netadmin@de2:~$
- Alternatively, you can use the command:
This command outputs the external (public) IP address of the device.curl ifconfig.io
The output will look like:
where 198.51.100.33 is the device’s IP address.netadmin@de2:~$ curl ifconfig.io 198.51.100.33 netadmin@de2:~$
- Another way to get your device’s IP address is by using the command:
ip addr show
This command displays a list of network interfaces with their IP addresses, subnet masks, MAC addresses, and other parameters.
The output will look similar to:
where 198.51.100.33 is the device’s IP address (displayed after “inet”).netadmin@de2:~$ ip addr show 1: lo: <LOOPBACK,UP,LOWER_UP> mtu 65536 qdisc noqueue state UNKNOWN group default qlen 1000 link/loopback 00:00:00:00:00:00 brd 00:00:00:00:00:00 inet 127.0.0.1/8 scope host lo valid_lft forever preferred_lft forever inet6 ::1/128 scope host valid_lft forever preferred_lft forever 2: ens192: <BROADCAST,MULTICAST,UP,LOWER_UP> mtu 1500 qdisc mq state UP group default qlen 1000 link/ether 00:50:56:aa:6b:6c brd ff:ff:ff:ff:ff:ff inet 198.51.100.33/24 brd 198.51.100.255 scope global dynamic ens192 valid_lft 84459sec preferred_lft 84459sec inet6 fe80::250:56ff:feaa:6b6c/64 scope link valid_lft forever preferred_lft forever netadmin@de2:~$
2. Log in to the Peerobyte Control Panel.
Log in to the Peerobyte control panel using the appropriate instructions:
- a. If your account does not use two-factor authentication (2FA): “Signing in to the Control Panel”.
- b. If 2FA is enabled on your account: 2FA Signing in to the Control Panel”.
3. Select your storage.
- a. Click on the Services option in the main menu of the control panel.
A list titled My Products & Services will appear. - b. Select from the “Product/Service” list the storage you wish to connect to by clicking in its row.
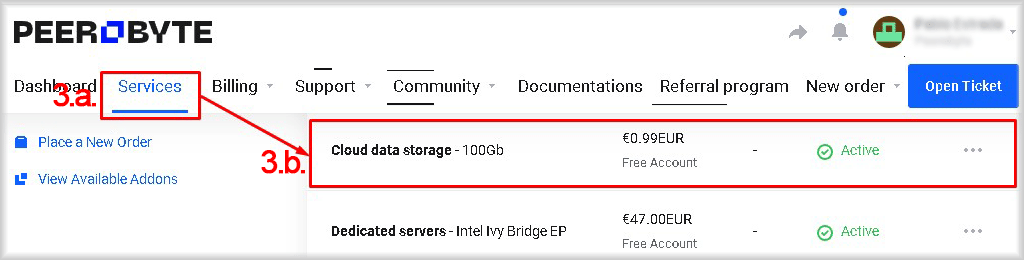

You will be taken to the control panel for your selected cloud storage.
4. Ensure that NFS is enabled.
In the “Service Management” section, check the value in the “Status” column of the “NFS” :
- If the status is “In Use”, proceed to step 5.
- If the status is “Not Used”, click “Enable” in the “NFS” row to turn on access.
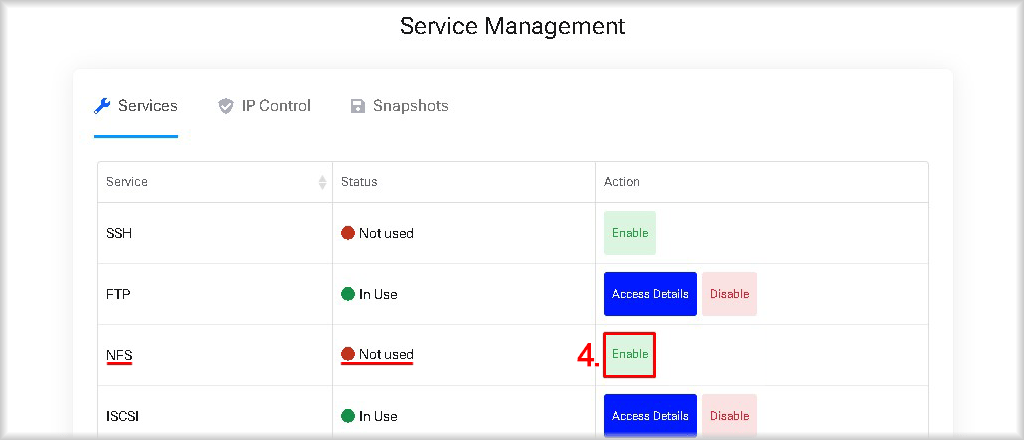
This will enable NFS access to your storage.
5. Add your device’s IP address to the trusted list.
- a. Go to the “IP Control” tab.
- b. Click the “+Add” button.
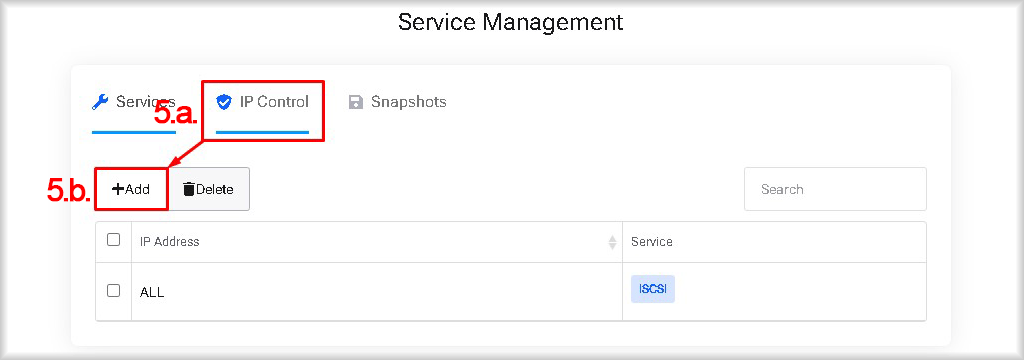
A window titled “Add new allowed IP” will open. - c. In the “IP Address” field, enter the IP address you obtained in step 1.
- d. Switch “Allow NFS” to the “On” position.
- e. Click the “Add” button.
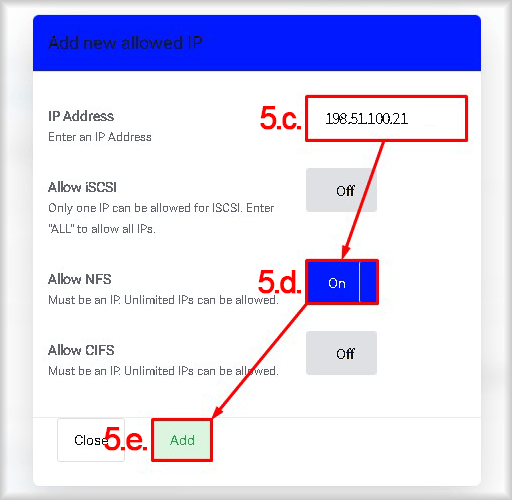
The IP address will be added to the trusted list for NFS connections and will appear in the “IP Control” table.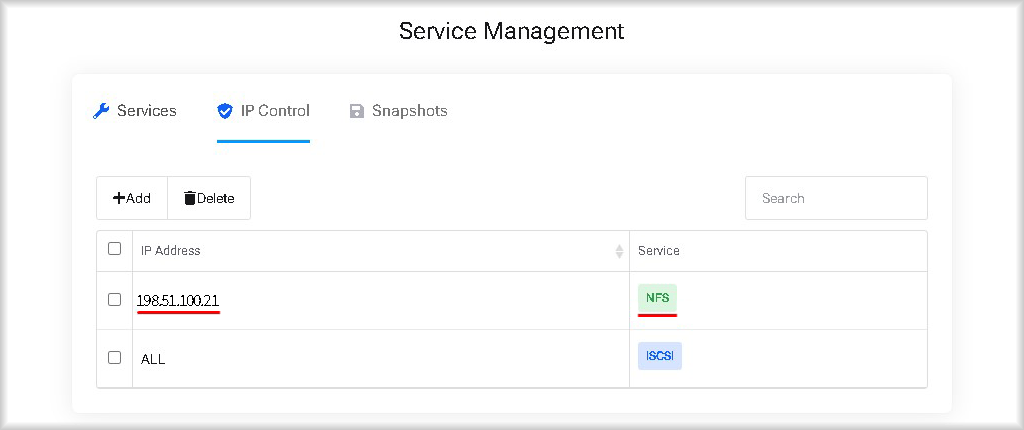
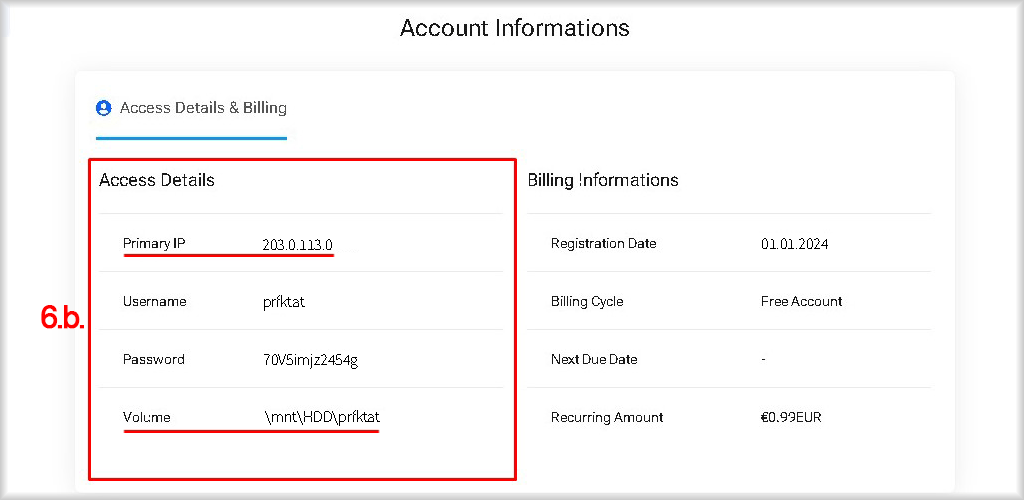
6. Obtain the connection credentials for the storage.
The information needed to connect via NFS – the “IP address” and “Username” – will be sent to you by email when your Peerobyte cloud storage is ready. Alternatively, you can get the required information by:
- a. In the “Service Management” section, click the “Access Details” button in the “NFS” row under the “Services” tab.
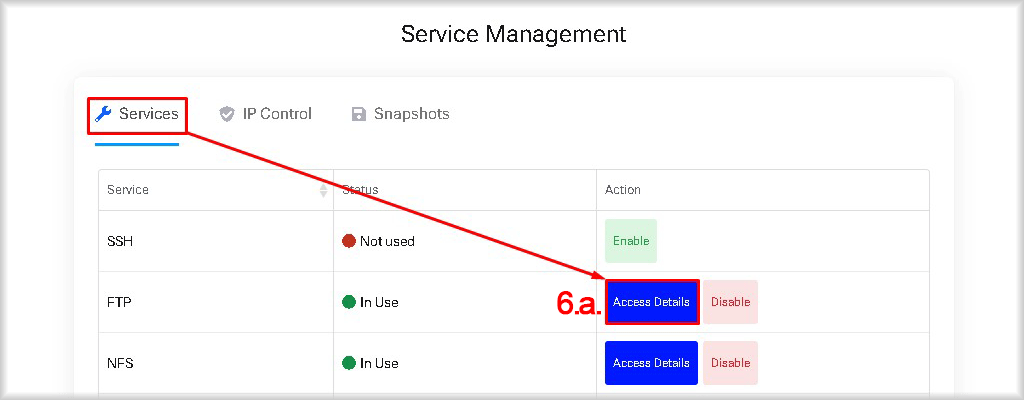
A window titled “NFS Access Details” will open, showing the full path to your cloud storage in the “NFS Path” field.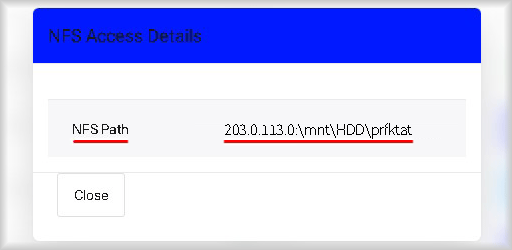
- b. Or in the “Access Details” block of the “Account Information” section, the connection data such as ”Primary IP” and “Username” are provided.
So, once you have the connection credentials and have added your device’s IP to the trusted list, you are ready to connect your device to the cloud storage.
II. Installing the Components for NFS
Below is a list of the basic commands to install the NFS client (the packages required for connecting to NFS) for different Linux distributions and versions.
1. Identifying the Linux Distribution and Version
You can determine your Linux distribution and version by running one of the following commands:
- lsb_release (if the lsb-release package is installed):
lsb_release -a
The output will look similar to:
where:netadmin@de2:~$ lsb_release -a No LSB modules are available. Distributor ID: Ubuntu Description: Ubuntu 20.04.5 LTS Release: 20.04 Codename: focal netadmin@de2:~$
Distributor ID – the Linux distribution.
Release – the Linux version. - hostnamectl (on systems with systemd):
hostnamectl
The output will look similar to:
where:netadmin@de2:~$ hostnamectl Static hostname: ru0 Icon name: computer-vm Chassis: vm Machine ID: 592cccdcd03e4020bf642842a1556620 Boot ID: d1be70cda7d44096a53440e381f1b56a Virtualization: vmware Operating System: Ubuntu 20.04.5 LTS Kernel: Linux 5.4.0-204-generic Architecture: x86-64netadmin@de2:
Operating System – the Linux distribution and version. - /etc/*-release (universal option):
cat /etc/*-release
The output will look similar to:
where:netadmin@de2:~$ cat /etc/*-release DISTRIB_ID=Ubuntu DISTRIB_RELEASE=20.04 DISTRIB_CODENAME=focal DISTRIB_DESCRIPTION="Ubuntu 20.04.5 LTS" NAME="Ubuntu" VERSION="20.04.5 LTS (Focal Fossa)" ID=ubuntuID_LIKE=debian PRETTY_NAME="Ubuntu 20.04.5 LTS"VERSION_ID="20.04" HOME_URL="https://www.ubuntu.com/" SUPPORT_URL="https://help.ubuntu.com/" BUG_REPORT_URL="https://bugs.launchpad.net/ubuntu/" PRIVACY_POLICY_URL="https://www.ubuntu.com/legal/terms-and-policies/privacy-policy" VERSION_CODENAME=focal UBUNTU_CODENAME=focalnetadmin@de2:~$
DISTRIB_ID – the Linux distribution.
DISTRIB_RELEASE – the Linux version.
2. Installing the NFS Client
Once you know your operating system’s distribution and version, choose the appropriate command below to install the NFS client:
- Debian / Ubuntu
		sudo apt-get update
sudo apt-get install nfs-common
- CentOS 7 / Red Hat Enterprise Linux (RHEL) 7
sudo yum install nfs-utils
- CentOS 8 / RHEL 8+ (also CentOS Stream, AlmaLinux, Rocky Linux)
sudo dnf install nfs-utils
- Fedora
sudo dnf install nfs-utils
- SUSE Linux Enterprise Server (SLES) / openSUSE
sudo zypper install nfs-client
- Arch Linux
sudo pacman -S nfs-utils
- Gentoo
sudo emerge net-fs/nfs-utils
III. Connecting the NFS Drive via Terminal
To connect to the cloud storage via NFS, follow these steps:
1. Create a directory.
The NFS drive is mounted to an existing local directory. You can create a catalog with the command:
where:sudo mkdir -p <Directory>
- -p – The parameter will create all directories of the specified path. If any directory does not exist, that path directory is created without warning.
- <Directory> – The path and name of the directory to be created.
For example:
If the directory is created successfully, no message will be displayed.sudo mkdir -p /nfs/Disk1
2. Mount the NFS storage.
Mount the NFS drive to an existing directory using the command:
where:sudo mount <Storage_Path> <Directory>
- <Storage_Path> – The path to the NFS drive, which you can find in the “NFS Path” field in the storage control panel (see step 6.a).
- <Directory> – The directory where the NFS drive will be mounted.
Alternatively, the mount command may look like this:
where:sudo mount <Storage_IP>:/mnt/HDD/<Username> <Directory>
- <Storage_IP> – The IP address of the storage, which you can find in the “Primary IP” field in the storage control panel (see step 6.b).
- <Username> – The username for the cloud storage, which you can find in the “Username” field in the storage control panel (see step 6.b).
- <Directory> – The directory where the NFS drive will be mounted.
For example, in our case the command will look like:
If the NFS drive is mounted successfully, no message will be displayed, and a new network drive linked to the cloud storage via NFS will be added to your system. You can work with this drive as you would with a local drive.sudo mount 203.0.113.10:/mnt/HDD/prfktat /nfs/Disk1
Note that a drive mounted in this way is only available for the current session. After shutting down or rebooting, you will need to remount the NFS drive or set up automatic mounting as described in step 5 below.
3. Verify the mount.
You can verify that the drive is mounted in several ways:
- For example, display the disk usage of all mounted file systems using the command:
df -h
The output might look like:
In the second-to-last line, you can see that the NFS drive is successfully mounted to the specified directory.netadmin@de2:/nfs/Disk1$ df -h Filesystem Size Used Avail Use% Mounted on udev 1.9G 0 1.9G 0% /dev tmpfs 392M 1.2M 391M 1% /run /dev/sda1 39G 6.3G 33G 17% / tmpfs 2.0G 0 2.0G 0% /dev/shm tmpfs 5.0M 0 5.0M 0% /run/lock tmpfs 2.0G 0 2.0G 0% /sys/fs/cgroup /dev/loop1 64M 64M 0 100% /snap/core20/2434 /dev/loop2 68M 68M 0 100% /snap/lxd/22753 /dev/loop4 92M 92M 0 100% /snap/lxd/29619 /dev/sda15 105M 6.1M 99M 6% /boot/efi /dev/loop5 45M 45M 0 100% /snap/snapd/23545 /dev/loop6 64M 64M 0 100% /snap/core20/2496 tmpfs 392M 0 392M 0% /run/user/1000 /dev/loop0 45M 45M 0 100% /snap/snapd/23771 203.0.113.10:/mnt/HDD/prfktat 100G 128K 100G 1% /nfs/Disk1netadmin@de2:/nfs/Disk1$ - To check access to the NFS drive, you can create a file on it by running:
where:sudo touch <File>
<File> – The path, name, and extension of the file to be created.
The output may look like:
This command creates the file test.test on the connected drive. If no errors are shown, the file was created successfully.sudo touch /nfs/Disk1/test.test - You can check the file permissions by running:
where:ls -l <File>
-l – This option displays detailed information about the file (permissions, owner, group, modification date, size).
<File> – The path, name, and extension of the file to check.
The output might look like:
In the output, the first three characters (e.g., -rw) indicate that the user has read (r) and write (w) permissions on the file.netadmin@de2:/nfs/Disk1$ ls -l /nfs/Disk1/test.test -rw-r--r-- 1 1023 1023 0 Mar 1 09:44 /nfs/Disk1/test.test netadmin@de2:/nfs/Disk1$
4. Set up automatic mounting.
Open the file system table for editing with:
(You can use any text editor installed on your system, such as vi, vim, or emacs.)sudo nano /etc/fstab
In Nano, add the details for the drive’s address, the mount directory, and the access options at the end of the file in the following format:
where:<NFS Path> <Directory> nfs auto,nofail,noatime,nolock,intr,tcp,actimeo=1800 0 0
- <NFS Path> – The network storage address as shown in the NFS Path field (see step 6.a).
- <Directory> – The path and name of the directory where the drive will be mounted (for example, /nfs/Disk1).
- nfs auto,nofail,noatime,nolock,intr,tcp,actimeo=1800 0 0 – The options for mounting the NFS drive. For example, auto enables automatic mounting at boot, nofail allows the system to continue booting even if the NFS server is unavailable, etc. For more information about these options, run man fstab.
Use the “Tab” key to separate the fields.
In our case, the /etc/fstab file with the added line for the NFS drive looks like:
After adding the details to /etc/fstab, save the file and exit the editor. Here’s how you can do it:LABEL=cloudimg-rootfs / ext4 defaults 0 1
LABEL=UEFI /boot/efi vfat umask=0077 0 1
203.0.113.10:/mnt/HDD/prfktat /nfs/Disk1 nfs auto,nofail,noatime,nolock,intr,tcp,actimeo=1800 0 0
- nano:
Save: Press “Ctrl+O”, then “Enter”.
Exit: Press “Ctrl+X”. - vi/vim:
Switch to command mode: Press “Esc”.
Save and exit: Type “:wq” and press “Enter”. - emacs:
Save: Press “Ctrl+X”, then “Ctrl+S”.
Exit: Press “Ctrl+X”, then “Ctrl+C”.
After the next reboot, the NFS drive will be automatically mounted to the specified directory.
IV. Disconnecting the Network Drive via Terminal
If the network drive is no longer needed, you can disconnect it. The following method works for disconnecting NFS drives as well as any other network drives, regardless of the protocol used.
Unmount the NFS drive for the current session with:
where:sudo umount <Directory>
<Directory> - The path and name of the directory where the drive is mounted.
For example:
This command will disconnect the drive mounted at /nfs/Disk1 for the current session.sudo umount /nfs/Disk1
If the network drive was set to mount automatically, remove its entry from the /etc/fstab file by opening it with:
(Again, you can use any text editor like vi, vim, or emacs.)sudo nano /etc/fstab
In the editor, find the line corresponding to the NFS drive and delete it entirely. Then save the changes and exit the editor using the same steps as described above. After the next reboot, the NFS drive will not be automatically mounted.
V. Connecting with the NFS Drive using the Nautilus File Manager (Files)
Initial Connection to the Cloud Storage
- Open the “Nautilus” file manager (“Files”).
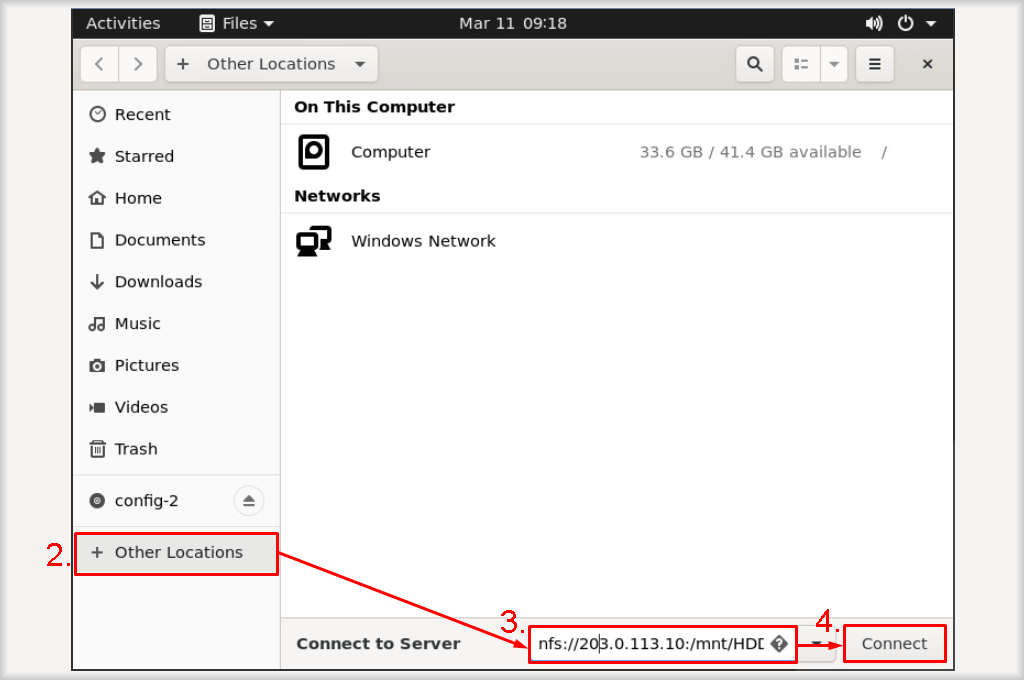
- Select “+ Other Locations” from the menu.
- In the “Connect to Server” field, enter the “NFS Path” value you obtained earlier (see step 6.a in Part I) in the following format:
nfs://<NFS Path>
For example:nfs://203.0.113.10:/mnt/HDD/prfktat
- Click the “Connect” button.
- Click on the cloud storage username or the server IP address in the “Network” section to open it. The connected NFS drive will open, and you can work with it just like a local drive.
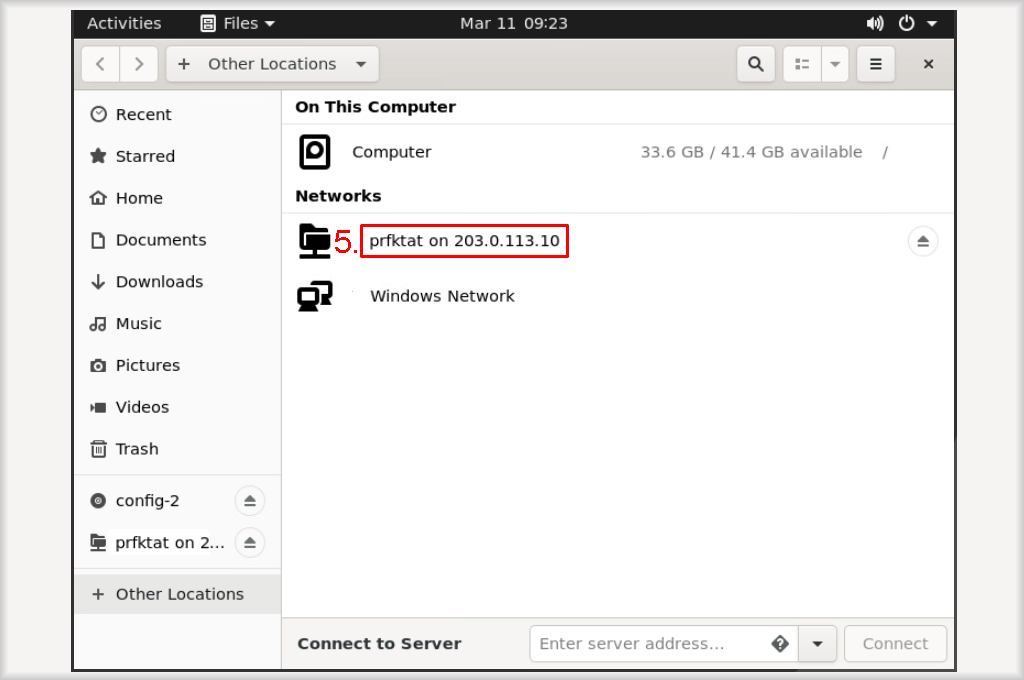
The connected NFS drive will open, and you can work with it just like a local drive.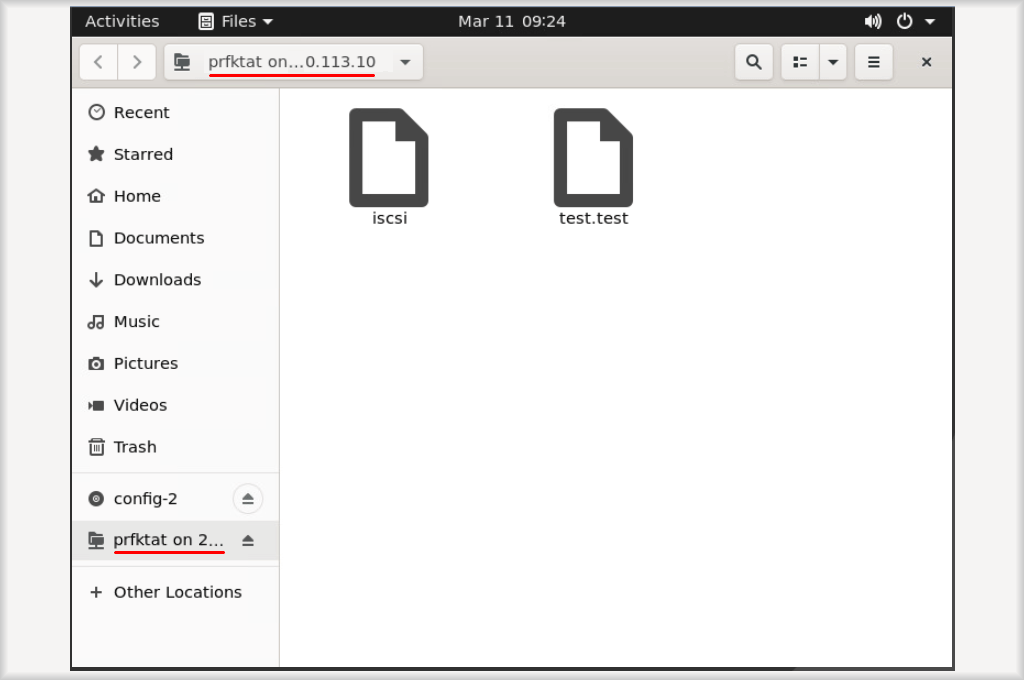
A drive connected this way will only be available until the current session ends.
Reconnecting to the Cloud Storage
When reconnecting, you do not need to manually enter the path in the “Connect to Server” field. Instead, open the “Recent Servers” list and select the desired server.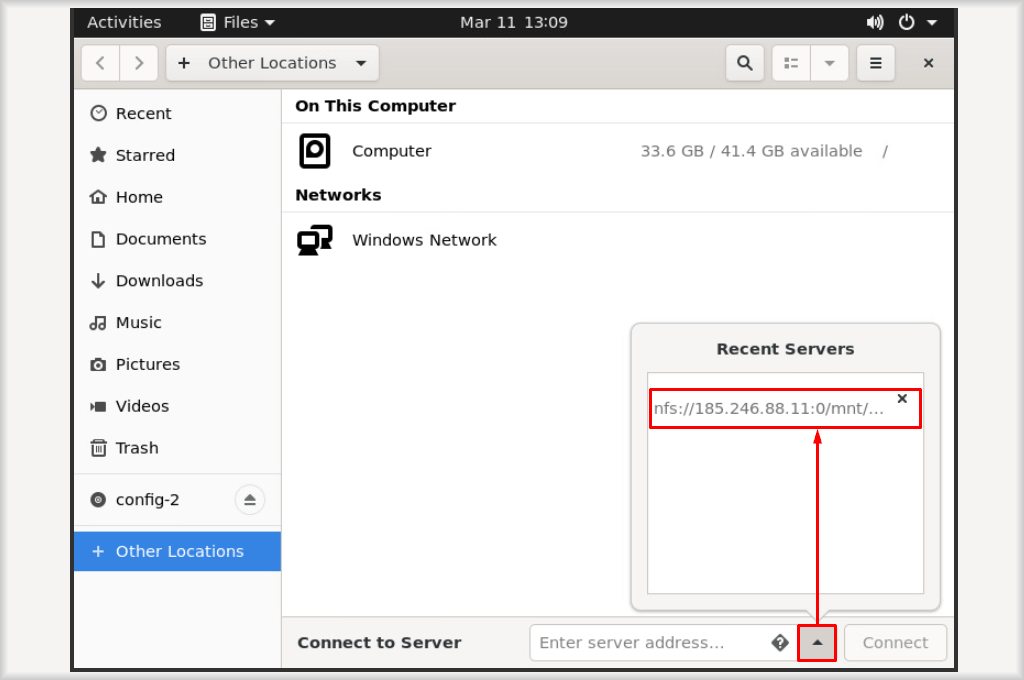
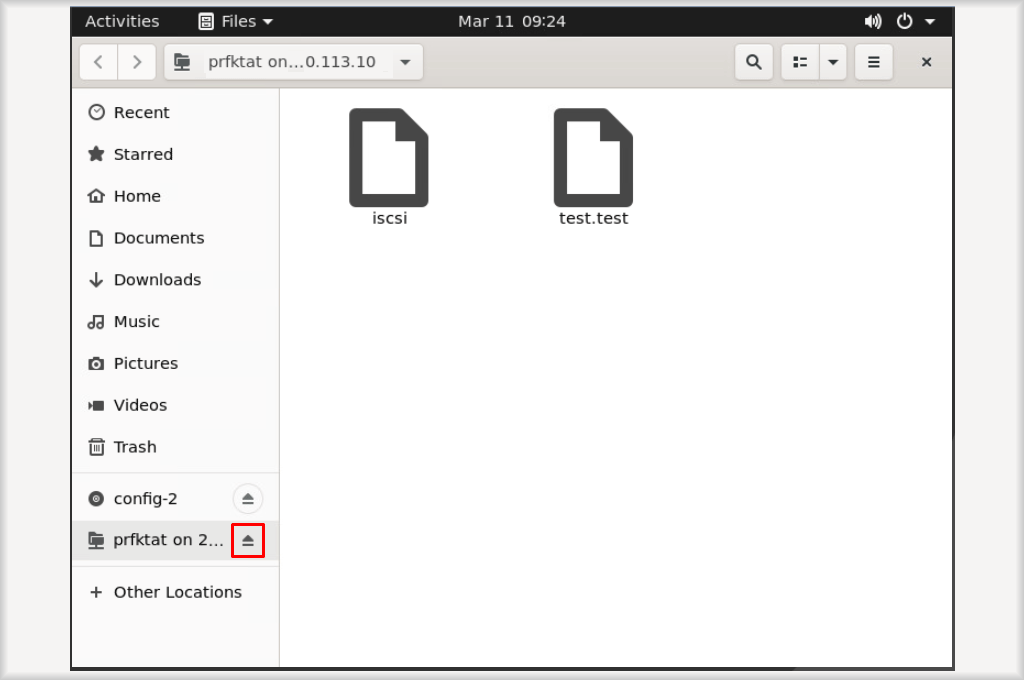
Disconnecting the Cloud Storage
To disconnect the cloud storage, click the “Eject” icon next to its name.