Windows Server: Connecting via NFS
This guide explains how to connect to Peerobyte cloud storage using the NFS protocol via a graphical user interface (GUI), using Windows Server 2012 R2 as an example. The methods described here are also applicable to newer versions of Windows Server.
In this guide, you will learn how to:
- Disconnect a network drive from the system.
- Add a device's IP address to the trusted list.
- Obtain credentials for connecting to cloud storage.
- Install software required for working with NFS.
- Connect cloud storage as a network drive using File Explorer.
Prerequisites
- Your system must be running Windows Server 2012 R2 or a newer version.
- You must have a Peerobyte account, including verification of your email address and phone number. Instructions for creating an account can be found in the document: "Creating an Account".
- You need to order Peerobyte cloud data storage. Instructions for placing an order are in the guide "How to Order Cloud Data Storage".
- After placing an order, wait for a notification email from Peerobyte confirming your cloud storage is ready to use.
I. Adding an IP Address to the Trusted List and Obtaining Credentials
Before connecting to Peerobyte cloud storage via NFS, you must add the IP address of the device accessing the storage to the trusted list.
To ensure uninterrupted access to the storage, use a static IP address. If a dynamic IP address is used, the connection may be lost whenever the IP address changes, as new addresses are not automatically added to the trusted list.
Additionally, you need credentials to configure the connection.
Steps to add the IP address to the trusted list and obtain connection credentials:
1. Determine the IP address of your device.
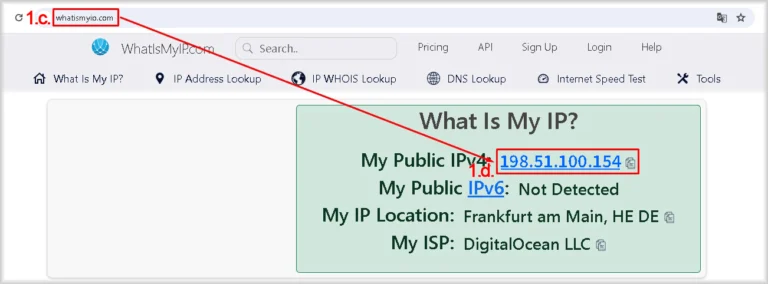
If you don’t know your device’s IP address, you can find it using one of these online services: WhatIsMyIP.com, IPinfo.io or MyIP.com.
a. Open a web browser.
b. If you are using a VPN only in your browser and not at the system level, and you plan to work with the cloud storage without the VPN, temporarily disable it to correctly determine the IP address of your device.
c. Visit the IP detection service website (e.g., WhatIsMyIP.com).
d. Save or write down your device's IP address.
2. Log in to the Peerobyte Control Panel.
Follow these steps based on your account's authentication method:
a. Without two-factor authentication (2FA): Refer to the guide "Signing in to the Control Panel".
b. With 2FA enabled: Refer to the guide "2FA Signing in to the Control Panel".
3. Select the storage service.
a. Click on Services in the main menu of the control panel.
This will open the My Products & Services list.
b. Find the storage you want to connect to in the Product/Service column and click on it.

You will be redirected to the management panel for the selected cloud storage.
4. Ensure NFS is enabled.
In the Service Management section, check the Status column for NFS:
If the status is In Use, proceed to step 5.
If the status is Not Used, click Enable in the NFS row to enable NFS access.
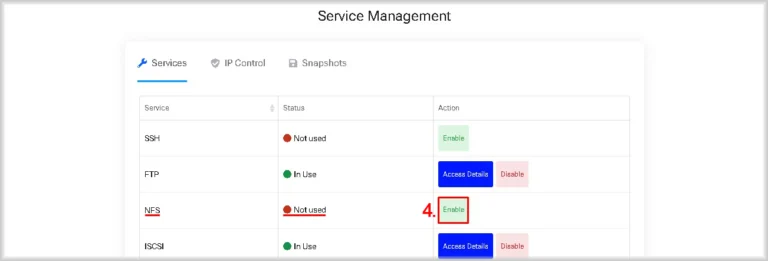
Access to your storage via the NFS protocol will be allowed.
5. Add the IP address to the trusted list.
a. Go to the IP Control tab.
b. Click the +Add button.

A window titled Add new allowed IP will appear.
c. Enter your device’s IP address in the IP Address field.
d. Toggle the Allow NFS switch to On.
e. Click Add.
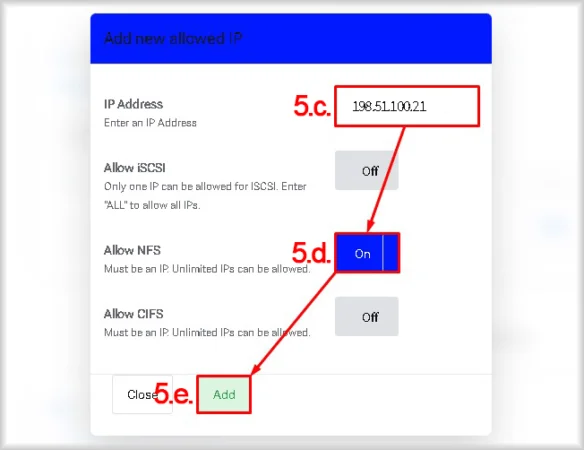
The IP address will be added to the trusted list for NFS connections and will appear in the IP Control table.

6. Obtain connection credentials.
Connection details, including the IP address and Username, will be sent to your email when your Peerobyte cloud storage is ready. Alternatively, you can retrieve these details as follows:
a. In the Service Management section, click Access Details in the NFS row on the Services tab.

A window titled NFS Access Details will open, displaying the full NFS path to the cloud storage.
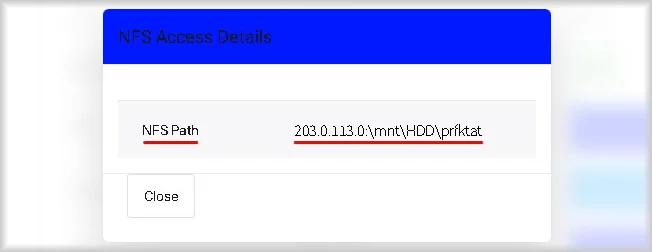
b. In the Access Details block under the Account Information section, find Primary IP and Username.
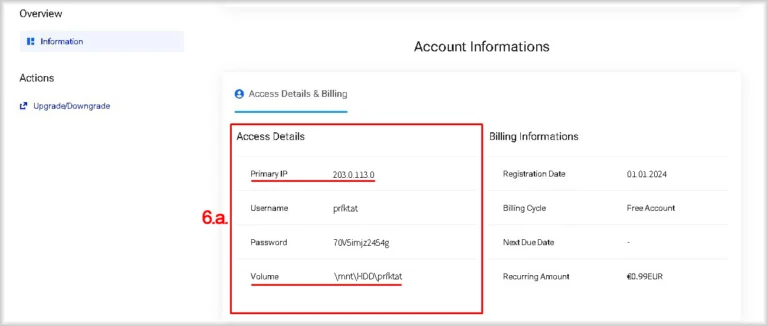
Now you have the credentials and the device's IP address added to the trusted list. You are ready to connect your device to the cloud storage.
II. Installing NFS Components
To install the NFS client:
1. Click the Server Manager icon on the taskbar.
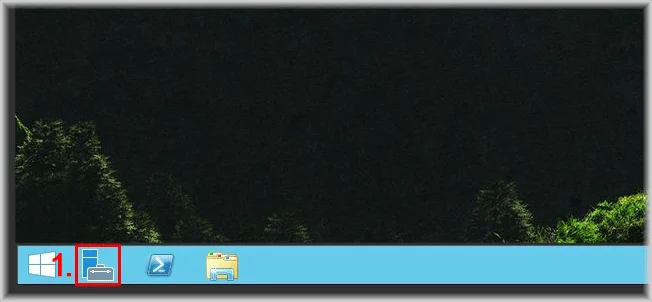
This will open the File Explorer application.
If the icon is not available, use one of the following methods:
- Press Win + R, type servermanager, and press Enter.
- Click Start on the taskbar, find Server Manager in the list, and click it.
2. In the main menu, select Manage.
A dropdown menu will appear.
3. Choose Add Roles and Features.

This will open the Add Roles and Features Wizard.
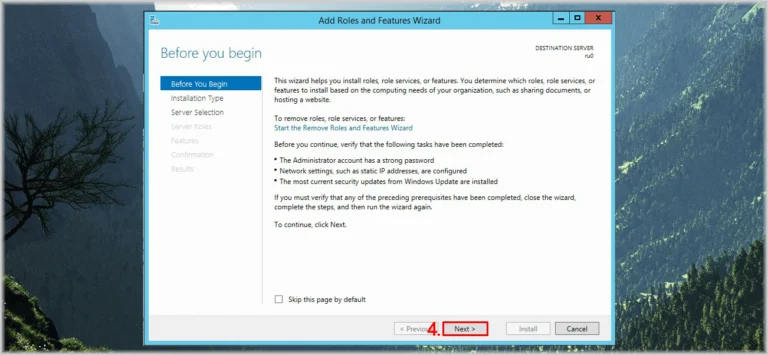
4. Click Next > until you reach the Features step.
5. In the Features list, find Client for NFS and ensure it is checked. If it is not, check it.
6. Click Next >.
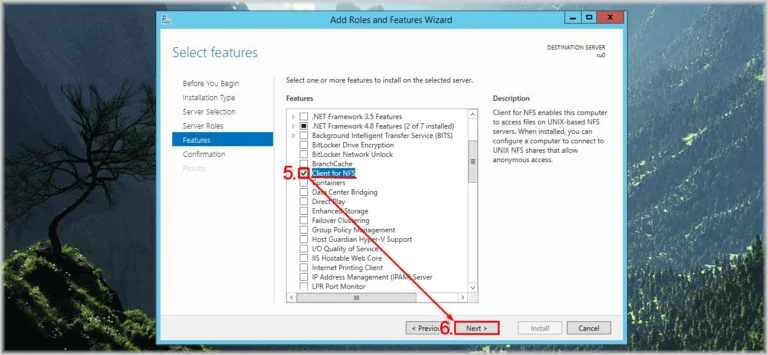
You will proceed to the Confirmation step.
7. Click Install.
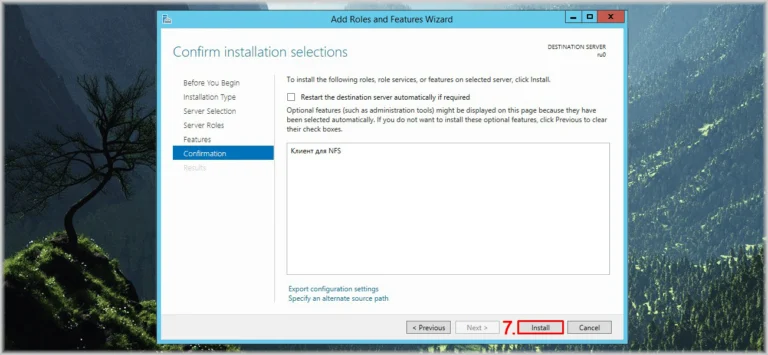
The installation process for Client for NFS will begin.
8. Once the installation is complete, click Close to exit the wizard.
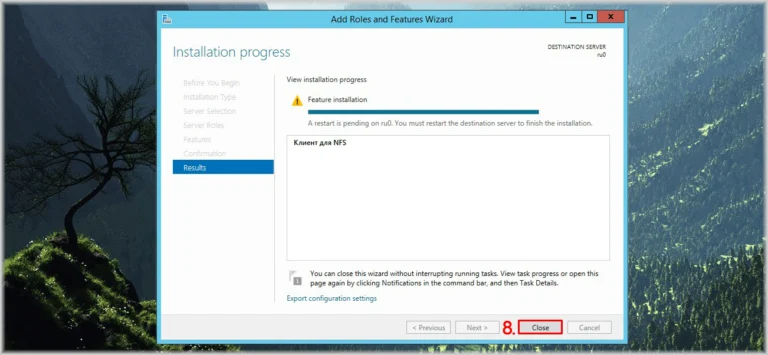
The Add Roles and Features Wizard window will be closed.
9. Restart the server, saving any unsaved data and stopping critical processes beforehand.
After restarting, your server will be ready to connect to the cloud storage using NFS.
III. Connecting via File Explorer
To connect cloud storage via NFS:
1. Open File Explorer from the taskbar.
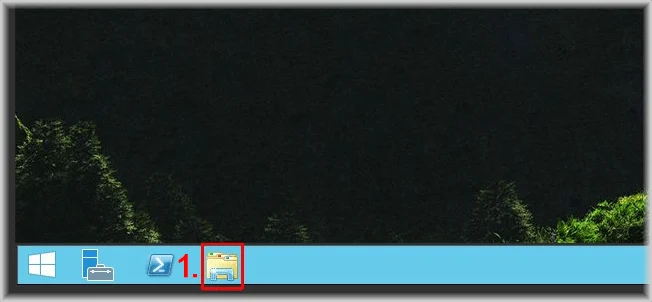
The File Explorer application will open.
If the icon is not available, use one of the following methods:
- Press Win + E.
- Click Start on the taskbar, then select This PC.
- Open the Start menu, search for "File Explorer", and select it.
2. Right-click Network in File Explorer.
A context menu will appear.
3. Select Map network drive… .
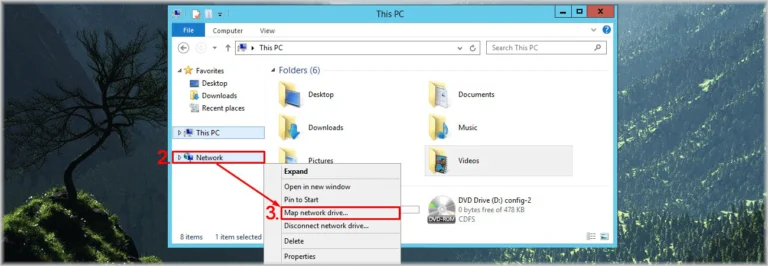
The Map Network Drive window will open.
4. In the Drive list, select the letter you want to assign to the drive associated with the cloud storage.
5. Copy and paste the value from the NFS Path field located in the NFS Access Details window of the Peerobyte cloud storage control panel into the Folder field (see section I, item 6.a).
For example, the storage path might look like this:
203.0.113.10\mnt\HDD\prfktat
Alternatively, you can also obtain connection details from the following sources:
- The email confirming that your cloud storage is ready for use.
- The Account Information block in the Access Details section of the Peerobyte cloud storage control panel (see section I, item 6.b).
If you use data from these sources, the path should be specified in the following format:
<IP_address>:\mnt\HDD\<Username>
Where:
<IP_address> - is the IP address of the cloud storage.
<Username> - is the username for accessing the cloud storage.
6. Check the box for Reconnect at sign-in if you want the storage to connect automatically at each login. Uncheck it if you prefer manual reconnection.
7. Click Finish.
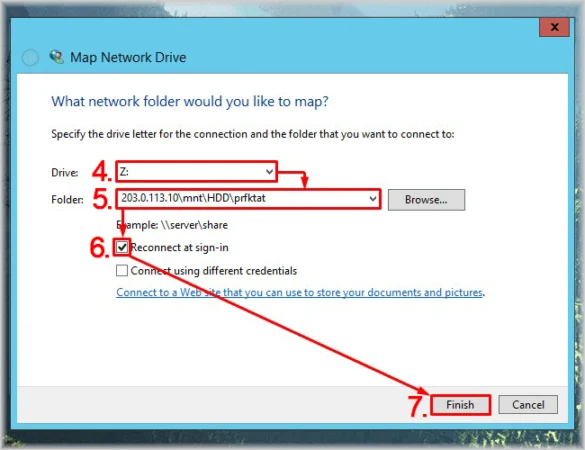
The system will add a new network drive connected to the cloud storage via NFS.

You can now access the cloud storage as if it were a local drive, allowing you to read, write, and manage files as needed.
IV. Disconnecting a Network Drive
If a network drive is no longer needed, you can disconnect it. This section explains how to perform the disconnection process.
The method described below applies to both drives connected via the NFS protocol and any other network drives, regardless of the protocol used.
To disconnect a network drive, follow these steps:
1. Click the File Explorer icon, which is pinned to the taskbar by default.
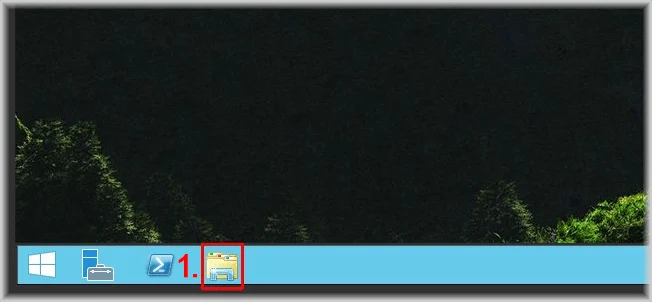
This will open the File Explorer application.
If the icon is not available on your taskbar, use one of the following methods to open File Explorer:
- Press the Win + E keyboard shortcut.
- Click the Start button on the taskbar, then select This PC.
- Open the Start menu, search for "File Explorer", and click the result.
2. Right-click the network drive you wish to disconnect.
A context menu for managing the network drive will appear.
3. Click Disconnect in the context menu.

The network drive will be disconnected from your system.