Windows: Connecting via FTP
Here we will cover how to connect to Peerobyte cloud data storage in Windows using Windows Explorer, Total Commander file manager, FileZilla FTP manager, and Command Prompt.
Prerequisites
- You must have a Peerobyte account, with your email address and phone number verified. For details on how to complete this process, refer to the instructions in the guide: "Creating an Account".
You must order cloud data storage. The process of ordering cloud storage is outlined in the guide: "How to Order Cloud Data Storage".
You must receive an email or a notification in your Peerobyte dashboard informing you that your ordered storage is ready for use.
You must have a device running a Windows-based operating system.
Port 21 must be open on the device you intend to use for connecting.
Connection Details
Before you connect to the data storage, you need to obtain the connection details, namely: IP address of the storage, username and password. You will receive all the necessary connection details in an email that will inform you when your data storage is ready for operation. You can also get them from the Peerobyte cloud storage control panel by following the steps below:
Log into the Peerobyte control panel as instructed:
- a. If two-factor authentication (2FA) is not enabled on your account: "Signing in to the Control Panel".
- b. If 2FA is enabled on your account: "2FA Signing in to the Control Panel".
Click on the Services item on the main menu in the Control Panel.This will open the My Products & Services list.
Select the storage you want to connect to from the Product/Service list by clicking in its row.
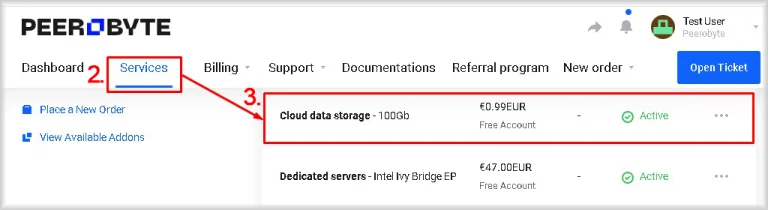

You will be taken to the control panel of your selected cloud data storage.
- Verify that the FTP protocol is enabled.
If the FPT row has the In Use status, then go to step 5. If the status is Not Used, then you must enable the FTP protocol to access the storage by clicking the Enable button in the FTP row.
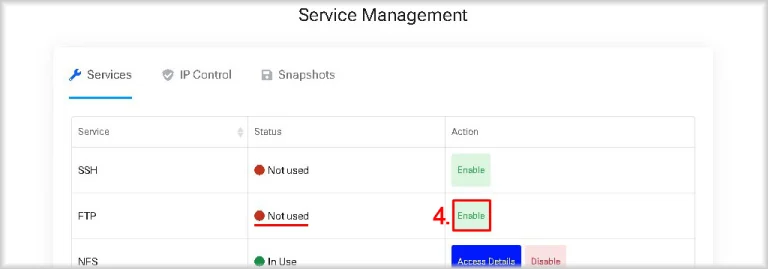

FTP access to your storage will be allowed.
The information you need can be obtained in two ways:
a. In the Access Details section of the Account information block.


- b. Or you can click the Access Details button in the FTP row of the Services tab of the Services tab of the Service Management block.
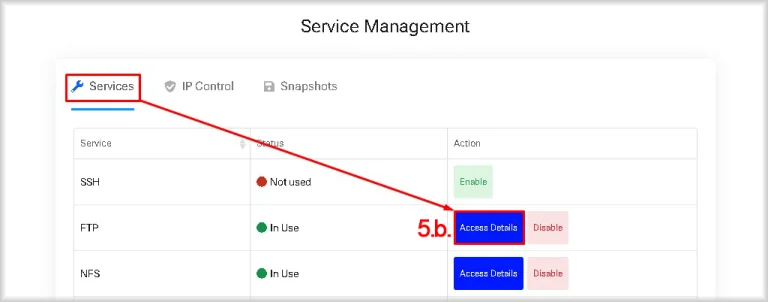

The FTP Access Details window that opens will also display the connection details.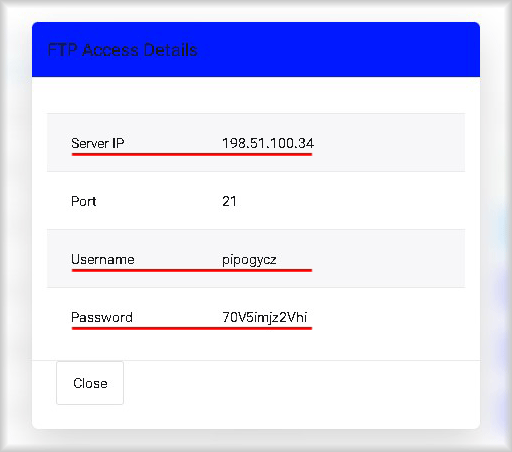

So, you have Primary IP or Server IP values, which are the IP address to connect to the storage and the username and password to access the cloud storage. Now you are ready to connect to the cloud storage.


Connecting via Windows Explorer
Connecting via Windows Explorer is probably the easiest solution for infrequent FTP cloud storage on a GUI system. Windows Explorer is usually pre-installed in the system and is suitable in cases where automation is not required.
We'll look at connecting to storage in Windows 7, but the procedure is exactly the same in Windows 10, and the steps are similar in other versions of Windows.
To connect to FTP using Explorer, follow the steps below:
Launch Windows Explorer.You can use one of the following methods to launch Windows Explorer:
- Use the Win + E key combination.
- Click the Explorer icon (usually in the form of a folder) on the taskbar.
- Click the Start button and select Windows Explorer from the list of applications.
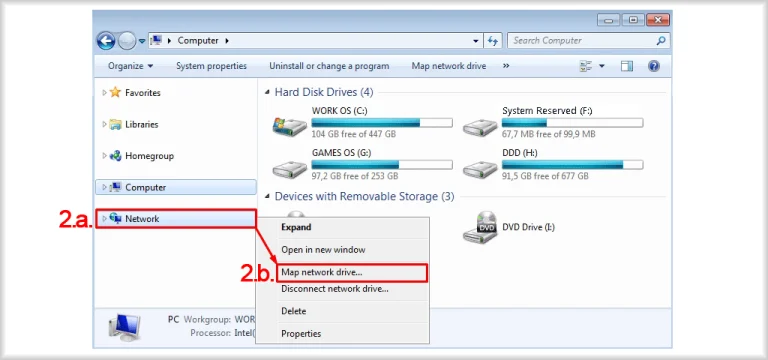
Run the network drive connection wizard.Use Ctrl + N (doesn't work on Windows 10) to launch the network drive connection wizard or:
- a. Right-click on the Network section in Explorer.
This will open a context menu. - b. Select the Map network drive... menu item.

The wizard for connecting network drives opens.
- a. Right-click on the Network section in Explorer.
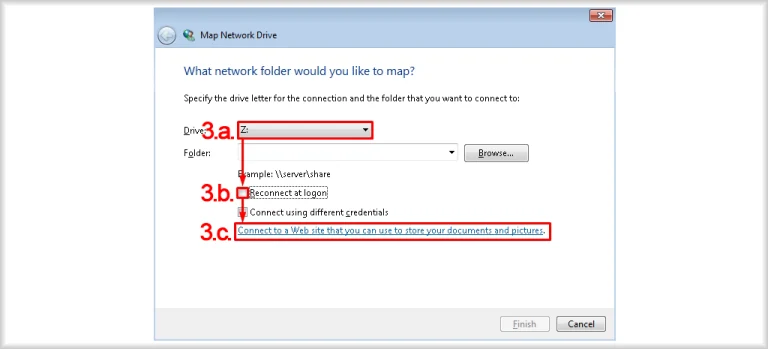
- Specify the connection settings for the network drive.
- a. From the Drive list, select the letter you want to assign to the drive associated with the cloud storage.
- b. Check the Reconnect at logon checkbox if you want the storage to connect automatically every time you log in, or uncheck it if you don't want the storage to connect automatically at logon.
- c. Click Connect to a Web site that you can use to store documents and pictures.

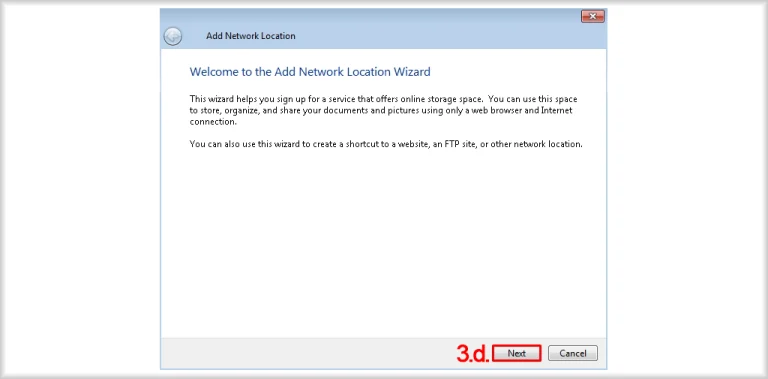
The wizard for adding a network location will start. - d. Click Next.

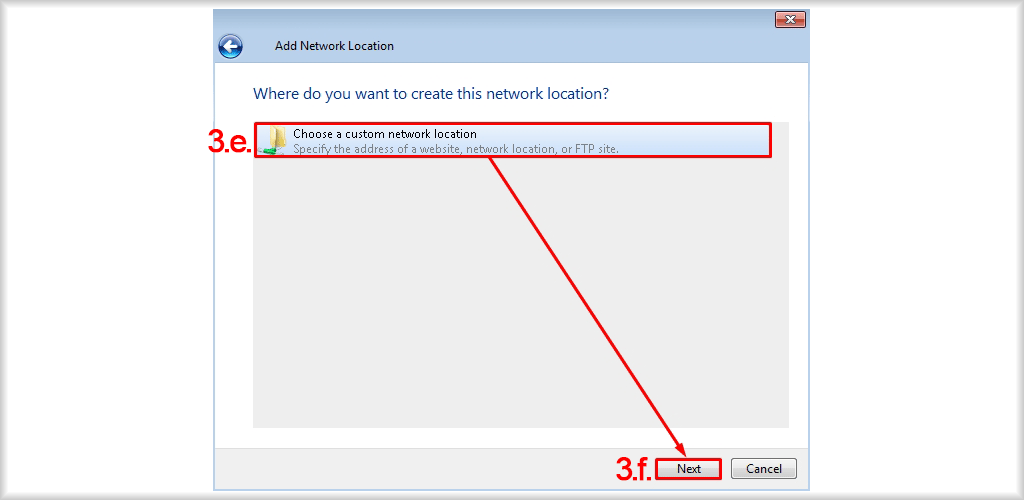
You will be taken to the step of selecting the network location of the storage. - e. Select Choose a custom network location.
- f. Click Next.
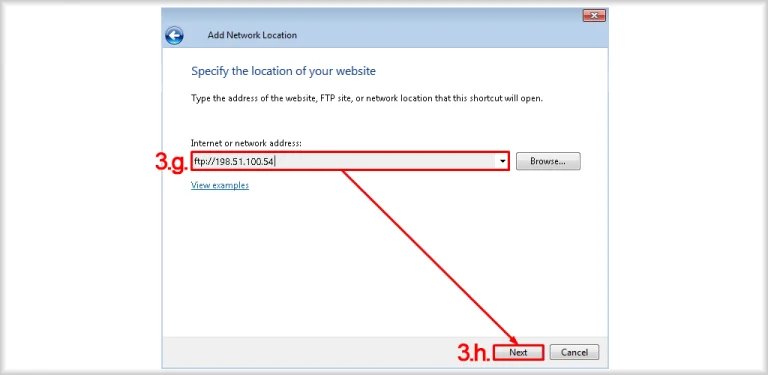
You will proceed to the step of specifying the storage address. - g. In the Internet or network address field, enter the value of the server IP address field that you received in the Connection details section in the following format:
ftp://<server_ip>
In case of connecting Peerobyte storage you should result in the following string:ftp://198.51.100.54 - h. Click Next.
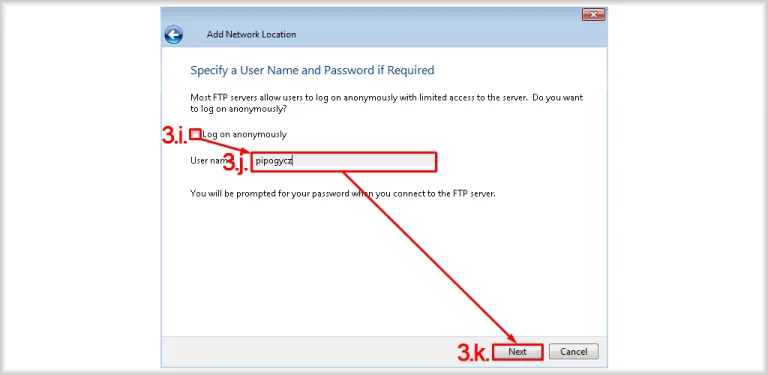
You will be taken to the step of specifying authentication settings. - i. Clear the Log on anonymously check box.
- j. In the User name field, enter the data warehouse user name you obtained in the Connection Details section.
- k. Click Next.
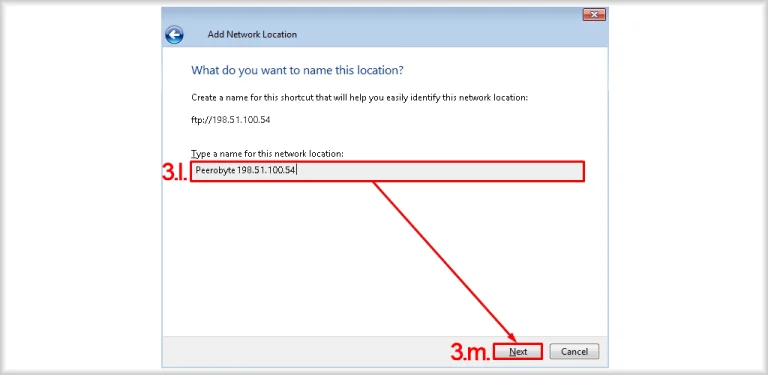
You will be taken to the step of specifying the name of the connection. - l. Enter a name for this network location in the Type a name for this network location field, or leave the name automatically assigned.
- m. Click Next.
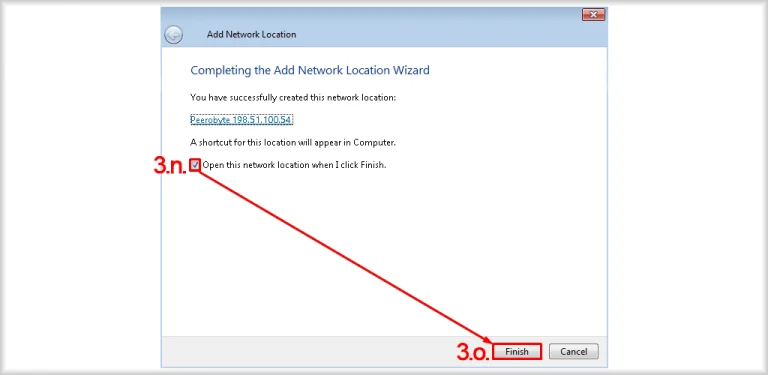
You will proceed to the final step of the wizard to add a network location. - n. Select the Open this network location when I click Finish check box.
- o. Click Finish.
This opens the cloud data storage user authentication window when connecting. - p. In the Password field, enter the data storage user name that you received in the Connection Details section.
- q. If you do not want to enter the password each time you connect to the data storage, check the Save password box.
- r. Click the Log On button.


You will be logged in to the cloud data storage via FTP and the storage window will be opened in Explorer.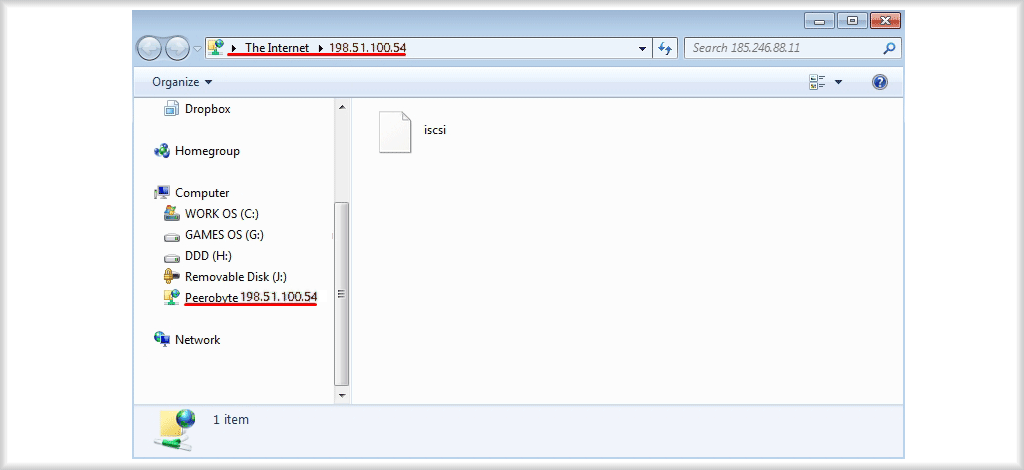
- a. From the Drive list, select the letter you want to assign to the drive associated with the cloud storage.


Connecting via Total Commander
You can also connect to cloud storage via many of the file managers, such as Total Commander (TC), whose connection to FTP we will review.
To connect to FTP via TC, follow the steps below:
Open Total Commander.
You can download Total Commander from the official site: Here.Open the wizard to create a connection to FTP.
Use the combination Ctrl + N to start the network drive connection wizard or:- a. Select the Net menu item of the TC main menu.
The Net submenu will open. - b. Select the FTP New Connection... menu item.


The window for creating a new connection to the FTP server will open.
- a. Select the Net menu item of the TC main menu.
- Specify the parameters of the new FTP connection.
- a. In the Connect to (host or URL) field, specify the IP address of the server obtained in the Connection Details section and the port number for FTP connections, separated by a colon, in the following form:
<Server_IP>:<Port>
In the case of a Peerobyte cloud data storage connection, the field should look like this:198.51.100.54:21 - b. Clear the Anonymous connection check box.
- c. Click the OK button.


An FTP connection to the data store you specified will be initiated and the window asking for the user name of the data store will open. - d. In the User Name field, enter the cloud storage user name you obtained in the Connection Details section.
- e. Click OK.

The window asking for the data storage user password opens. - f. In the Password field, enter the cloud storage user password that you obtained in the Connection Details section.
- g. Click OK.


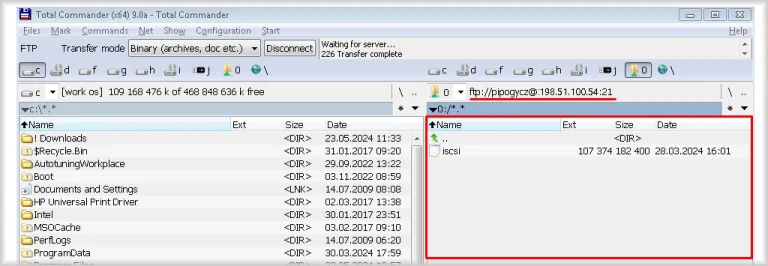

- a. In the Connect to (host or URL) field, specify the IP address of the server obtained in the Connection Details section and the port number for FTP connections, separated by a colon, in the following form:


Connecting via FileZilla
FileZilla is a popular and powerful FTP client for working with an FTP server.
Here are the step-by-step instructions on how to connect to an FTP server using FileZilla:
- Install and run FileZilla.
- a. Go to the official FileZilla website to the Download FileZilla Client section.
- b. Download the latest version of FileZilla Client.
- c. Install it on your device following the installer instructions.
- d. Launch FileZilla.
- a. Go to the official FileZilla website to the Download FileZilla Client section.
- Enter the connection details.
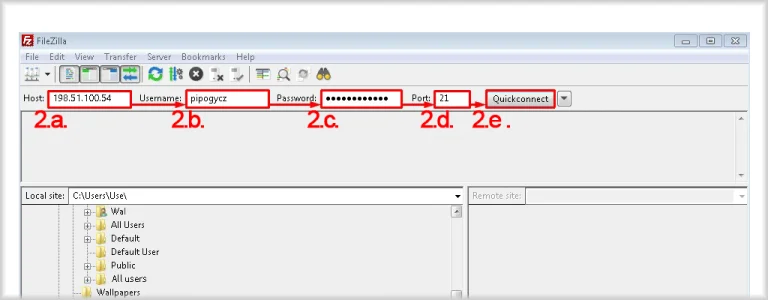
You will receive all the details you need to connect in the cloud storage readiness email. You can also get the connection details in the Connection Details section.- a. At the top of the FileZillad window, in the Host field, enter the IP address of the cloud data storage.
- b. In the Username field, enter your data storage username.
- c. In the Password field, enter your storage user password.
- d. In the Port field, enter the value 21.
- e. Click the Quickconnect button.

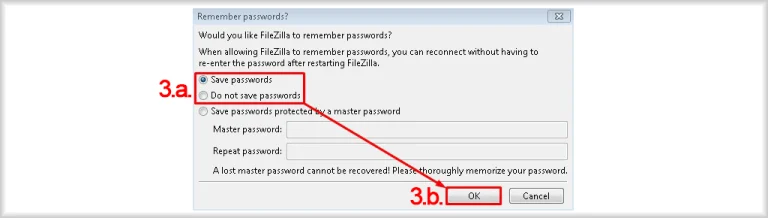
The window for saving the password opens.
- a. At the top of the FileZillad window, in the Host field, enter the IP address of the cloud data storage.
- Answer the connection wizard questions.
- a. In the Remember password window, select:
- Save password - If you want to save the password for use in future sessions.
- Do not save password - If you do not want to save the data store password. - b. Click OK.

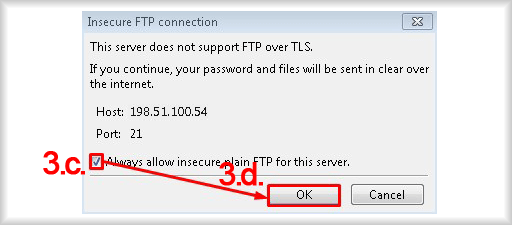
An insecure connection warning window will open, as our datastore does not use TLS when connecting via FTP. - c. Tick the Always allow insecure plan FTP for this server checkbox if you do not want to see the insecure connection message every time you connect.
- d. Click the OK button.
A window will open with the contents of your cloud data storage.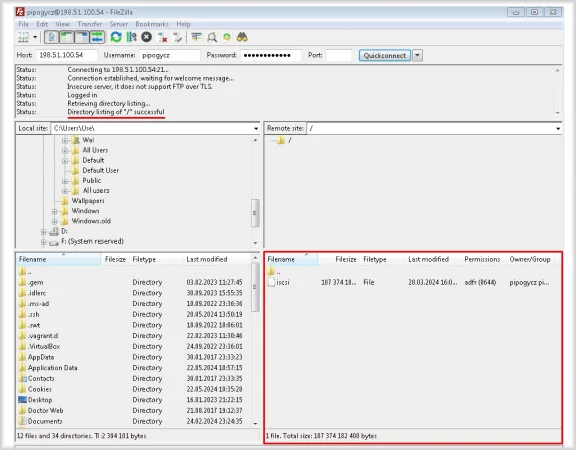

- a. In the Remember password window, select:


Connecting via the Windows Command Prompt
You can connect to cloud data storage via FTP protocol outside the graphical interface, without installing additional software, via the command line. Such a connection will require minimum resources.
Launching the Command Prompt
If you are in a graphical environment, you can launch the Windows command line as follows:
- Use the Win + R key combination.
This will open the Run window. - Type "cmd" in the Open field.
- Press the Enter key.
A Windows command prompt window will open.
Connecting to the server
To connect to the server, use the command:
FTP <Primary_IP_or_Server_IP>
Insert into the command the Primary IP or Server IP value that you got in the Connection Details section, and you will get the following command:
FTP 203.0.113.11
In response to the command, you will be prompted to enter the storage username, after which you will be prompted to enter the cloud storage user password. How to get the password and username is described in the Connection details section,
The password will not be displayed, so be careful with the case of the characters you enter. For our storage it will look like this:
		C:\Users\Ueser1> ftp 203.0.113.11
Connected to 203.0.113.11.
220 ProFTPD Server (nas FTP Server) [::ffff:203.0.113.11]
Name (203.0.113.11:netadmin): pipogycz
331 Password required for pipogycz
Password:
230-Welcome to TrueNAS FTP Server
230 User pipogycz logged inftp>
If after the connection attempt you see the ftp> characters, then the connection to the data storage via FTP protocol has been successful and you can work with it using commands.
Commands
You can display the list of commands available for use with the help command. Then, for any of the displayed commands, you can get information by applying a command of the form:
help <command>
ls - displays a list of directories and files in the current directory.
cd <path to new directory> - moves you to a new directory.
lcd <path to new directory> - moves you to a new directory on the machine from which you are connected to the storage.
pwd - displays the path to the current directory.
mkdir <directory name> - creates a new directory in the current storage directory.
rmdir <directory name> - deletes a directory from the current storage directory.
get <file name> [<new file name>] - downloads a file from the current storage directory and saves it to the current directory on the machine from which you are connected to the storage. Optionally, you can rename the downloaded file.
mget <file name> [<file name>...] | <filter> - downloads a group of files that you explicitly list or specify by a filter from the current storage directory and saves them to the current directory on the machine from which you are connected to the storage. For example, the mget * command will download all files from the current storage directory. You need to confirm the download of each file by pressing y or cancel by pressingn.
put <file name> - uploads a file from the current directory on the machine from which you are connected to the current storage directory.
mput <file name> [<file name>...] | <filter> - uploads a group of files that you explicitly list or specify by a filter from the current directory on the machine from which you are connected to the current storage directory. For example, the mput * command uploads all files from the current directory on the machine to the storage. You need to confirm the upload of each file by pressing y or cancel by pressingn.
delete <file name> - deletes the specified file from the current storage directory.
quit - ends the FTP session with the storage.