Windows 7/8/10/11: Connecting via NFS
This guide provides a detailed explanation of how to connect Peerobyte cloud storage via the NFS protocol using a graphical user interface (GUI) on Windows 10. The described methods are also applicable to Windows 7 and all later desktop versions of Windows.
In this guide, you will learn how to:
- Add your device's IP address to the trusted list.
- Retrieve the credentials for connecting to the cloud storage.
- Install software to enable NFS functionality.
- Connect to the cloud storage as a network drive via File Explorer (Windows Explorer).
- Disconnect the network drive from your system.
Prerequisites
- Your system must run on Windows 7 or later.
- You need a Peerobyte account, including verified email and phone number. Detailed
instructions for creating an account can be found in the document: “Creating an Account”. - You must place an order for Peerobyte cloud storage. The ordering process is explained in “How to Order Cloud Data Storage”.
- After ordering, wait for an email notification from Peerobyte confirming that your cloud storage is ready to use.
I. Adding IP Address to Trusted List and Obtaining Connection Details
Before connecting to cloud storage via NFS, you need to add your device's IP address to the trusted list and retrieve the connection details.
Steps to follow:
1. Determine your device's IP address
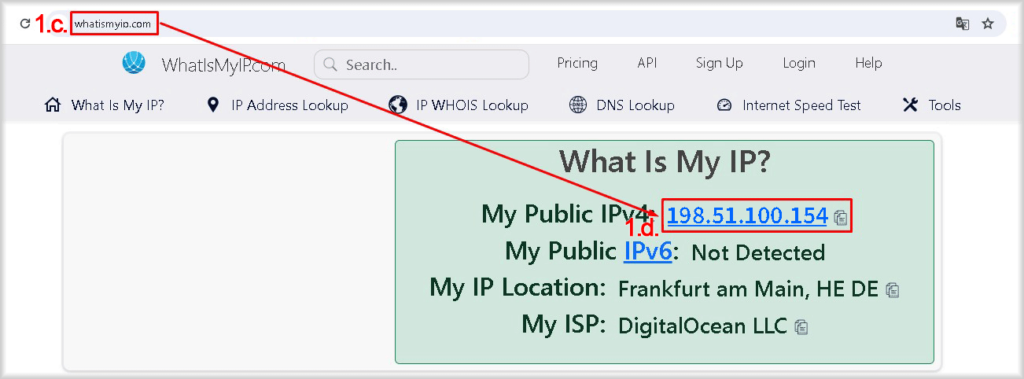
If you don’t know your device's IP address, you can find it using online services like WhatIsMyIP.com, IPinfo.io, MyIP.com.
a. Open a web browser.
b. Disable any connected VPN in the web browser if it will not be used with the cloud storage.
c. Visit an IP-checking service like WhatIsMyIP.com.
d. Save or write down your device's IP address.
After determining the IP address, you can enable the VPN if you disabled it earlier in step b.
2. Log in to the Peerobyte Control Panel
Follow these steps depending on your account settings:
a. Without two-factor authentication (2FA): Refer to “Signing in to the Control Panel”.
b. With 2FA enabled: Refer to “2FA Signing in to the Control Panel”.
3. Select the cloud data storage
a. Click Services in the control panel’s main menu.
This will open the My Products & Services list.
b. Select the storage you want to connect to by clicking on its row in the Product/Service list.
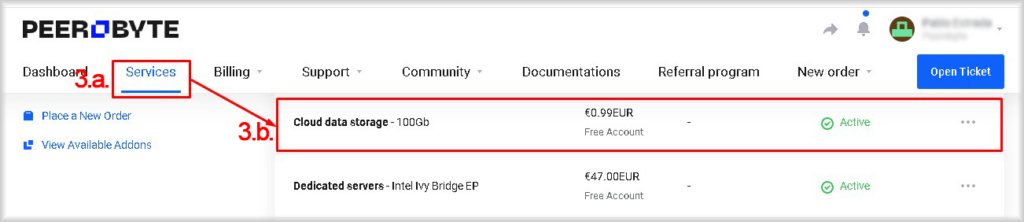
You will navigate to the control panel of your chosen cloud data storage.
4. Ensure the NFS protocol is enabled
Go to Service Management and check the Status column for NFS:
- If the status is In Use, proceed to step 5.
- If the status is Not Used, click Enable next to NFS.

NFS access to your storage will be allowed.
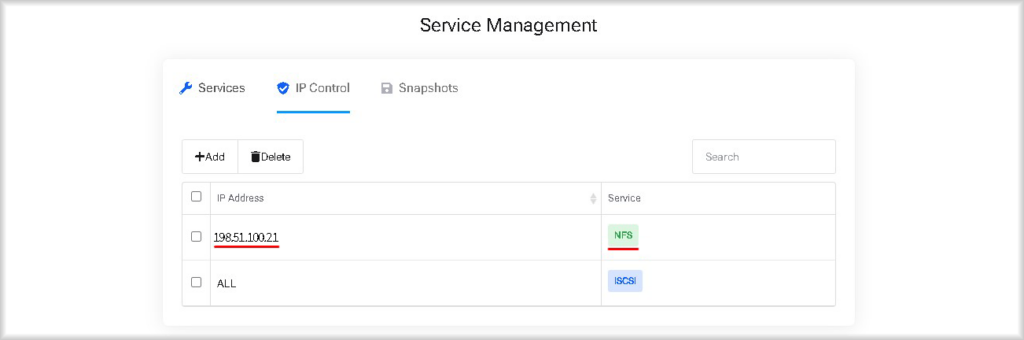
5. Add the IP address of the device to the trusted list
a. Go to the IP Control tab.
b. Click the +Add button.
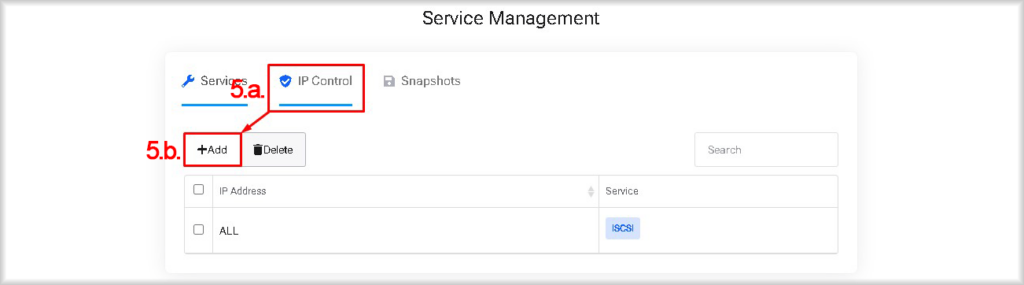
The Add new allowed IP window will open.
c. Enter the IP address obtained in step 1 in the IP Address field.
d. Switch the Allow NFS toggle to On.
e. Click the Add button.
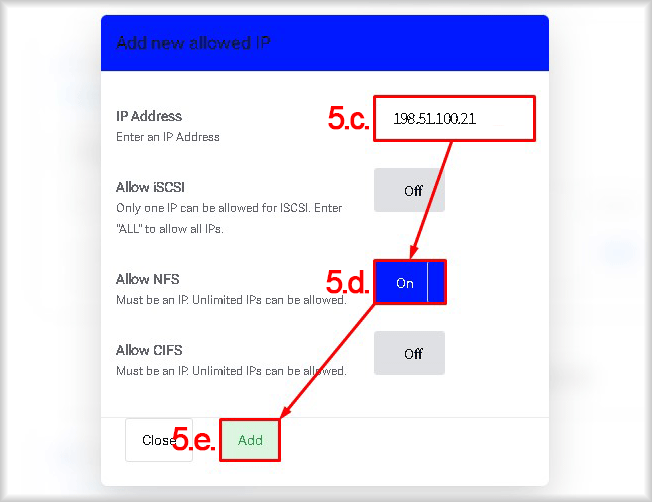
The IP address will be added to the trusted list for NFS connection and will appear in the "IP Control" table.
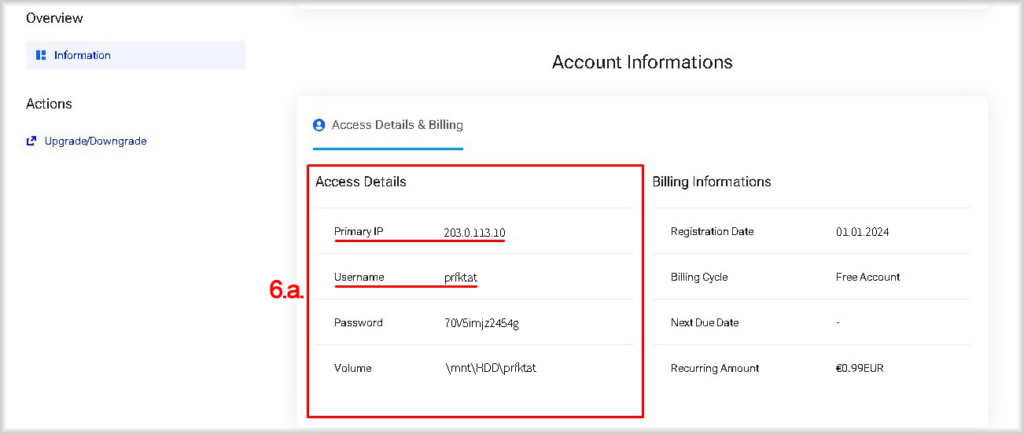
6. Retrieve connection details
The information required to connect to the storage via the NFS protocol, including the IP address and Username, will be sent to your email in a notification about the readiness of your Peerobyte cloud storage. Alternatively, you can obtain the required details in the following ways:
a. In the Access Details section of the Account Information block, the connection details will be listed as Primary IP and Username.
b. In the Service Management section, you can retrieve the connection details by clicking the Access Details button in the NFS row of the Services tab.
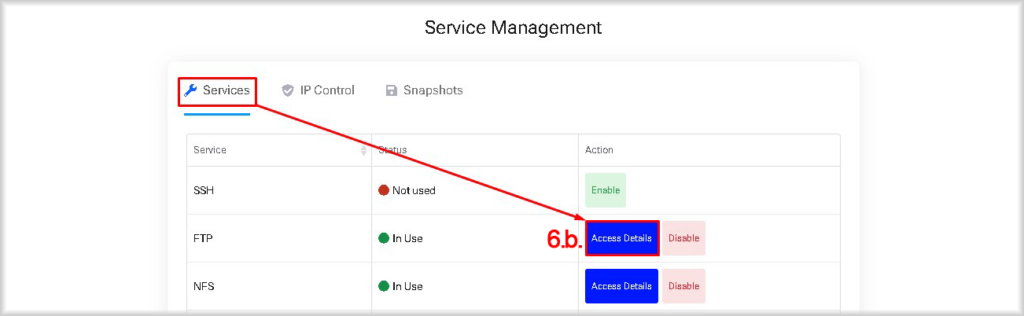
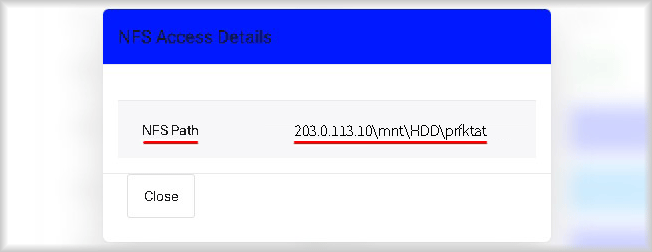
This will open the NFS Access Details window, where the NFS Path field will display the full path to your cloud storage.
Now that you have the connection details and have added your device's IP to the trusted list, you are ready to connect your device to the cloud storage.
II. Connecting via File Explorer
Here we will review connecting to cloud data storage via NFS in Windows 10. This method is also suitable for connecting cloud storage in Windows 7 and Windows 8.
To connect to a data storage over NFS using File Explorer, follow these steps:
1. Install the components for NFS.
a. Enter Turn windows features on or off in the Type here to search field on the taskbar.
A list of objects found by the query will be displayed.
b. Click Turn windows features on or off: Control panel.
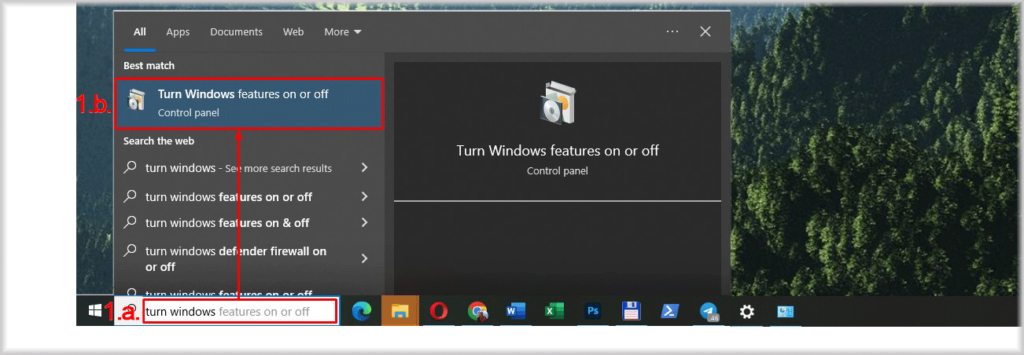
The Turn windows features on or off window will open.
c. Find the Services for NFS section and expand it by clicking the + sign.
A list of services will open.
d. Ensure the Client for NFS service is checked. If not, check it.
e. Click OK.
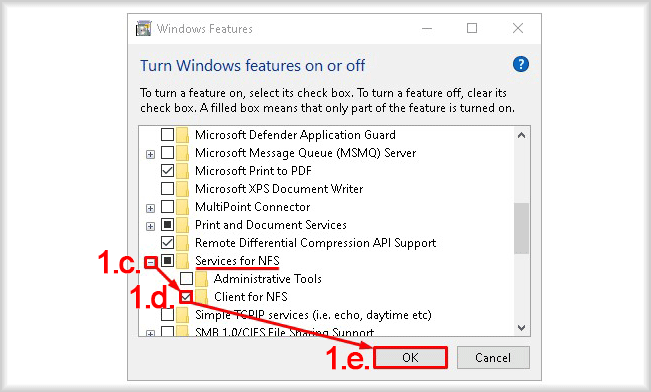
If you checked Client for NFS, additional components for NFS connection will be installed, and a system restart prompt will open.
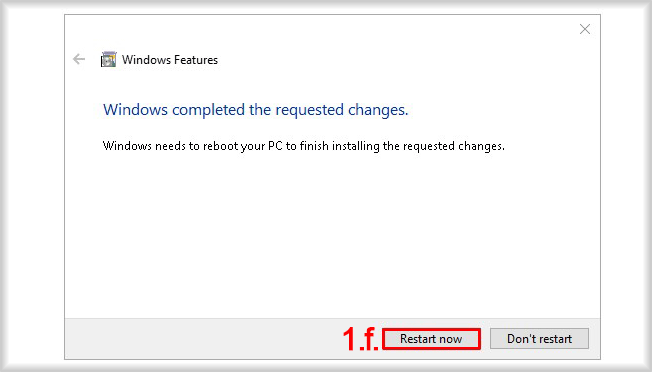
f. If you are prompted to restart the system after this step, save all unsaved files and click Restart now.
If you cannot restart the system at this time, click Don't restart and restart the system at your earliest convenience. Only after restarting the system proceed to the following steps of this instruction.
2. Launch File Explorer
To launch File Explorer (Windows Explorer in Windows 7), use the Win + E key combination.
The File Explorer (Windows Explorer) window will open.
3. Launch the network drive mapping wizard
a. Right-click on the Network section in File Explorer.
A context menu will open.
b. Select the Map network drive… menu item.
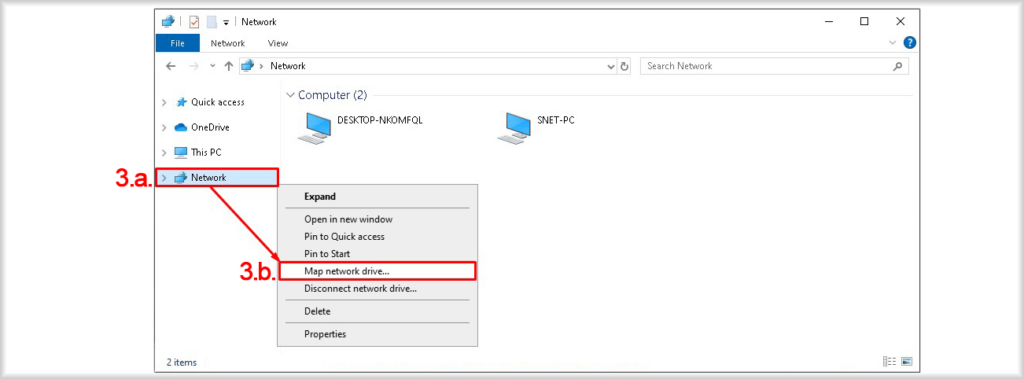
The Map Network Drive window will open.
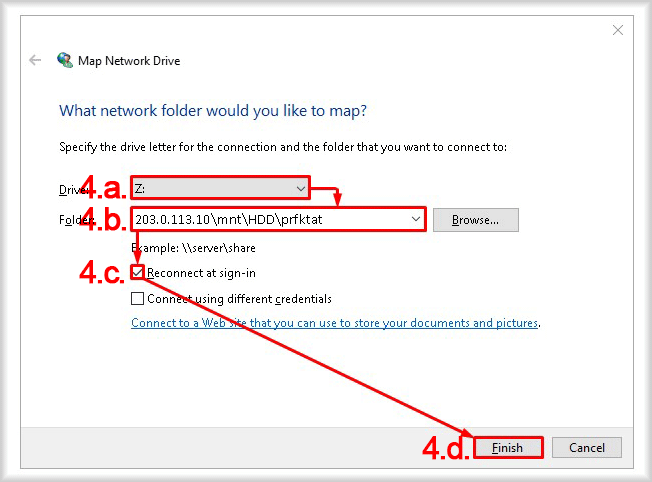
4. Specify the network drive connection parameters
a. Select a drive letter from the Drive list that you want to assign to the disk linked to the cloud data storage.
b. Specify the path in the Folder field.
The details needed to construct the path to the storage will be sent to your email in a notification about the readiness of your cloud storage. Alternatively, you can obtain the required connection details from the Peerobyte cloud storage control panel in your personal account. Instructions for this can be found in Section I “Adding IP Address to Trusted List and Obtaining Connection Details”.
The format of the storage path may vary depending on how you retrieve the connection details:
- If you use the details from the readiness email or the Account Information section's Access Details block (as described in Step 6.a of Section I):
<IP_address>:\mnt\HDD\<Username>
- If you use the details from the NFS Access Details window (as described in Step 6.b of Section I):
<NFS_Path>
Example:
In this example, we copied the value from the NFS Path field in the NFS Access Details window and pasted it into the Folder field, which now appears as:
203.0.113.10:\mnt\HDD\prfktat
c. Check Reconnect at sign-in for automatic reconnection at login, or leave it unchecked if manual reconnection is preferred.
d. Click Finish to add the network drive.
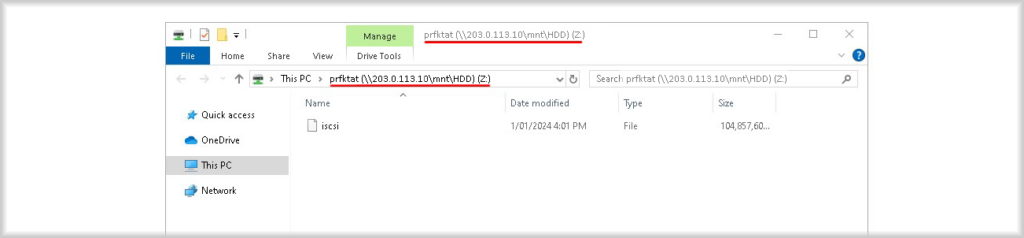
The network drive is now connected, and you can use it like a local drive.
III. Disconnecting the Network Drive
If the network drive is no longer needed, you can disconnect it. This section explains how to do that.
The method described below works for disconnecting drives connected via the NFS protocol as well as any other network drives, regardless of the protocol used.
Steps to disconnect a network drive:
1. Launch Explorer (Windows Explorer) by using the Win + E key combination.
The File Explorer window will open.
2. Right-click on the network drive you want to disconnect.
This will open a context menu with options for the selected network drive.
3. Click on the Disconnect item.
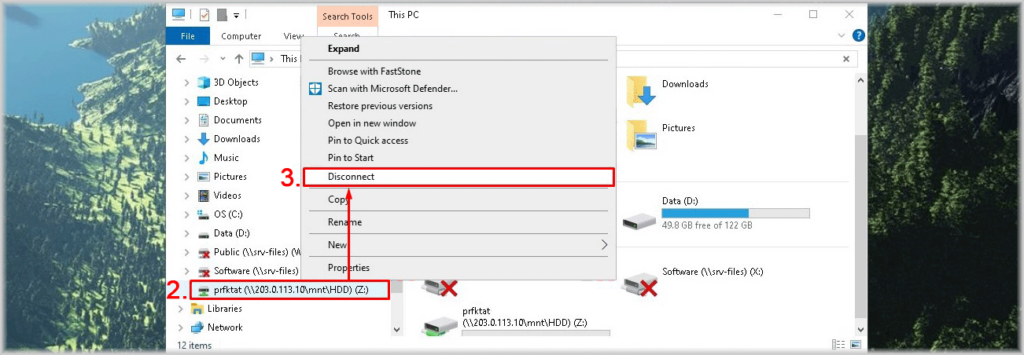
The network drive will be disconnected from your system.