Windows Powershell: Connecting via NFS
This guide explains how to connect Peerobyte cloud storage via the NFS protocol using Windows PowerShell. We’ll cover all setup stages, from adding your device’s IP address to the trusted list and obtaining necessary credentials, to installing NFS client software. The guide will conclude with the steps to connect to cloud storage using the New-PSDrive and Net Use commands.
We will look at the specifics of connecting both desktop and server versions of Windows. In addition, we will look at ways of disconnecting network drives from the system and, of course, outline the basic requirements for successful connection of cloud storage using the NFS protocol.
Prerequisites
- Your system should be running Windows 10/11 Pro, Enterprise, or Education editions, or Windows Server 2016 or newer.
- PowerShell 5.1 or higher must be installed.
- You need a Peerobyte account, including verified email and phone number. See the “Creating an Account” document for details.
- Purchase cloud storage from Peerobyte following the “How to Order Cloud Data Storage” instructions.
- Wait for an email notification from Peerobyte confirming your cloud storage is ready for use.
Adding Your IP Address to the Trusted List and Obtaining Connection Credentials
Before connecting via NFS, add your device’s IP address to the trusted list and obtain the necessary credentials.
1. Finding Your Device's IP Address
To add your IP address to the trusted list, first find your device’s IP using PowerShell:
a. Launch PowerShell
Press Win + X and select Windows PowerShell (Admin) or Windows PowerShell.
b. Retrieve IP Address
Run this command:
(Invoke-WebRequest -uri "http://ifconfig.me/ip").Content|
Alternatively, use:
		$wc = new-object System.Net.WebClient
$ip = $wc.DownloadString("http://myexternalip.com/raw")
$ip
2. Accessing the Peerobyte Control Panel
Log in to the Peerobyte Control Panel:
a. If 2FA is not enabled, refer to “Signing in to the Control Panel”.
b. If 2FA is enabled, refer to “2FA Signing in to the Control Panel”.
3. Selecting the Cloud Storage for Connection
a. Click the Services item on the main menu in the control panel.
The My Products & Services list will open.
b. Select the storage you want to connect to from the Product/Service list by clicking in its row.
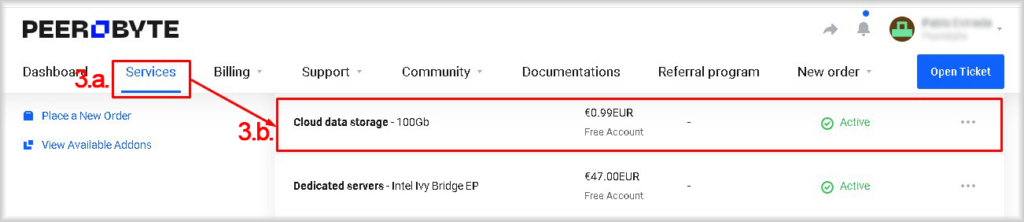
This will take you to the control panel for the cloud storage you selected.
4. Checking NFS Protocol Status
In the Service Management section, check the value in the Status column of the NFS row:
a. If the status is In Use, then the NFS protocol is active and you can proceed to step 5.
b. If the status is Not Used, then enable NFS protocol access to your storage by clicking the Enable button in the NFS row.
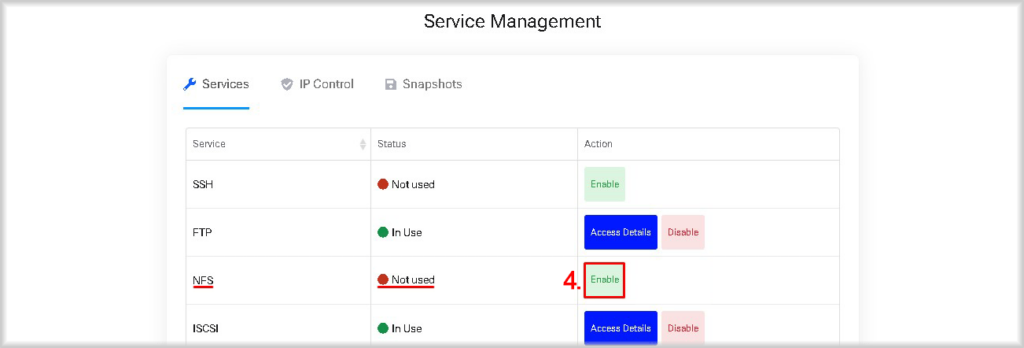
Access to your NFS storage will be enabled and the NFS protocol status will change to In Use.
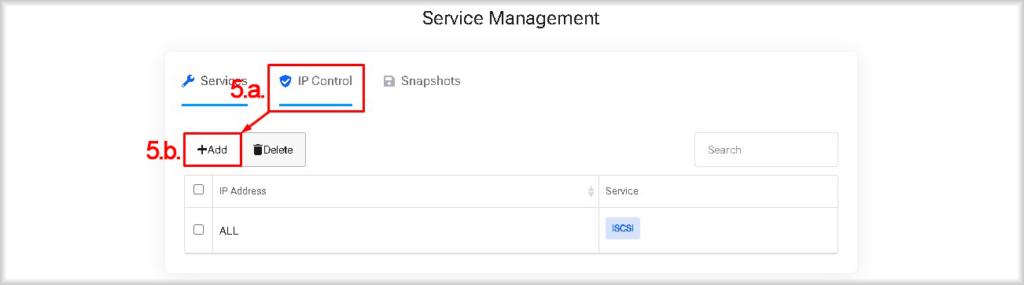
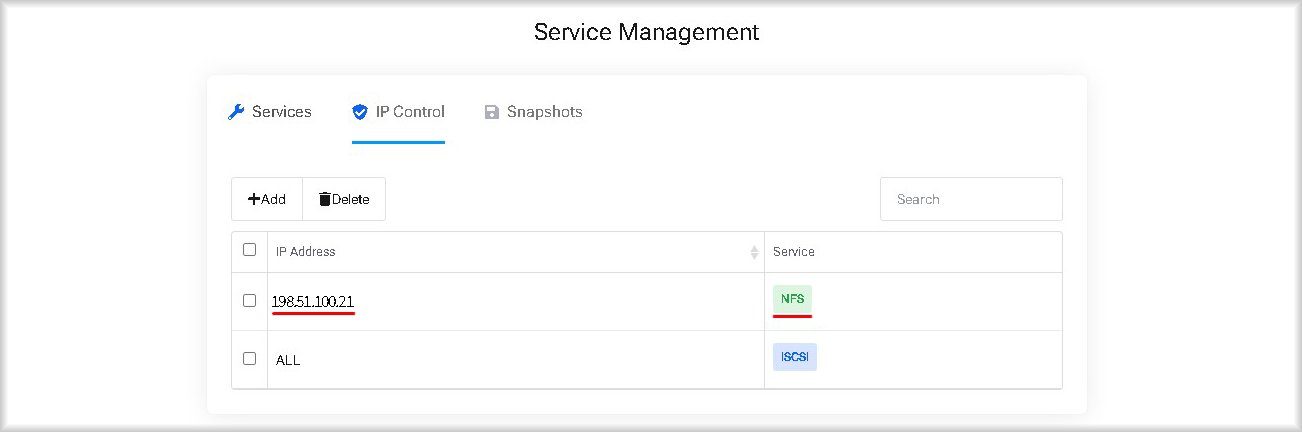
5. Adding Your IP Address to the Trusted List
a. Go to the IP Control tab.
b. Click +Add to open the Add New Allowed IP window.
c. Enter your device’s IP address in the IP Address field.
d. Switch Allow NFS to On.
e. Click Add.
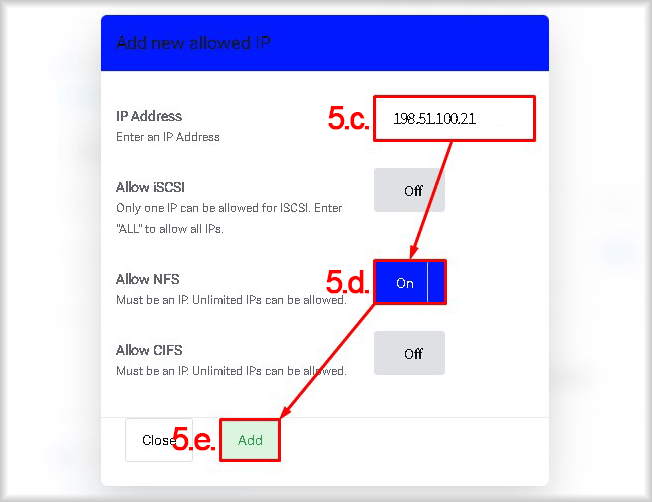
Your IP address will now be listed as trusted for NFS connections.
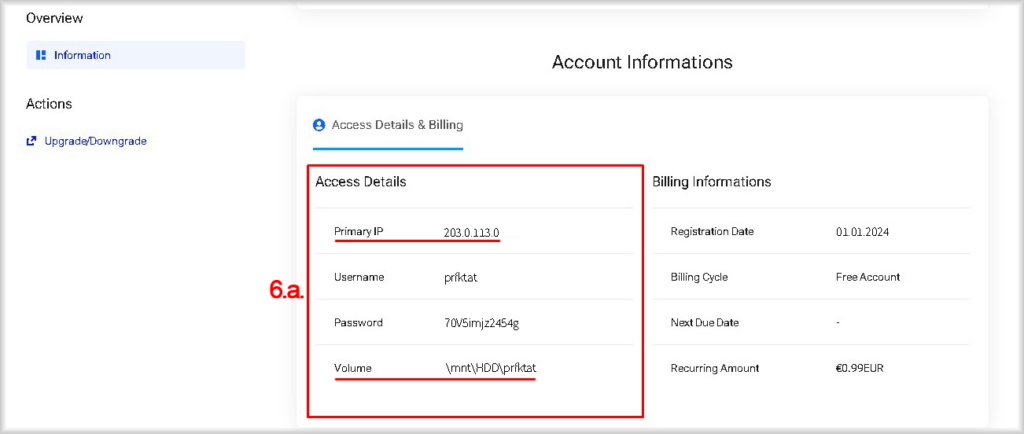
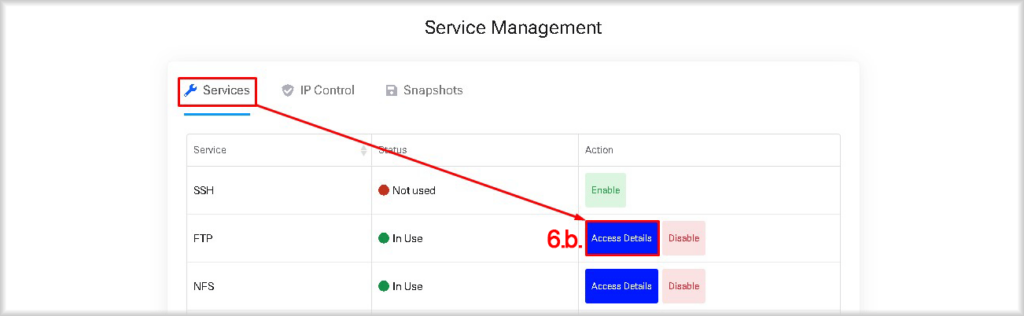
6. Obtaining Connection Credentials
The information required to connect to the storage via NFS protocol: Primary IP and Volume, is sent to your e-mail in the letter informing you that the Peerobyte cloud data storage is ready for operation. You can also obtain this information in the following ways:
a. In the Access Details section of the Account information block.
b. Or you can obtain the information by clicking the Access Details button in the NFS row of the Services tab of the Services tab of the Service Management block.
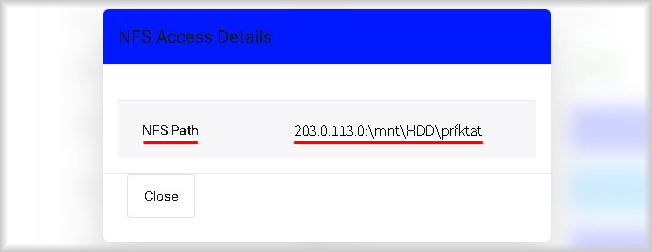
This will open the NFS Access Details window, where the NFS Path line will show the path for your storage connection, which is the union of the data from the Primary IP and Volume.
Installing NFS Client Software
To work with cloud storage using the NFS protocol, you need to install and configure the NFS client. We will show you how to install the NFS client on desktop and server versions of Windows, as well as using the DISM deployment system.
Run PowerShell as an administrator before performing the NFS client installation steps to avoid access restrictions.
Installing the NFS Client on Windows 10/11
1. Checking for NFS Client
Verify that the system has an NFS client by running the command:
Get-WindowsOptionalFeature -Online | Where-Object { $_.FeatureName -like "*NFS-Client*" }
This command will check for the presence of the ServicesForNFS-ClientOnly component and display its status (Enabled or Disabled) if it is installed. Next steps depend on the command result:
- If the component is installed and has a status of Enabled, proceed to the section "Connecting to Cloud Storage via NFS".
- If the status is Disabled, go to Step 3: Starting the NFS Client.
- If the component is not found, continue with Step 2 to install it.
2. Installing NFS Client
If the component ServicesForNFS-ClientOnly does not appear when checking for its presence, install it by running the command:
Add-WindowsCapability -Online -Name "NFS.Client~~~~0.0.1.0"
This command will install the necessary component and display information regarding the need for a restart:
- If the RestartNeeded parameter is False, proceed to step 3: "Starting the NFS Client".
- If the RestartNeeded parameter is True, save any unsaved data and restart the system using the command:
Restart-Computer
3. Starting the NFS Client
If the NFS client is installed but has a Disabled status, activate it by running the following command:
Enable-WindowsOptionalFeature -Online -FeatureName "ServicesForNFS-ClientOnly" -All
This command will start the NFS client as a service and display whether a system restart is required:
- If the RestartNeeded parameter is False, proceed to the section “Connecting to Cloud Storage via NFS Protocol”.
- If the RestartNeeded parameter is True, save any unsaved data and restart the system using the command:
Restart-Computer
After the restart (if needed), the NFS client will be ready to use and available for connecting to NFS storage.
Installing the NFS Client on Windows Server
1. Checking for the NFS Client
Check if the NFS client is available on your system by running the following command:
Get-Service -Name NfsClnt
The command’s result will show the status of the NFS client. Follow one of these scenarios based on the status:
- If the NFS client is present and its status is Running, proceed to the section “Connecting to Cloud Storage via NFS Protocol”.
- If the NFS client status is Stopped or Paused, continue to step 3: “Starting the NFS Client”.
- If you see the error message “Cannot find any service with service name 'NfsClnt' ” proceed to step 2 to install the NFS client.
2. Installing the NFS Client
Install the NFS client component by running the command:
Get-Service -Name NfsClnt
This command will install the required component and indicate if a system restart is necessary:
- If the Restart Needed column displays No, proceed to step 3: “Starting the NFS Client”.
- If the Restart Needed column displays Yes, save all unsaved data and restart the system with the command:
Restart-Computer
3. Starting the NFS Client
If the NFS client was just installed or its status is Stopped or Paused, start it by running the command:
Set-Service -Name NfsClnt -StartupType Automatic
This command will start the NFS client and set it to start automatically.
Installing the NFS Client Using the DISM Deployment Tool
To install the NFS client on both server and desktop versions of Windows, you can use the DISM deployment tool.
1. Checking for the NFS Client
Check for installed components depending on your operating system.
For Desktop Versions of Windows:
Check for the presence of the NFS client by running the following command:
Get-WindowsOptionalFeature -Online | Where-Object { $_.FeatureName -like "*NFS-Client*" }
This command will check for the ServicesForNFS-ClientOnly component and display its status (Enabled or Disabled) if installed. The next steps depend on the command's output:
- If the component is installed and the status is Enabled, proceed to the section "Connecting to Cloud Storage via NFS Protocol".
- If the component status is Disabled, go to step 3: "Starting the NFS Client".
- If the component is not found, proceed to step 2 to install the NFS client.
For Server Versions of Windows:
Check for the presence of the NFS client by running the following command:
Get-Service -Name NfsClnt
The command's result will show the NFS client status. Follow one of these scenarios based on the result:
- If the NFS client is present and its status is Running, proceed to the section "Connecting to Cloud Storage via NFS Protocol".
- If the NFS client status is Stopped or Paused, continue to step 3: "Starting the NFS Client".
- If the error “Cannot find any service with service name 'NfsClnt'” appears, proceed to step 2 to install the NFS client.
2. Installing the NFS Client
To install the NFS client, use the command:
DISM /Online /Enable-Feature /FeatureName:ServicesForNFS-ClientOnly /All
After installation, DISM may display a message indicating the need for a system restart:
		The operation completed successfully.
A restart is required to complete the operation.
Do you want to restart the computer now? (Y/N)
If you see this message, you can:
- Restart the computer immediately by pressing Y on the keyboard.
- Postpone the restart by pressing N. In this case, save any unsaved data, finish important tasks, and then execute the restart command:
Restart-Computer
If a restart is not required or has already been completed, proceed to step 3: "Starting the NFS Client".
3. Starting the NFS Client
If the NFS client status is Stopped or Paused, or if the client was just installed, start the NFS client as a service by running the command:
Set-Service -Name NfsClnt -StartupType Automatic
This command will start the NFS client as a service and configure it to start automatically at system boot.
Connecting to Cloud Storage via NFS Protocol
In this section, we’ll cover how to connect cloud storage via the NFS protocol as a network drive using PowerShell commands: New-PSDrive and Net Use.
Before Connecting
Ensure that:
- Your device’s IP address is added to the trusted list for the cloud storage.
- You have the credentials to connect to the NFS-based storage.
- The NFS client is installed and running on your device.
If any of these actions haven’t been completed, follow the instructions in the relevant sections above before proceeding.
1. Launching PowerShell
To connect to cloud storage, choose the appropriate permission level to launch PowerShell—either as an administrator or as a regular user, depending on your needs:
a. Launching as a User
Use regular permissions if:
- The network drive should be accessible to all user applications, including File Explorer.
- The drive should be visible to all users without requiring administrative rights.
b. Launching as Administrator
Launch PowerShell with administrative rights if:
- The drive is needed for administrative tasks or programs requiring elevated permissions.
- You plan to limit drive visibility to administrative tasks only.
To launch PowerShell, press Win + X and select:
- PowerShell for regular permissions.
- PowerShell (Admin) for administrator access.
2. Connecting a Network Drive
Connecting a Network Drive with the New-PSDrive Command
To connect cloud storage as a network drive, use the command:
New-PSDrive -Name <Drive_Letter> -PsProvider FileSystem -Root <NFS_Storage_Path> [-Persist]
Where:
-Name <Drive_Letter> - specifies the letter to assign to the network drive in the system (without the “:” colon).
-PsProvider FileSystem - indicates that a file system is being connected.
-Root <NFS_Storage_Path> - specifies the UNC path to the network resource. You will receive the necessary details for <NFS_Storage_Path> via email when your cloud storage is ready, or you can find the connection details in the Peerobyte cloud storage control panel. See step 6 in the “Adding IP Address to Trusted List and Obtaining Connection Credentials” section of this guide for instructions.
Depending on how you received the connection details, <NFS_Storage_Path> may be structured as follows:
- If using details from the setup email:
\\<IP_address>\mnt\HDD\<User_Name>
- If using details from the Account information section under Access Details:
<Primary_IP><Volume>
- If using the NFS Access Details:
\\<NFS_Path>
In this case, remove the “:” colon from <NFS_Path> for proper processing.
-Persist makes the connection persistent and visible in File Explorer (if PowerShell is launched as a regular user). Note that in desktop versions, the -Persist parameter may not always work reliably, and the connection may not be retained after a system reboot.
For more details on the New-PSDrive command, see “New-PSDrive Command Documentation”.
Example of the New-PSDrive сommand and output:
		PS C:\Windows\system32> New-PSDrive Z -PSProvider FileSystem -Root \\203.0.113.0\mnt\HDD\prfktato -persist

Name           Used (GB)     Free (GB) Provider      Root                                               CurrentLocation
----           ---------     --------- --------      ----                                               ---------------
Z                                      FileSystem    \\203.0.113.0\mnt\HDD\prfktato

PS C:\Windows\system32>
You can check if the network drive is connected by using:
Get-PSDrive
Connecting a Network Drive with the Net Use Command
The Net Use command is a legacy Windows command-line option that predates New-PSDrive. Although officially unsupported in Windows 10, Windows Server 2016, and later versions, it often still works on these versions.
The syntax for connecting cloud storage is:
Net Use <Disk_Letter>: <NFS_Storage_Path> [/persist:<yes|no>]
Where:
<Disk_Letter> - specifies the letter to assign to the network drive (with the colon :).
<NFS_Storage_Path> - is the UNC path to the network resource. You’ll receive the necessary details for <NFS_Storage_Path> via email when your cloud storage is ready, or you can find the connection details in the Peerobyte cloud storage control panel. See step 6 in the “Adding IP Address to Trusted List and Obtaining Connection Credentials” section of this guide for instructions.
Depending on how you received the connection details, <NFS_Storage_Path> may be structured as follows:
- If using details from the setup email:
\\<IP_address>\mnt\HDD\<User_Name>
- If using details from the Account information section under Access Details:
\\<Primary_IP><Volume>
- If using the NFS Access Details:
\\<NFS_Path>
In this case, remove the “:” colon from <NFS_Path>; otherwise, the path will be processed incorrectly.
[/Persist:<yes|no>] determines the persistence of the connection. Yes retains the connection after reboot, while No makes it temporary.
For more details on the Net Use command, see “Net Use Command Documentation”.
Example of the Net Use command and output:
		PS C:\Windows\system32> net use Z: \\203.0.113.0\mnt\HDD\prfktato /persistent:yes
Enter the user name for '203.0.113.0': prfktato
Enter the password for 203.0.113.0:
The command completed successfully.
PS C:\Windows\system32>
When running this command, you will need to enter the cloud storage username and password, pressing Enter after each entry.
Now, the network drive is ready for use.
Disconnecting Cloud Storage
This section explains how to disconnect a network drive associated with cloud storage using PowerShell.
1. Launching PowerShell
To remove the network drive, launch PowerShell with the same permissions that were used when connecting the drive. If the drive was connected with administrator rights, use PowerShell (Admin). If it was connected with user rights, start PowerShell accordingly.
To launch PowerShell, press Win + X and select the appropriate menu options:
- PowerShell — for user-level access.
- PowerShell (Admin) — for administrator access.
2. Disconnecting the Drive from the System
When you disconnect the drive, data on it is preserved, but access to it will be closed for the system.
Disconnecting the Drive with the Remove-PSDrive Command
To disconnect the network drive, use the following command:
Remove-PSDrive -Name "<Drive_Letter>" -Force
Where:
<Drive_Letter> is the letter assigned to the drive you wish to disconnect, without the colon.
-Force forcefully disconnects the network drive, even if it is in use.
For more information about the Remove-PSDrive command, see “Remove-PSDrive Command Documentation”.
Example: To disconnect the drive connected by the New-PSDrive command above, we used the following command:
Remove-PSDrive -Name "Z"
If Remove-PSDrive does not work (e.g., after a system restart), use the Net Use command with the /delete parameter.
Disconnecting the Drive with Net Use /delete:
Although the Net Use command is not officially supported in operating systems later than Windows Server 2012 and Windows 8, it may still work.
To disconnect the network drive, use the following command:
Net Use <Drive_Letter>: /delete
Where:
<Drive_Letter> - is the letter assigned to the network drive you wish to disconnect.
/delete - specifies that the network drive should be removed from the system.
For more information about the Net Use command, see “Net Use Command Documentation”.
Example: To disconnect the drive connected by the New-PSDrive command above, we used the following command:
Net Use Z: /delete