How to Order Cloud Data Storage
Here we will review the procedure for ordering cloud data storage.
Prerequisites
1. You must have a Peerobyte account registered according to the Instructions.
2. You must be able to pay the service by bank card or bank transfer.
3. You must log in to your account on the Peerobyte website or log in to the control panel of your account:
- a. If 2FA (Two-Factor Authentication) is not enabled, follow the Login Instructions.
- b. If 2FA is enabled, follow the Login Instructions for 2FA.
Instructions
How to get to the cloud storage ordering page
From Peerobyte's control panel
1. Select the New order main menu item in the Peerobyte control panel.
A drop-down menu will appear showing the products available for ordering.
2. Select the Cloud Data Storage menu item.
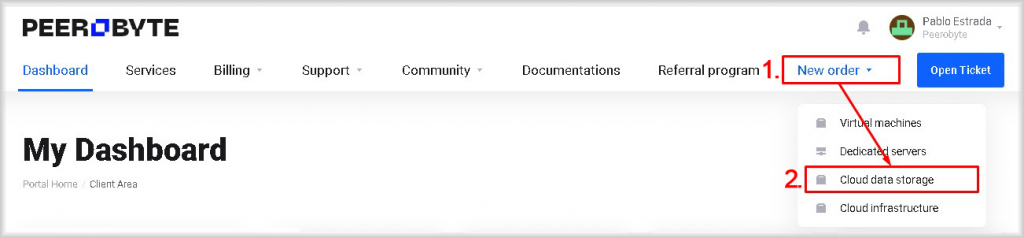
You will be redirected to the Cloud Data Storage page where you can order storage.
From the Peerobyte website
1. Select the Products main menu item in the Peerobyte control panel.
A drop-down menu will appear, displaying the product categories available for ordering.
2. Select the Cloud Storage item from the Products menu.
A list of products under that category will be displayed.
3. Select the Cloud Data Storage submenu item.
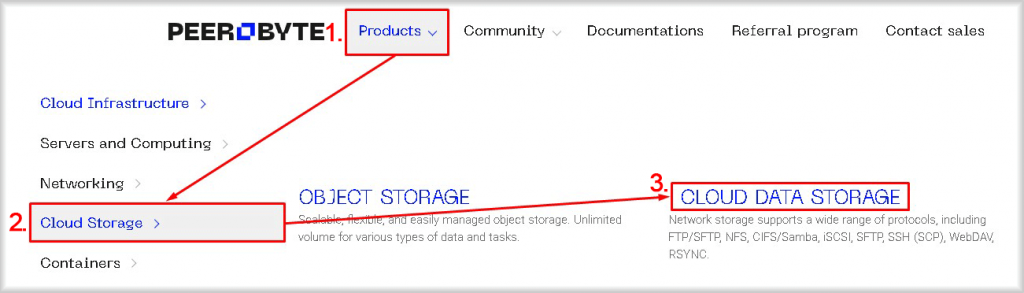
You will be redirected to the Cloud Data Storage page where you can order storage.
Placing an order for cloud data storage
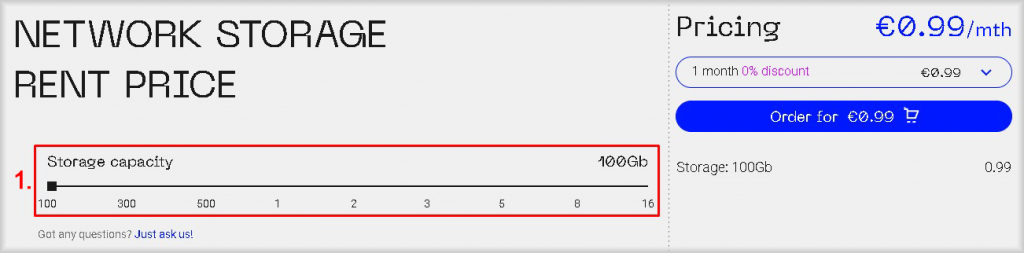
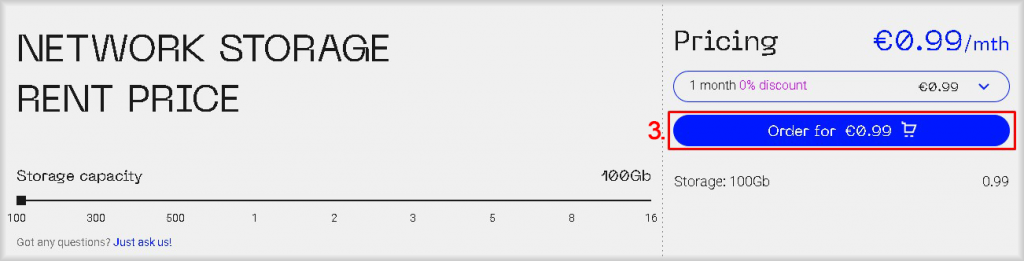
1. By moving the Storage Capacity slider, select the size of the storage you need.
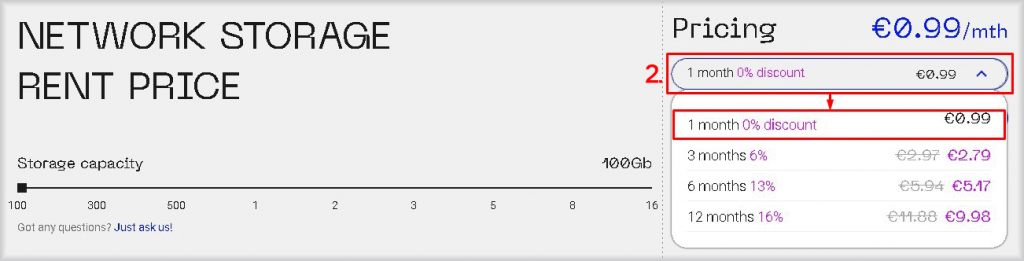
2. Select the duration of the payment period by clicking on the corresponding field and selecting the appropriate duration of the payment period from the drop-down list.
The longer the payment period is selected, the cheaper the cost of one month of service usage will be.
3. Click the Order for... button.
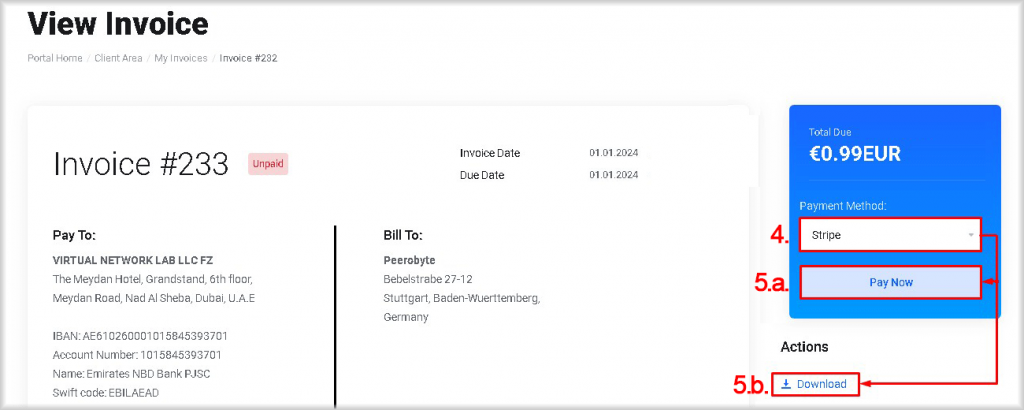
A confirmation of the order will be sent to your email and you will be redirected to the View Invoice page to pay your cloud storage bill.
If there are sufficient funds in your Peerobyte account to pay for the order, they will be automatically charged and the status of the invoice will change to Paid. You are not required to make such an invoice payment, and you may proceed directly to step 11 of these instructions.
4. In the opened View Invoice window select the payment method: Stripe or Bank transfer.
5. Proceed to payment:
- а. If you have selected Stripe payment method, click Pay Now. This will open the Checkout window for making payments.
- b. If you have selected the Bank Transfer payment method, click Download. A window will open to save the bill. Save the invoice, pay it, and go directly to step 11 of these instructions.
6. On the Checkout page, select a cardholder from the Billing address list or create a new cardholder.
To create a new cardholder, select Add new billing address from the Billing address list and fill in the opened fields: First Name, Last Name, Address 1, Address 2, City, Country, State/Region, Zip Code, Phone Number.
7. Enter your bank card number in the Card Number field.
8. In the Expiry Date field specify the expiration date of the card in MM/YY format.
9. Fill in the CVV/CVC2 field with the corresponding bank card values.
10. Check the correctness of the entered data, correct errors, if any, and click the Make payment button.
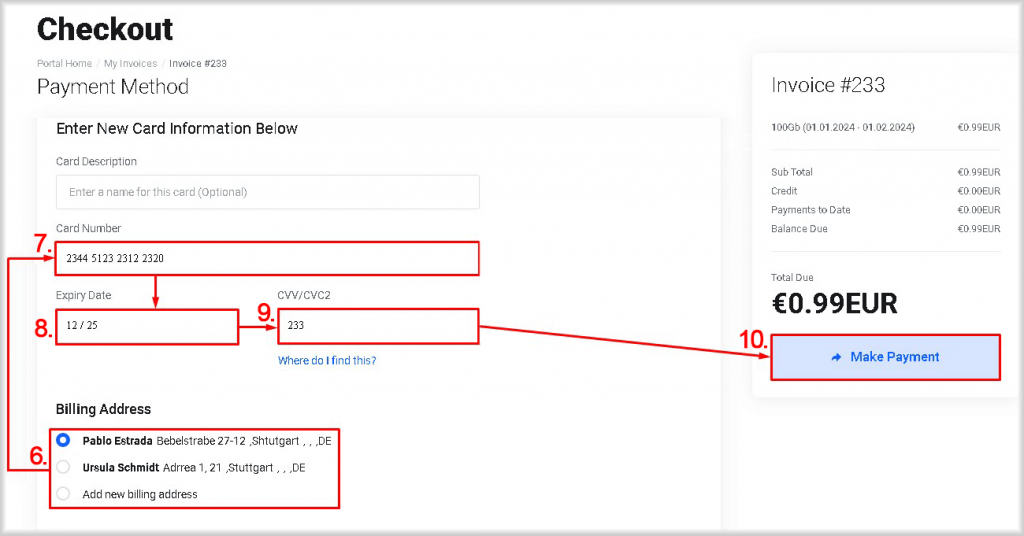
Your card will be charged the amount specified in the Total Due field and automatic debiting will be activated at the end of each subsequent payment period and until you cancel the use of the storage.
11. Expect to receive an email notification that your cloud storage is ready for use, which will be sent to the email address specified during account registration.
The storage readiness letter will contain information for connecting your storage.
If you are ordering products or services from Peerobyte for the first time, you may receive a call from our manager before access is granted.