Virtual Machine Control Panel
In this section, we'll delve into the virtual machine's control panel, identifying the range of actions it enables and the types of information that can be accessed through it.
Prerequisites
1. You must have a Peerobyte account registered according to the Instructions.
2. You must order a virtual machine according to the Instructions.
3. You should receive an email from Peerobyte stating that the machine you ordered is ready for use.
4. You must log in to the Peerobyte control panel:
- a. If 2FA (Two-Factor Authentication) is not enabled, follow the Login Instructions.
- b. If 2FA is enabled, follow the Login Instructions for 2FA.
Access to the Virtual Machine Control Panel
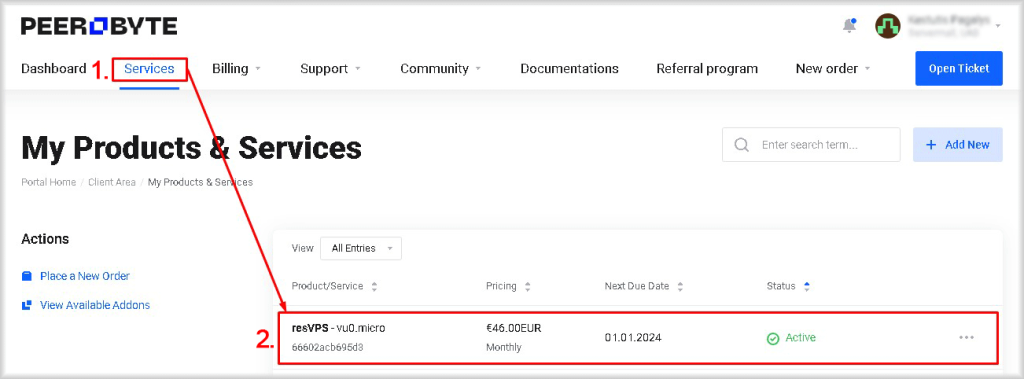
To access the control panel of the virtual machine, follow these steps:
1. Select the Services menu item.
The My Products & Services window will open.
2. Click on the virtual machine to which you want to gain control panel access.
The control panel for the virtual machine will open.
1. Service Actions
In the Service Actions section, you can perform the following operations on the virtual machine:
a. Start - Start the virtual machine.
When you click the Start button, a window will open where you need to confirm your intention to start the virtual machine by clicking the Start button. After clicking the Start button, the virtual machine will be turned on and its operating system will start loading. The Start button button is available only when the machine has the Stopped status.
b. Stop - Shutdown the virtual machine.
When you click the Stop button, a window will open in which you should confirm your intention to stop the machine by clicking the Stop button. After clicking the Stop button, the virtual machine will shut down and the Start button will appear on the control panel. The Stop button is available only when the machine has the Running status.
c. Reboot - Perform a reboot of the virtual machine instance.
When you click the Reboot button, a window will open where you need to confirm your intention to reboot the virtual machine instance by clicking the Reboot button. After pressing the Reboot button, the virtual machine instance will be rebooted. The Reboot button is available only when the virtual machine's status is Running.
d. Reinstall - Allows you to reinstall your virtual machine using the same operating system image.
When you click the Reinstall button, a window will open where you need to confirm your intention to reinstall the instance's operating system by clicking the Confirm button. After clicking Confirm, the operating system of the virtual machine will be reinstalled. Reinstalling the OS will erase all data on the virtual machine.
e. Console - Launches the management console of the virtual machine's operating system.
Using this console, you can work with the virtual machine as if you were sitting in front of a monitor and keyboard directly connected to a physical computer. To connect, you will need the username and password that were sent to you in an email from Peerobyte, notifying you that the virtual machine is ready for operation.
Using the console requires opening a new window in your browser, an action that is often blocked by browsers and may require adding the site peerobyte.com to the list of sites allowed to show pop-up windows.You can access the virtual machine using Console only if the virtual machine status is Running.

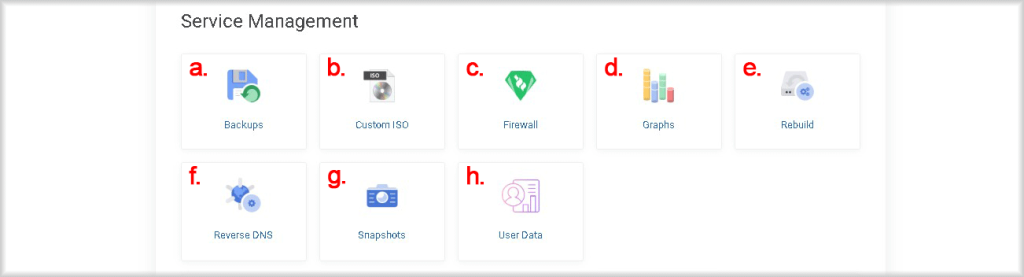
2. Service Management
In this section, you can perform the following operations on the virtual machine:
a. Backup - Allows users to create, view, and restore backups of the virtual machine data.
Backups can be used to recover data in case of loss or damage. Restoring a virtual machine from a backup will overwrite the current state of the virtual machine and all data on it.
Detailed instructions on working with backups are provided in the Virtual machine backup management guide.
b. Custom ISO - Allows you to connect one of the images we added to the virtual machine.
Here are recovery, diagnostic and system management tools for system administrators and experienced users. Mounting a customized ISO will require a reboot of the machine.
c. Firewall - Allows you to filter traffic based on criteria you specify.
You can set traffic filtering rules depending on IP type, protocol, network port number and traffic source. In general, we recommend using this functionality to close unused network ports and protocols, limit the IP addresses accepted by the target audience and trusted traffic sources. You can set up to a maximum of 50 firewall rules.
d. Graphs - Allows you to display a graph of changes in the average daily volume of incoming and outgoing traffic of the virtual machine.
e. Rebuild - Allows you to rebuild a virtual machine using an operating system image of your choice.
Clicking the Rebuild button opens a window where you can select the operating system image to rebuild the virtual machine. You can make your selection by clicking the button to the right of the name of the selected operating system image (Rebuild) and a confirmation window will open. Confirm your intention by clicking the Confirm button. During the recreation process, all data on the virtual machine will be lost and the password for logging into the virtual machine OS will change.
f. Reverse DNS - Allows you to map an IP address to a domain name.
Reverse DNS (rDNS) is the opposite of normal DNS, which maps domain names to IP addresses. Here you can change the mapping of an IP address to DNS and add such a mapping for IPv6 if such an address is obtained for your virtual machine and is not already mapped to DNS.
g. Snapshots - Allows creating instant snapshots of the current state of the virtual machine, including all data, applications, and settings.
These Snapshots can be used for quick system recovery to the previous state of the virtual machine in case of problems. After creating a snapshot, you can restore the virtual machine state from it, change its description, or delete it. Storing snapshots is charged separately per gigabyte according to Peerobyte's tariffs.
h. User Data - Allows you to configure a script that automates the process of virtual machine configuration.
User Data allows you to specify your own Cloud-init script to configure a virtual machine when it is created and recreated, which can be useful for software customization and other automation tasks. User Data supports Smarty variables such as '{$password}'. The list of supported variables and their descriptions are provided below.
| Variable Name | Description |
| serviceid | The unique ID of the service. Database Field: tblhosting.id |
| userid | The unique ID of the account that owns the service. Database Field: tblclients.id. |
| pid | The product ID for the service. Database Field: tblproducts.id |
| serverid | The assigned server ID for the service. Database Field: tblservers.id |
| domain | The domain entered by the customer when ordering. Database Field: tblhosting.domain |
| username | Username generated for the service. (defaults to first 8 letters of the domain) Database Field: tblhosting.username |
| password | Password generated for the service. (10 char generated on first creation consisting of letters & numbers, both upper & lowercase). Database Field: tblhosting.password |
| producttype | The product type which can be one of hostingaccount, reselleraccount, server or other. |
| moduletype | The module name (will match filename of module). |
| configoptionX | with X being from 1 to 24. These fields contain the module settings for the product defined in the ConfigOptions function. |
| clientsdetails | Contains an array of all client details service owner. This contains things like firstname, lastname, email, address1, country, etc… |
| customfields | Contains an array of all custom fields defined on the product. The key is the custom field name - $params[‘customfields’][‘Field Name’]. |
| configoptions | Contains an array of all the configurable options defined on the product. Again the key being the option name in this case - $params[‘configoptions’][‘Option Name Here’]. |
| server | true/false - Is the product assigned to a server. |
| serverip | The IP Address of the selected server. |
| serverhostname | The Hostname of the selected server. |
| serverusername | The Username of the selected server. |
| password | The Password of the selected server. |
| serverpassword | The Password of the selected server. |
| serveraccesshash | The Access Hash of the selected server. |
| serversecure | true/false - Is an SSL connection enabled in the Server Configuration. |
| serverport | The server port if module supports override with custom port |
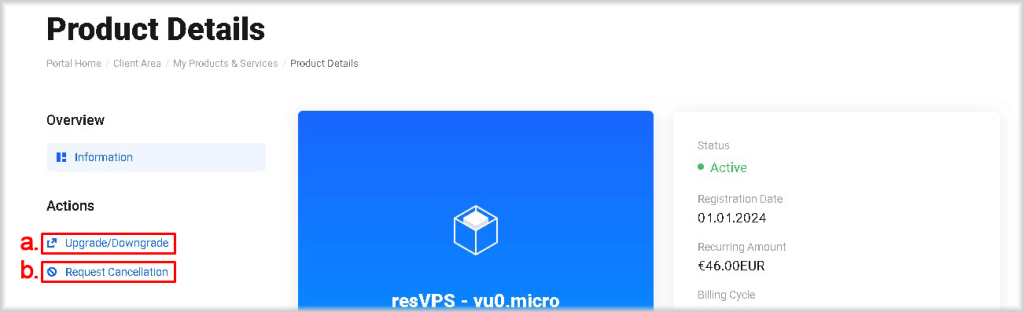
3. Reconfiguration & Cancelation Actions
a. Upgrade/Downgrade - Allows you to change the configuration of the virtual machine.
When you click the Upgrade/Downgrade button, a window will open where you need to select a new configuration for your virtual machine by clicking the Choose Product button in the block with the selected configuration. A confirmation window will then open where you need to choose a Payment Method: Credit Card or Bank Transfer, and enter a Promotional Code, if available, and then click the Confirm button. If you choose the Credit Card payment method, you will be redirected to the payment page to pay by card. If you choose the Bank Transfer method, an invoice will be issued to you.
b. Request Cancellation - Allows you to cancel the use of a virtual machine.
When you click the Request Cancellation button, a window will open where you must confirm your intention to cancel the service by clicking the Confirm button. Additionally, you will need to specify when the service should be canceled: immediately or at the end of the current billing period.
After canceling the service, the virtual machine data may be completely deleted. Cancellation of the service will cancel the automatic debit from the card or Peerobyte account at the end of the payment period.
Information
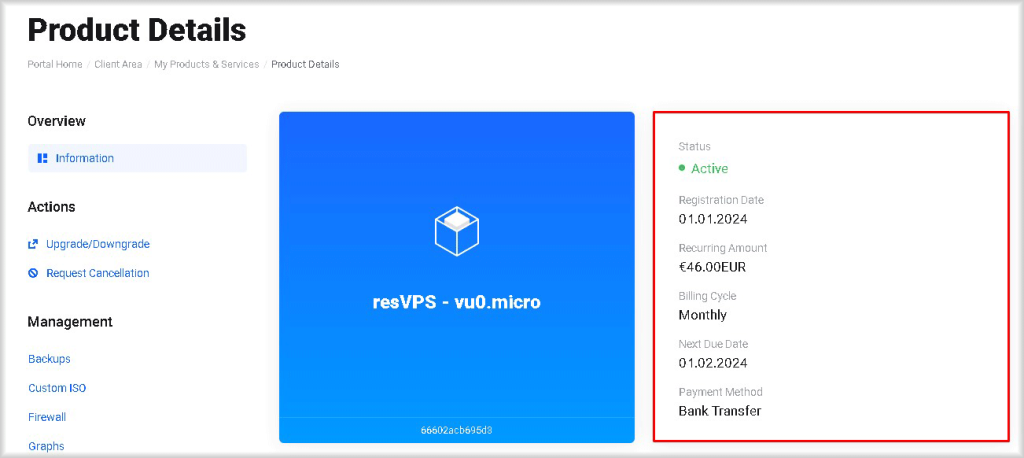
On the virtual machine control panel, you can find the following information:
Billing Information
Service Status - The current state of the service:
- Active - The service is fully operational.
- Pending - The service is paused until initial payment is received or a decision is made by the manager.
- Completed - The provision of service has been completed by mutual agreement.
- Suspended - The provision of service is suspended due to overdue payment. If the payment is overdue for more than 14 days, the data related to the service will be deleted.
- Deleted - The service is deleted. There is a possibility of restoring the service and data from this state if you contact the support service via the ticket system in time.
- Canceled - The service is canceled. There is a possibility of restoring the service and data from this state if you contact the support service via the ticket system in time.
- Fraud - The service is suspended due to suspicions of illegal activity.
Registration Date - The date when the service began.
Renewal Amount - The amount required for the renewal of the virtual machine for the next billing period.
Billing Cycle - The billing period you have set.
Next Payment Date - The date by which the next period's payment must be made to maintain server functionality.
Payment Method - The payment method you chose when obtaining the service:
Credit Card - For individuals and payment by bank card.
Bank Transfer - For legal entities and payment through the company's bank account.
Instance Details
Status - The current state of the virtual server:
- Running - The virtual machine is running.
- Stopped - The virtual machine is stopped.
- Locked - The virtual machine is locked, this happens during the process of rebuilding or reinstalling the virtual machine, or during an upgrade.
- Error – The server is in an error state. In this case, it is necessary to contact support through our ticket system.
- Undefined - The server's status is not determined. This status can occur during the deletion of a virtual machine or if something goes wrong. In this case, it is necessary to contact support through our ticket system.
Password - Password to authenticate the administrator (superuser) in the virtual machine's operating system.
Operating System - The operating system image installed on the virtual machine.
Region - The availability zone where the virtual machine is located.
CPU - The number of virtual CPU cores used by the virtual machine.
RAM - The memory capacity used by the virtual machine.
Storage - The storage capacity used by the virtual machine.
DDOS Protection - State of the distributed denial-of-service (DDoS) mitigation service.

Public Network IPv4
Main IP Address - IPv4 addresses assigned to the virtual machine.
Netmask - Determines which part of the IP address belongs to a subnet and which device IP addresses are part of that subnet.
Gateway - Specifies the router through which the virtual machine will go outside the local network.

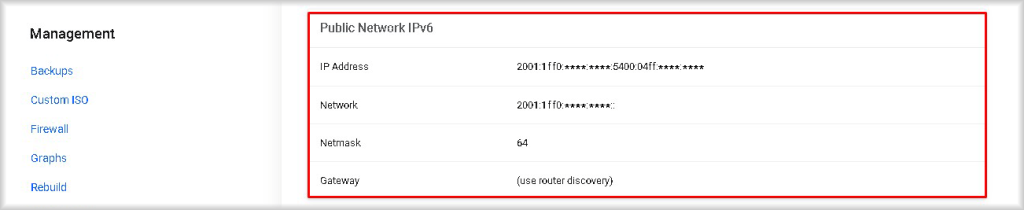
Public Network IPv6
IP Address - IPv6 addresses assigned to the virtual machine.
Network - The base address of the network to which the virtual machine belongs.
Netmask - determines which part of the address belongs to the network and which part to devices within that network.
Gateway - Specifies the router through which the virtual machine will go outside the local network.
Hosting Information
Domain - This is a unique identifier for the virtual machine instance. It can be used when communicating with support, when you need to mention a specific virtual machine in a support request for another product or service.

Configurable Options
Products - IP addresses assigned to the virtual machine upon creation.
Region - Additional IP addresses assigned to the virtual machine.
DDoS Protection - Indicates whether the DDoS protection option is enabled.
IPv6 - Indicates whether the virtual machine's additional IPv6 address option is enabled.
Backups - Indicates whether the backup option is enabled.
