
Quick Start in Cloud Infrastructure
In this section we will demonstrate, by way of examples, how to deploy a basic infrastructure on the Peerobyte cloud using the cloud infrastructure control panel (the cloud console). We will cover the following operations:
- Creating and importing a key pair;
- Creating an instance;
- Allocating a public IP address from the pool and associating it with the instance;
- Creating and attaching an additional volume to the instance;
- Connecting to the instance for further administration.
Prerequisites
- Peerobyte account
You must have a registered account in the Peerobyte Customer Portal. See “Creating an Account” for details. - “Cloud Infrastructure” service activated
Before you begin, order the “Cloud Infrastructure” service through your Peerobyte customer portal and wait for confirmation of its activation. You will receive notification by e-mail or within the customer portal when the infrastructure is ready. - Log in to the cloud console
Sign in to the cloud console as a user. For instructions, see “Logging in to the Cloud Infrastructure Control Panel”.
I. Adding a Key Pair
To create an instance you will need a key pair. Here we show how to create or import a key pair into your project.
Creating a Key Pair
- In the cloud console, go to Compute → Key Pairs, then click Create Keypair.
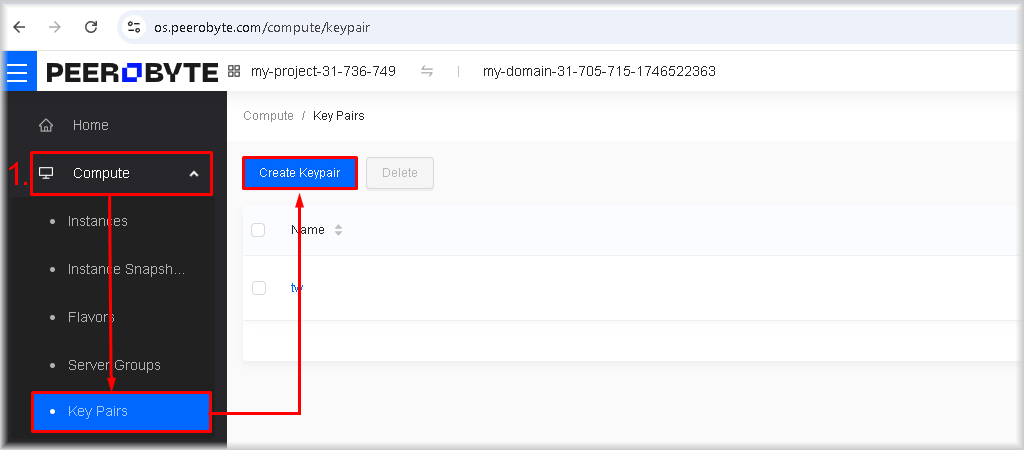
The key pair creation window will open. - Click Create Keypair.
- In the Name field, enter a unique name for your key pair.
- Click OK.

A dialog will open prompting you to save the private key. - Download and store the private key locally.
Important: Store the private key in a secure, access-controlled vault to prevent compromise. If leaked, an attacker gains full control of your resources and can modify settings or steal data.
The key pair will appear in your project’s list of key pairs.
Importing a Public Key
- In the cloud console, go to Compute → Key Pairs, then click Create Keypair.

The key pair import window will open. - Click Import Keypair.
- In Name, enter a unique name for this key pair.
- Click Load from local files if your public key file is stored locally.
Alternatively, you can paste the contents of the public key into the Public Key field and proceed to step 6.
A dialog box will open for you to select and upload your public key. - In the file-selection dialog, choose your public key file.
- Click OK.

The public key will be imported and listed among your project’s key pairs.
II. Creating an Instance via the cloud console
In this section we cover how to create an instance in the Peerobyte cloud via the cloud console.
- Launch the instance-creation wizard
Navigate to Compute → Instances and click Create Instance.
- Select a flavour
Choose the instance type based on the required number of virtual CPUs and RAM. Click the row of the desired flavour.
In the right-hand pane you’ll see your project’s quota usage. Green indicators for CPU Quota and Memory (GiB) Quota confirm you are within limits.
If you see “Insufficient Memory / CPU quota to create…”
This means your quotas are too low for that flavor. You may either request a quota increase from Peerobyte support or choose a smaller flavour.
- Select an operating system
Under Operating System, pick the desired distribution and then the specific version.
- Configure the system disk
In System Disk, choose a disk type (All-Flash or Hybrid) and enter its Size.
Note: The system-disk size must exceed both the Image Size of your chosen OS and the Min System Disk requirement.
- Add additional volumes (optional)
If you need extra disks, click Add Data Disk in the Data Disk section as many times as required. For each disk, select the type from the Type list (All-Flash or Hybrid) and specify the volume size in the Size field.
- Proceed to configuring network parameters
Click Next: Network Config once the basic instance parameters have been set.
- Choose the instance network
In Networks → Current Project Networks, select the network in which the instance will run by clicking its row. Normally, each project has a single network created automatically.
- Select a security group
In Security Group, choose the required group by clicking its row. This group is created automatically for every project and can be altered if required.
- Proceed to configuring system parameters
Click Next: System Config in the bottom-right corner after setting the network parameters.
You will move to the System Config step.
- Enter the instance name
In Name, type a unique name for the instance within your project.
- Select the OS login type for the instance
Select the method for signing in to the instance operating system. It defines how you will connect for administration after creation. Two options are available: by key pair or by password.
a. Login type Keypair
When you select the Keypair login type, access to the instance is done via SSH (OpenSSH) using the private key. This option is considered the main one for remote management, as it is more resistant to brute force.
To use a key pair, in the Login Type field specify Keypair, then in the Keypair list select the required key. If the list is empty, create a key pair by clicking Create Keypair and follow the steps described above in section I "Adding a key pair".
b. Login type Password
When you select the Password login type, you set a password for the standard user of the OS image (the default user). This allows you to sign in to the instance via the cloud console control panel, and can also allow SSH access if password authentication is enabled in the OS image. It is important to consider that some images block SSH login with a password by default via OpenSSH settings; in such cases, password access will be available only through the console until you change the SSH configuration inside the instance. Password login is less secure, so use it for test environments, training, and initial setup, when console access is critical.
To enable this option, in the Login Type field select Password, set the password and repeat it in Confirm Password; to connect, use the name from the Login Name field and the specified password.
- Set your own automated setup and initialisation code (Optional)
If needed, specify user data for automatic initialisation of the instance (for example, Cloud-Init or Ignition - depending on the selected OS image). User data allows you to perform the initial operating system configuration on first boot: create users, set access settings, apply basic configuration, and start software installation.
To add data, open the Advanced Options section and paste the configuration into the User Data field. If you use Ignition, additionally enable the Enable Config Drive option.
- Specify the number of instances
In the Count field enter the number of instances you wish to create.
- Proceed to the configuration-verification stage
Click Next: Confirm Config.
You will be taken to the Confirm Config step. - Verify the configuration
A summary of the instance configuration is displayed. Check it carefully and, if amendments are required, return to the previous steps by clicking Previous: … .
If all is correct, click Confirm.
The creation process starts and you are redirected to Instances. The Status column will show Build, indicating that the instance is being created.
When the status changes to Active, the instance is ready for operation and for further actions such as assigning a floating IP address and adding additional disks.
III. Attaching a Floating IP Address
When you create an instance, it is assigned an internal IP address - it is used only for communication inside the cloud infrastructure. To connect to an instance via the internet, you need to associate an external (floating) IP address with it.
Floating IP addresses are allocated to the project from a pool, and their number is limited by project quotas. Quotas are set when you order the Cloud Infrastructure service and, if needed, can be increased by contacting Peerobyte support.
This section describes how to associate a floating IP address with an instance, and how to allocate a new floating IP address from the pool if free addresses have run out, but project quotas still allow you to get additional addresses.
Assigning a floating IP address to an instance
If your project has floating IP addresses with the Down status, you can associate them with an instance to provide internet access by following these steps:
- Go to the instances page
Open the Compute → Instances section.
- Start the IP address adding wizard
In the row with the instance that you want to associate a floating IP address with, click More and in the drop-down menu select Related Resources, then Associate Floating IP.
- Associate the IP address
In the Instance IP section, select the internal IP address of the instance to which the floating IP address will be associated. Then in the Floating IP Addresses section select the floating address and click OK.
The floating IP address will be associated with the instance, after which the instance will be accessible from the internet via this address. The floating IP will be shown in the Floating IP column of the Instances section.
Allocating an IP from the pool
If you requested an increase in the quotas for floating IP addresses from the support team and your request was approved, then before you associate a new IP address with an instance, you need to allocate it to the project from the pool by doing the following steps:
- Start the floating IP allocation wizard
Go to Network → Floating IPs and click Allocate IP.
- Allocate an address from the pool
In the Network list, select the external network from whose pool the floating IP address will be allocated, and then click OK.
The allocated address will appear on the Floating IP page. Its Down status indicates that the IP address is not being used.
IV. Attaching an Additional Volume
In this guide we examine the process of creating a data-storage volume and attaching it to an instance.
Creating a Volume
- Launch the volume-creation wizard
Navigate to Storage → Volumes, then click Create Volume.
- Specify the volume parameters
Select the volume type from the Volume Type list, enter the required capacity in the Capacity (GiB) field, specify the volume’s name in the Name field, and then click Confirm.
You will be taken to the Volumes page, where the name of your volume will appear. The Status column will show Creating, indicating that the creation process has started. When the volume has been created and is ready for use, its status will change to Available.
Attaching the Volume
- Go to the instances page
Navigate to Compute → Instances.
- Launch the volume-attachment wizard
In the row of the instance to which you wish to attach the additional volume, click More and, in the drop-down menu that opens, select Related Resources, then Attach Volume.
- Select the volume.
In the Volume section choose the volume that is to be attached to the instance and click OK.
The volume will now be attached to your instance.
To view the list of volumes attached to your instance, click the instance ID to open the instance-detail page, and then switch to the Volumes tab.
V. Connecting to an Instance
After you connect to an instance, you get full access to its operating system, similar to a terminal connected to a machine in a data centre.
Here we give an overview of the following connection methods:
- Connection via OpenSSH using a key pair - a recommended connection method from a remote terminal, secure and convenient for daily work and automation. A floating IP is required for the instance.
- Connection from the cloud console - this connection method is available in the browser. It works even if the instance OS network settings fail and there is no floating IP attached to the instance.
- Connection via OpenSSH with a password - quick access from a remote terminal without using a key pair, suitable for initial setup and less secure than using a key pair. A floating IP is required for the instance.
Detailed connection to instances is described in the "Remote Access & Administration" section.
Connection via OpenSSH using a key pair
We recommend using this connection method, as it is more secure than using a password. This method is convenient because when you work from a terminal, you can paste commands and data into the terminal from the clipboard and copy them back, which improves convenience. To connect using a key pair, a floating IP must be attached to the instance.
Connection procedure:
- Open a terminal:
a. For Windows: PowerShell or CMD;
b. For macOS/Linux: Bash, Zsh, or another terminal. - Run a command in the terminal in the following format:
ssh -i <key> <user>@<IP>- -i - a command parameter that indicates that authentication will be performed using the private key.
- <key> - the path to the private key of the key pair, whose public key is stored on the instance for authentication.
- <user> - the user name that will be used for authentication. If you did not create a user yourself and you connect as the standard user of the instance OS built from pre-installed images, then depending on the OS distribution the user can be as follows:
- Ubuntu: ubuntu;
- Debian: debian;
- CentOS: centos (sometimes cloud-user);
- RHEL: cloud-user;
- Fedora Cloud: fedora;
- Amazon Linux: ec2-user;
- AlmaLinux: almalinux (sometimes cloud-user);
- Rocky Linux: rocky (sometimes cloud-user);
- SUSE Linux Enterprise Server (SLES): sles;
- openSUSE Leap / Tumbleweed: opensuse;
- Oracle Linux: opc;
- Arch Linux (cloud images): arch;
- FreeBSD (if it is present in the cloud): freebsd.
The name may differ in images, so follow the instructions in the documentation for your specific OS image.
- <IP> - the floating (external) IP address of the instance. You can find it on the Compute → Instances tab, in the Floating IP column.
For example, when working from PowerShell, the command can look like this:
ssh -i c:\users\user1\.ssh\instance_key1.pem [email protected] - -i - a command parameter that indicates that authentication will be performed using the private key.
- On first login, there will be a prompt to confirm the key fingerprint. In response, type yes on the keyboard and press Enter.
Connection via the cloud console
Connection via the cloud console is available even if the instance operating system has no network configuration at all and no floating IP is attached, so it is suitable for initial setup or fixing network problems in the OS settings. A disadvantage of this method is that copying and pasting text is limited, which reduces convenience.
Connection procedure:
- Go to the instances page.
Go to Compute → Instances.
- Open the instance management console.
In the row with the instance you want to connect to, click Console. In the window that opens, click Confirm.
A new console tab will open. If the new tab does not open, check your browser pop-up blocking settings. - Sign in as a user in the instance OS.
Click inside the open console tab to activate the input field. Enter the user name, and then the password.
For example, for Ubuntu OS, the login prompt can look like this:
Connection via OpenSSH with a password
You can also connect to an instance from a remote terminal via SSH, using a user name and password. For this, the image on which the instance is based must be configured for such a connection. Not all of our pre-installed images allow this by default. Also, a user must be created in the instance OS and a password must be set for that user, known to you.
Connection procedure:
- Open a terminal:
a. For Windows: PowerShell or CMD;
b. For macOS/Linux: Bash, Zsh, or another terminal. - Run a command in the terminal in the following format:
ssh <user>@<IP>- <user> - the user name that will be used for authentication. If you did not create a user yourself and you connect as the standard user of the instance OS built from pre-installed images, then depending on the OS distribution the user can be as follows:
- Ubuntu: ubuntu;
- Debian: debian;
- CentOS: centos (sometimes cloud-user);
- RHEL: cloud-user;
- Fedora Cloud: fedora;
- Amazon Linux: ec2-user;
- AlmaLinux: almalinux (sometimes cloud-user);
- Rocky Linux: rocky (sometimes cloud-user);
- SUSE Linux Enterprise Server (SLES): sles;
- openSUSE Leap / Tumbleweed: opensuse;
- Oracle Linux: opc;
- Arch Linux (cloud images): arch;
- FreeBSD (if it is present in the cloud): freebsd.
In other images, the name may differ, so follow the documentation of the specific OS image.
- <IP> - the floating (external) IP address of the instance. You can find it on the Compute → Instances tab, in the Floating IP column.
For example, when working from PowerShell, the command can look like this:
ssh [email protected] - <user> - the user name that will be used for authentication. If you did not create a user yourself and you connect as the standard user of the instance OS built from pre-installed images, then depending on the OS distribution the user can be as follows:
- On first login, there will be a prompt to confirm the key fingerprint. In response, type "yes" on the keyboard and press Enter.
What next?
When you have built the basic infrastructure, we recommend immediately strengthening the security of the new instance and performing the following actions before deploying workloads. We list measures that are relevant for both Linux and Windows systems.
- Update the system to the latest packages/updates
For Linux - the package manager, for Windows - Windows Update or WSUS. The goal is the same: close known vulnerabilities and reduce the risk of compromise. - Create a regular user with administrative privileges
In Linux - via sudo/doas (or the wheel group), in Windows - by adding the account to Administrators. Working under a limited account makes the system more secure and simplifies auditing. - Configure secure remote access and disable direct sign-in as root/Administrator
Linux - SSH with a key, Windows - OpenSSH with a key or strictly limited RDP (only with NLA). This prevents password guessing and improves sign-in security. Before disabling passwords, ensure that the new method works. - Open only the required ports in the built-in firewall
Linux - UFW/firewalld/iptables-nft; Windows - Windows Defender Firewall. Keep open only the services required for work (SSH or RDP, ICMP if needed) and any additional ports or protocols that your production services really need. - Create your own security group in the cloud console
The firewall must duplicate OS protection: allow only SSH or RDP and ICMP Echo (for diagnostics) plus the ports and protocols required by your production services. Other ports are closed. - Take an instance snapshot after the basic setup
This allows you to quickly roll back to a working state if later changes cause errors or failures.
