Cloud Infrastructure Free Trial
You can evaluate the Peerobyte cloud infrastructure with real resources by using a free 30‑day trial. As part of the trial period, a dedicated project will be deployed for you. It will be available both from the Peerobyte cloud infrastructure control panel and via the command-line interface (CLI).
There are two trial options available:
- Without linking a bank card (no charges)
To start without linking a bank card, a minimal configuration without a public IP address is provided: 1 vCPU, 2 GB of RAM and a 10 GB SSD. This option is suitable for getting familiar with the interface and performing basic functionality checks. When the trial period ends, the project resources are automatically stopped and the data is subject to deletion. You can continue using the project on a paid basis and change its configuration by contacting Peerobyte Support before the end of the trial period. - With a linked bank card (charge of €0.99)
To run full‑scale tests, you need to link a bank card. An amount of €0.99 will be charged from the card and credited to your account balance. Additionally, Peerobyte will grant a €222 bonus, available for 30 days to pay for any cloud infrastructure configurations within the available balance. The bonus can be spent partially. If the cost of the selected configuration exceeds the remaining balance, you can top up the balance with the missing amount. When the trial access ends, the amount for the next billing period will be charged to your card unless you opt out of continuing to work with the project in advance by contacting Peerobyte Support.
During the trial period, you can contact Peerobyte Support to change your project's resource limits. If you increase resources beyond the allocated limits and bonus funds, an additional payment will be required. You can also request project cancellation and deletion; in this case, no amount will be charged from the bank card linked to the account for the next billing period.
Several days before the end of the trial period, you will receive a notification at the email address specified during registration. If no bank card is linked and you plan to keep the project for further work, you must contact Support; otherwise, the project will be deleted when the trial access ends. If you selected trial access with a linked bank card and do not explicitly refuse to extend the project, the cost of the selected configuration for the next billing period will be charged from the card when the trial period ends.
To receive the bonus and trial access, you need to perform the following actions:
- Registering or signing in to a Peerobyte account.
- Completing the account profile.
- Phone number verification.
- Bank card verification (for the option with a linked bank card).
- Selecting the configuration (for the option with a linked bank card).
Below you will find a step‑by‑step description of all stages of obtaining trial access, the process of opting out of extension, and links to the instructions on authentication and getting started quickly with the Peerobyte cloud infrastructure.
I. Registering or signing in to a Peerobyte account
To obtain trial access and the bonus, first go to the trial activation page. Then sign in to your account or register. Proceed as follows:
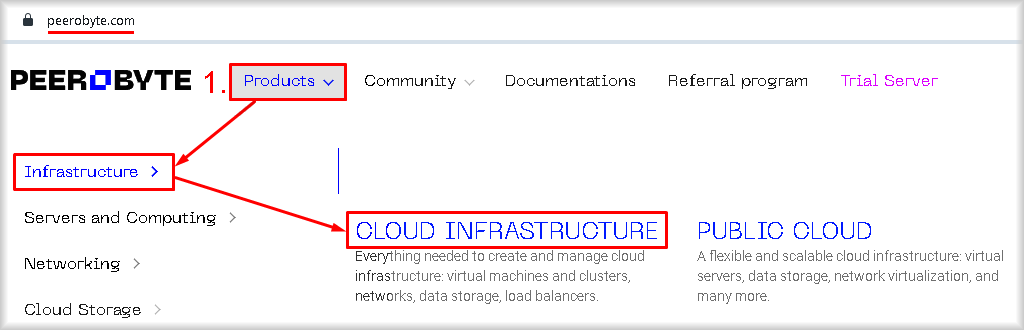
- On the website peerobyte.com, select the "Product" item in the main menu, then "Infrastructure" and "Cloud Infrastructure".
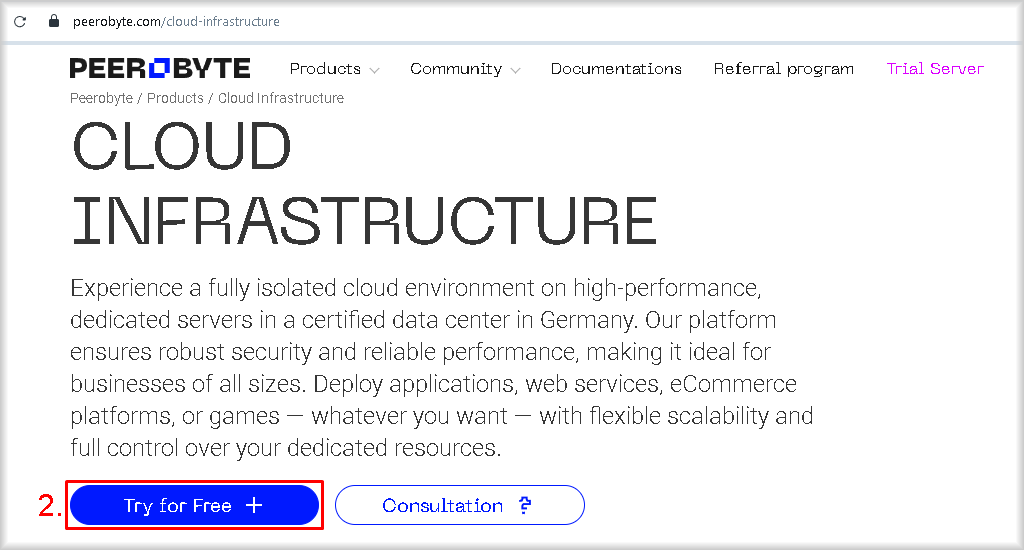
- Click the "Try for Free +" button.
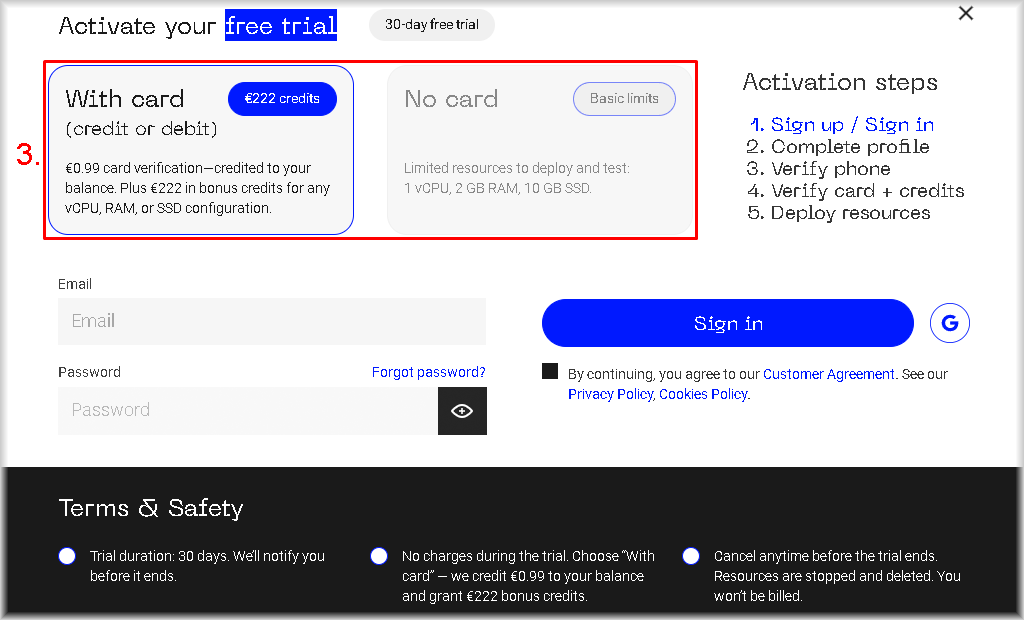
The "Activate your free trial" window will open.
- Select the type of trial access:
- “With card” – to receive the €222 bonus, your bank card will be linked to your account and €0.99 will be charged and credited to the account balance (recommended);
- “No card” – for a minimal configuration (1 vCPU, 2 GB RAM, 10 GB SSD) without linking a bank card.
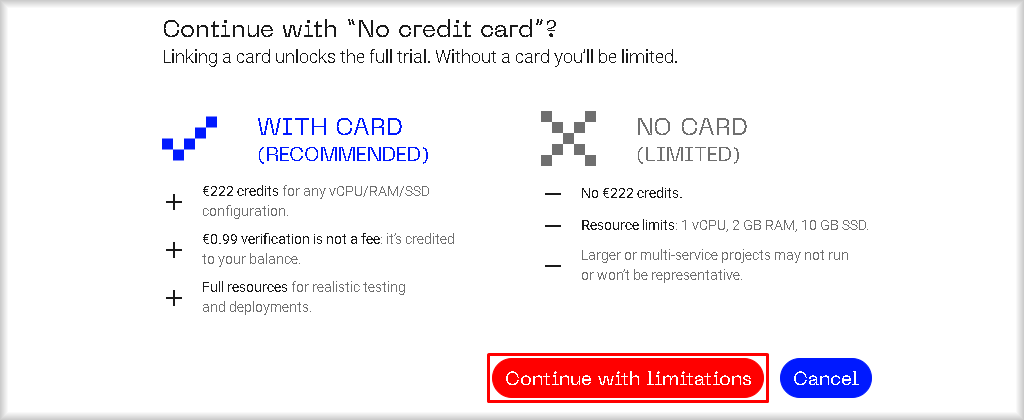
If you select "No card", a window with a description of the limitations of the selected type of trial access will open. In this window, click the "Continue with limitations" button.
-
If you do not have a Peerobyte account, proceed to the next step.
If you already have a Peerobyte account:- If you are already signed in, click the "Request Free Trial" button.
- If you are not signed in yet, enter your authentication details in the "Email" and "Password" fields and click the "Sign In" button.
For further steps, follow the instructions in:
- Section II – if you have not yet completed your account profile information.
- Section III – if you have not yet verified your mobile phone number.
- Section IV – if you have completed your profile, verified your phone and selected the "With card" trial type.
- Section VII – if the profile is completed, the phone is verified and the "No card" trial type is selected.
- Enter your e‑mail address in the "Email" field so that it can be used for subsequent authentication.
Alternative method (using a Google account for authentication):
Instead of entering an e‑mail address and password, you can create a Peerobyte account using an existing Google account. To do this, click the "G" button, select the required account from the list or sign in to it if it is not in the list, and then confirm the linking of the accounts. When the account is linked, you will receive a password for signing in to your Peerobyte account. Save it in case sign‑in with Google becomes unavailable. Then follow the steps described in Section II of this guide.
- Create a password for your Peerobyte account and enter it in the "Password" field.
The password must:- Contain at least 8 characters.
- Contain both upper‑case and lower‑case letters.
- Contain digits.
Using a password that you use for other services is not recommended.
- Review the "Customer Agreement", "Privacy Policy", "Cookies Policy" and their appendices. To open the text, click the link with the name of the document.
Important: If you do not agree with any of the terms specified in these documents, stop the registration process and leave the website. - If you agree with all the terms of the documents mentioned in item 7, tick the checkbox "By continuing, you agree to our Customer Agreement".
- Click the "Sign Up" button.
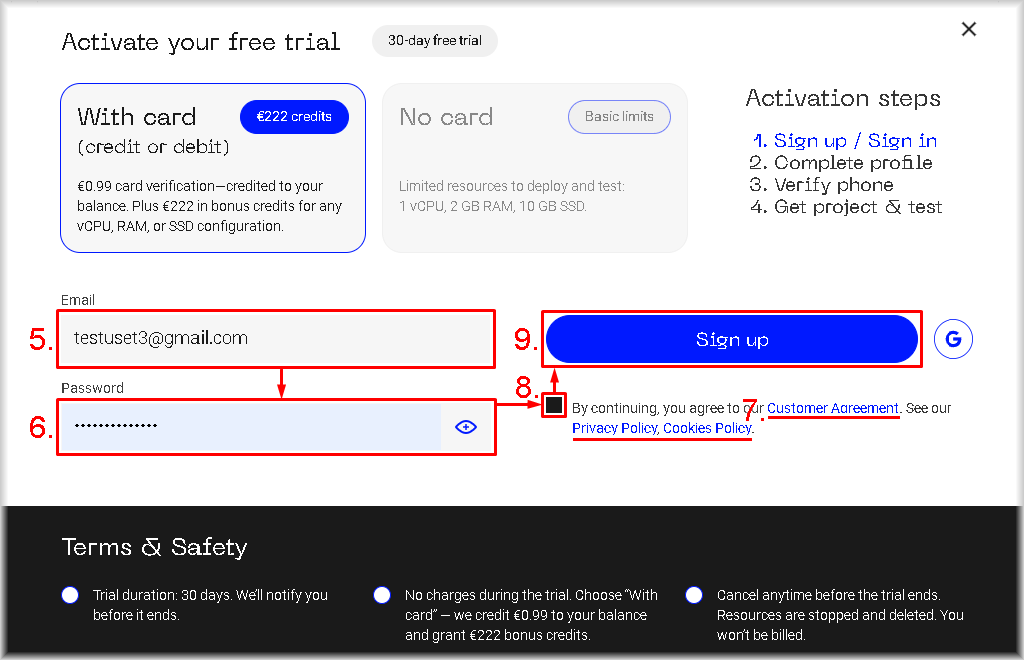
You will be redirected to the profile information page. The process of filling in this page is described in the next section.
II. Completing the account profile
Completing the profile with up‑to‑date information is a required step in creating an account. The steps below describe how to provide the necessary data:
- Select the account type from the "Account Type" list:
- “Individual Account” — if you plan to use Peerobyte services for personal purposes.
- “Business Account” — if you represent an organisation.
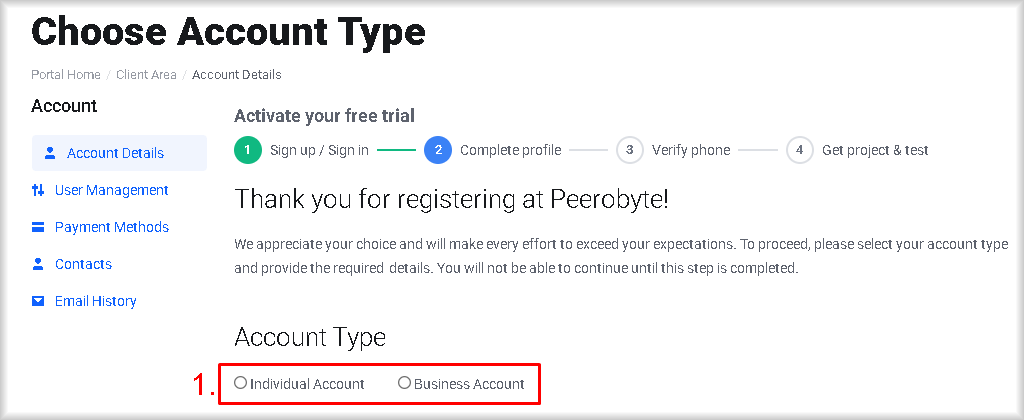
Fields for entering account information will appear.
- Enter your first and last name in the "First Name" and "Last Name" fields.
- Enter your phone number by selecting the country code from the list and entering the remaining part of the phone number in the "Phone Number" field.
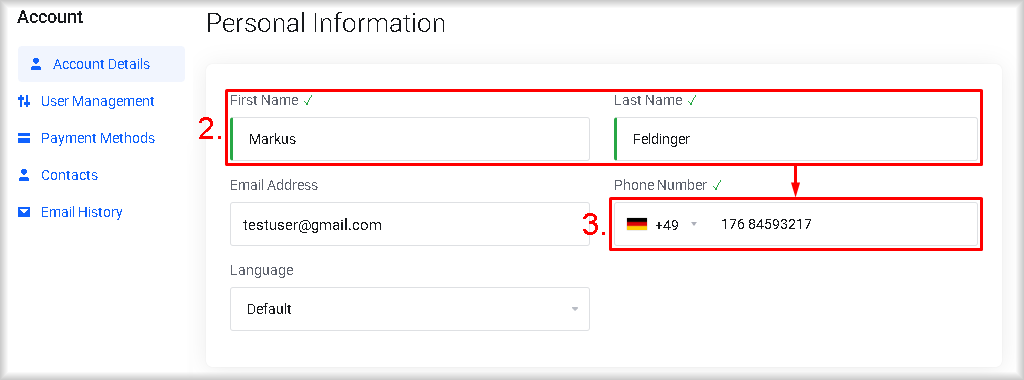
- If you selected "Business Account", enter in the "Company Name" field the name of the company you are authorised to represent. If you selected "Individual Account", proceed to the next step.
- Enter the address:
- If you represent a company, enter its registered address.
- If the account is used for personal purposes, enter your home address.
To do this, fill in the "Address 1", "City", "Zip Code" fields and select the appropriate values in the "Country" and "State/Region" lists.
This data will be used for sending correspondence if needed.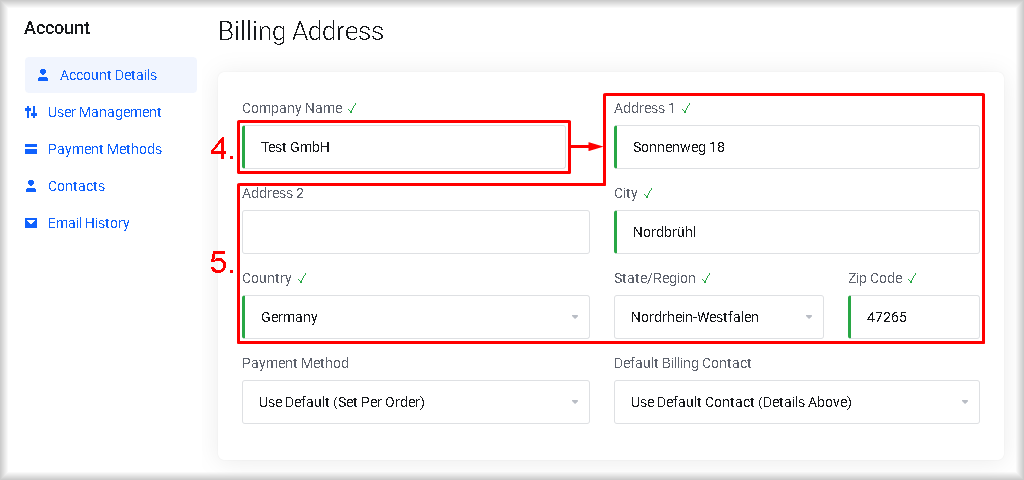
- Click the "Save Changes" button.
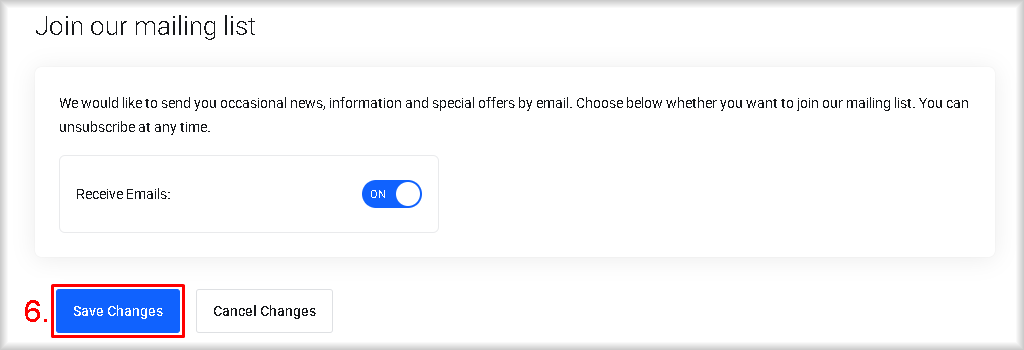
The data you have entered will be saved, and you will proceed to the "Verify phone" step, which is described in the next section.
III. Phone number verification
To protect your account and prevent misuse, we request your mobile phone number and ask you to verify it. Follow the instructions below to verify your number:
- Click the "Start Verification" button.
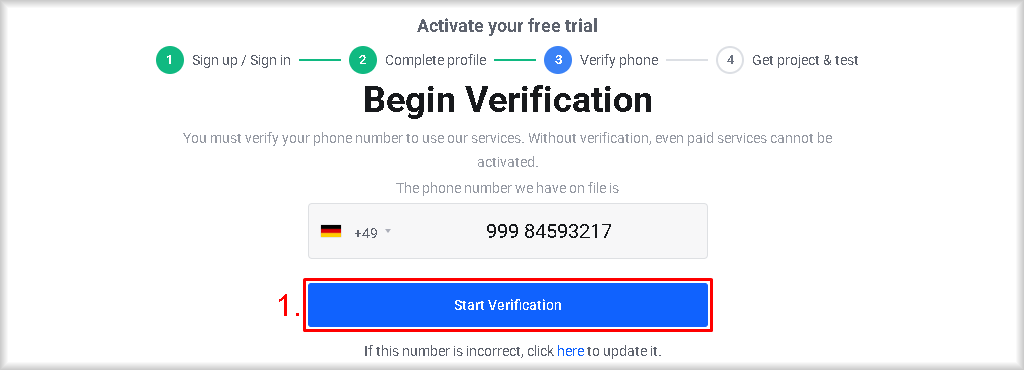
If you see that the number is incorrect, click the "here" link, correct the number, click the "Update number" button and return to step 1.
An SMS message with a verification code will be sent to the specified mobile phone number. - Enter the verification code you received.
If you do not receive the SMS message with the verification code within 5–10 minutes, make sure that:- Your phone is connected to the mobile network and able to receive SMS messages.
- The phone number is entered correctly.
You can check the mobile phone number in the upper right corner of the "Verification Initiated" window. If the number is incorrect, click "Go Back", then click the "here" link, correct the number, click the "Update number" button and return to step 1.
- Click the "Confirm" button.
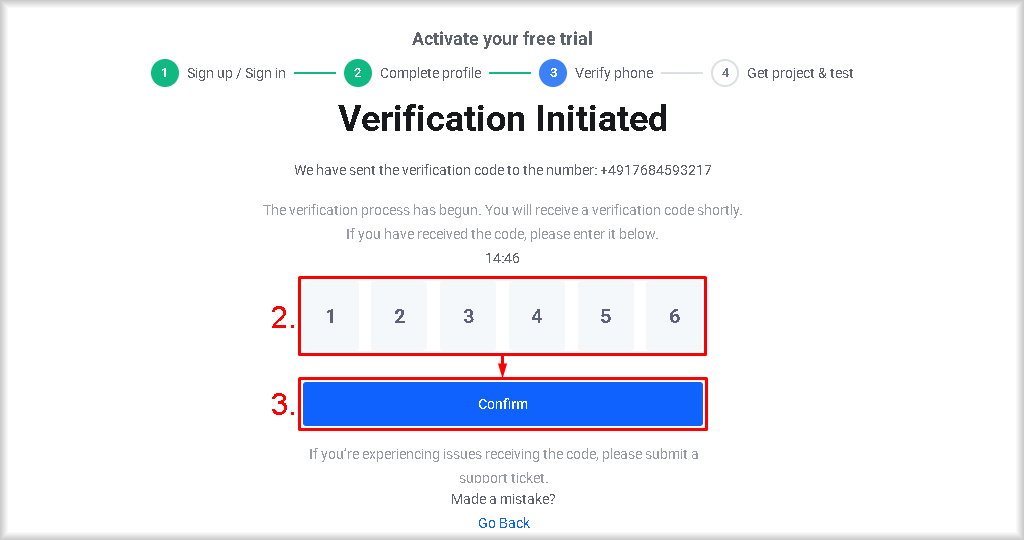
If the verification is successful, you will see the message "Verification Successful".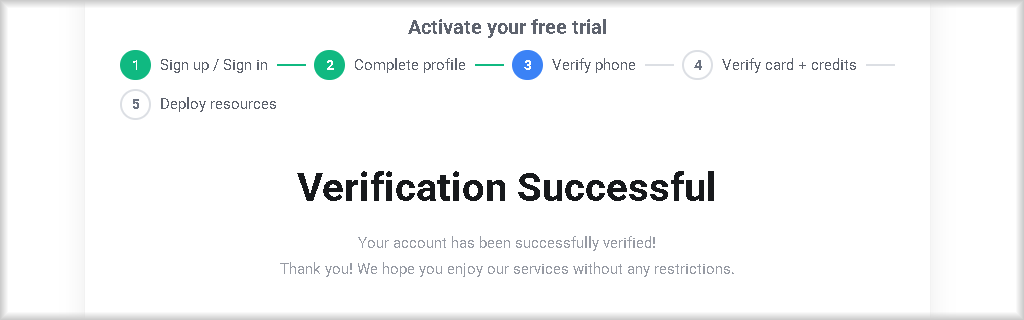
If you selected the "No card" trial type, a trial project will be created automatically after verification, and you can go directly to Section VII to try out your project in practice.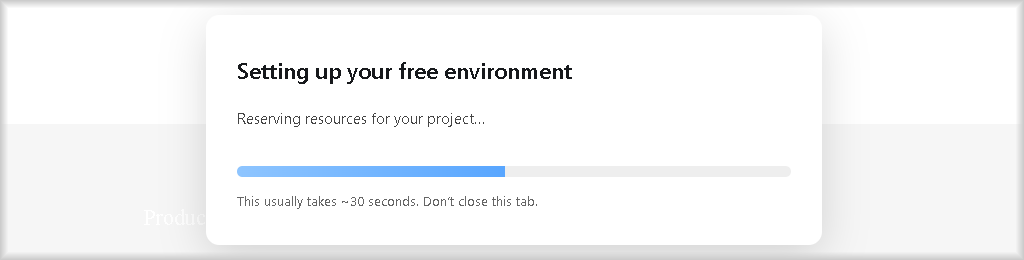
If you selected "With card", you will be redirected to the bank card verification page. The card verification procedure is described in the next section.
Incorrect Code!
If you see the message "Incorrect Code!", re‑enter the code, making sure that you have entered the verification code correctly. If verification still fails after re‑entry, create a support ticket as described below in Section VI.
Too many attempts!
If you see the message "Too many attempts!", it means that you have reached the limit of verification attempts. In this case, contact the Support team for further instructions by clicking "Submit Ticket". In your message to Support, specify a subject in the "Subject" field and briefly describe the issue in the "Message" field, then click the "Send Message" button and wait for a reply from Support.
IV. Bank card verification
To receive the maximum bonus, you must verify your bank card. You can do this by completing the following steps:
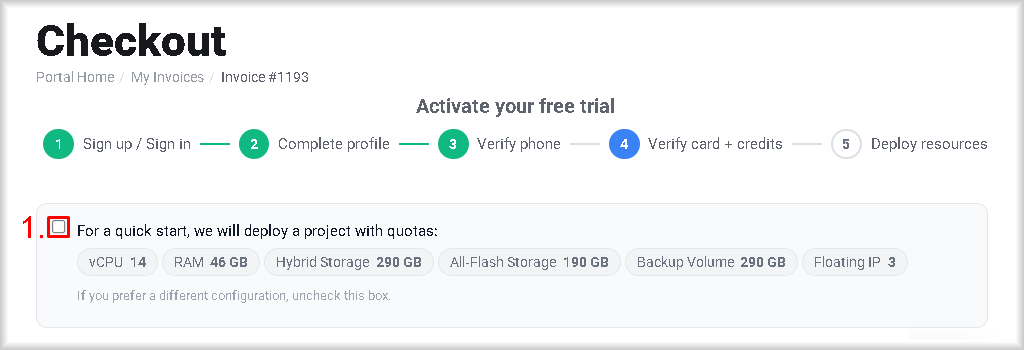
- Clear the "For a quick start…" checkbox if you want to select the limits of your trial project yourself. If you leave this checkbox selected, a project will be deployed for you with limits pre‑selected by us, which are shown below.
- Enter the details of the bank card that will be linked to your account and from which €0.99 will be charged and credited to your account balance. Enter the relevant card details in the "Card number", "Expiry Date", and "CVV/CVC2" fields.
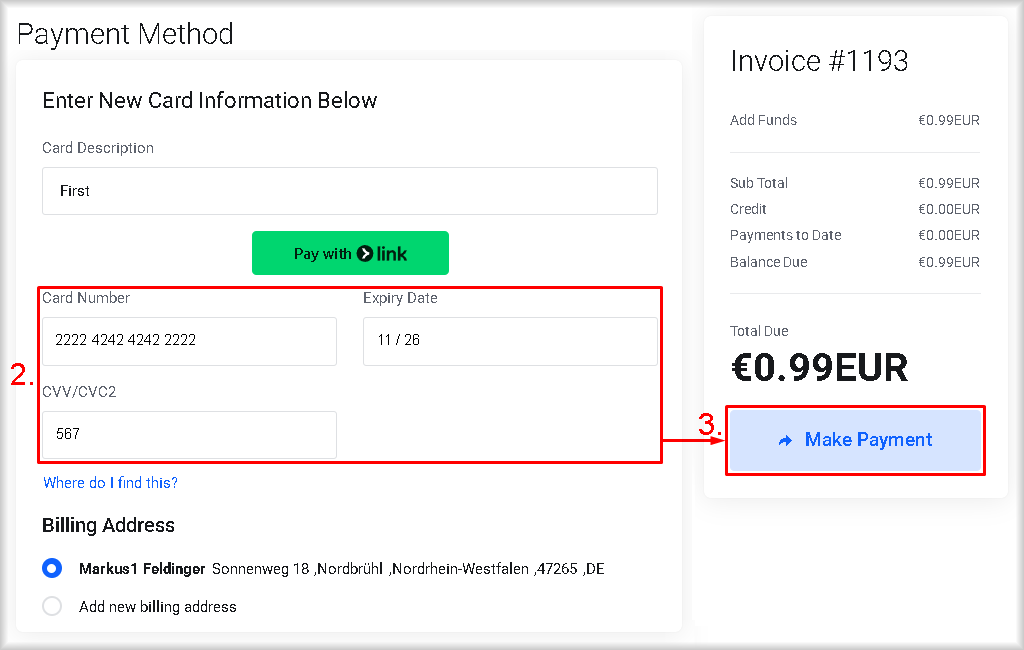
- Click the "Make payment" button.
An amount of €0.99 will be charged from the specified bank card and credited to your account balance. A €222 bonus will also be credited to the balance, and the bank card will be linked to your account.
If the "For a quick start…" checkbox was selected, a trial cloud infrastructure project with the limit configuration specified by us will be deployed. In this case, you can start working with the project as described in Section VII.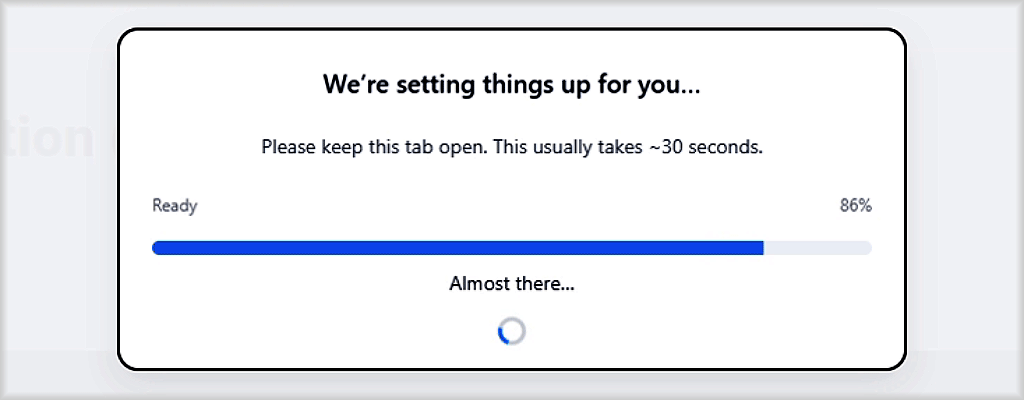
If the "For a quick start…" checkbox was not selected, you will be redirected to the page for selecting the limit configuration of the trial project. How to do this is described below in the next section.
V. Selecting the configuration
If you selected the "With card" trial type and cleared the "For a quick start…" checkbox, you will be prompted to select the resource limits of your trial project after your bank card is verified:
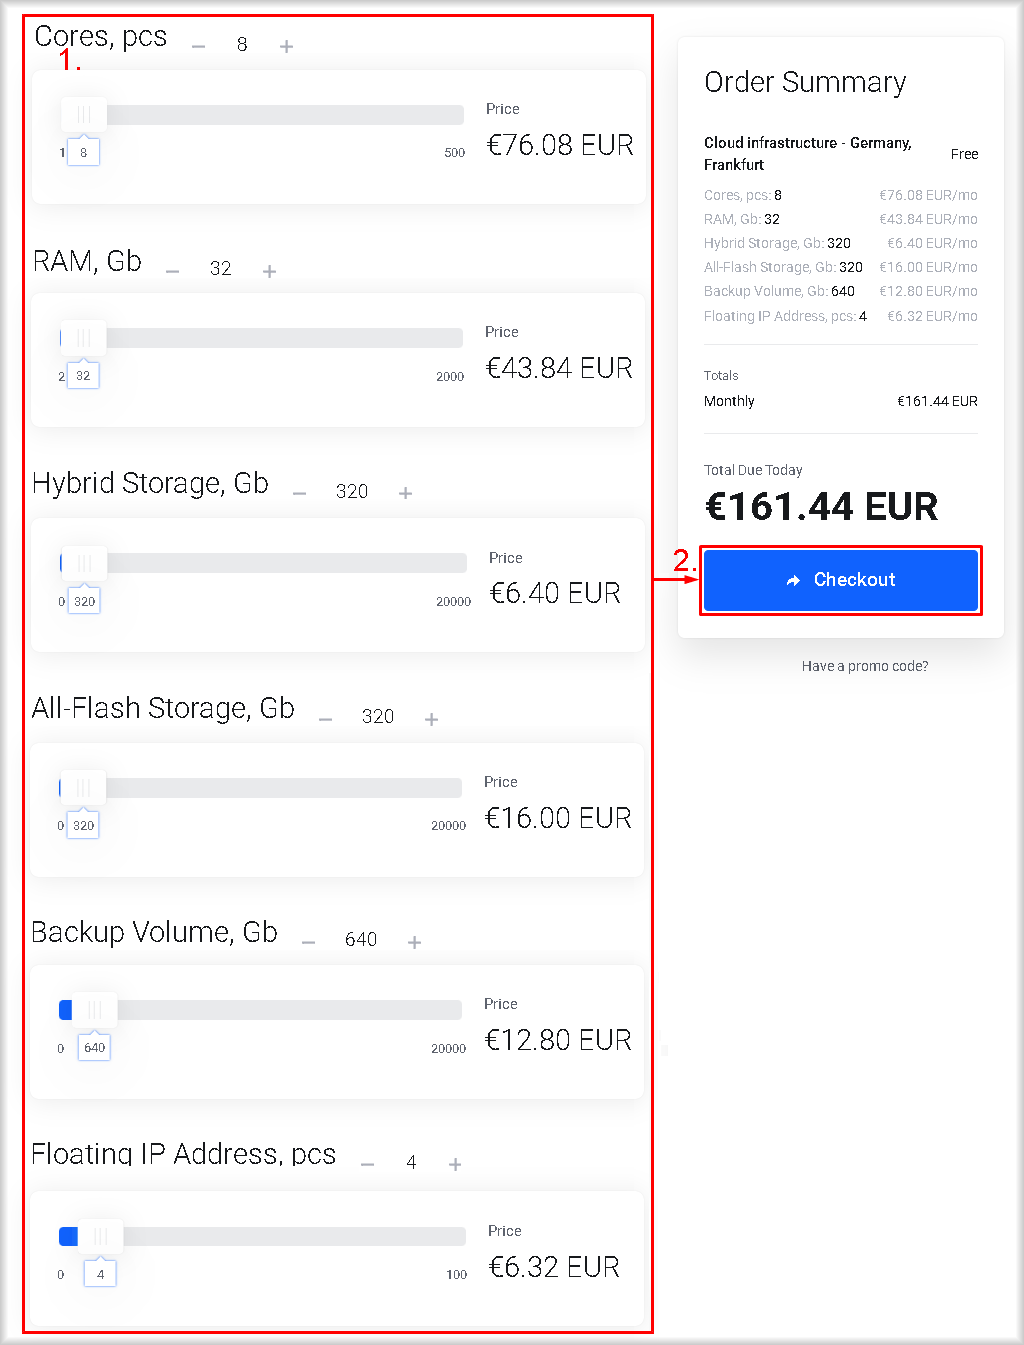
- Select the limit configuration of the trial project by moving the sliders or by entering the required values directly in the input fields. You must select the following parameters: "Cores", "RAM", "Hybrid Storage", "All‑Flash Storage", "Backup Volume", "Floating IP Address".
The "Total Due Today" field will show the monthly cost of the cloud infrastructure. If it exceeds the account balance including the bonus, you must pay the missing amount to obtain the trial project.
If you decide to keep your project after the end of the trial period, the amount displayed in the "Monthly" field will be charged every month from the linked bank card to pay for the cloud infrastructure. - Click the "Checkout" button.
You will be redirected to the "Review & Checkout" page. - Select "Apply €xxx.xx from my credit balance…" so that the funds for the cloud infrastructure, including the bonus funds, are debited from the Peerobyte account balance.
Important: If you select another option, you will be prompted to enter bank card details to charge the amount directly, and the bonus funds on your account balance will not be used. - Tick the "I have read and agree to the Terms of Service" checkbox if you agree with all the provisions of the "Terms of Service" document. You can review its contents by clicking the document name.
- Click the "Checkout" button.
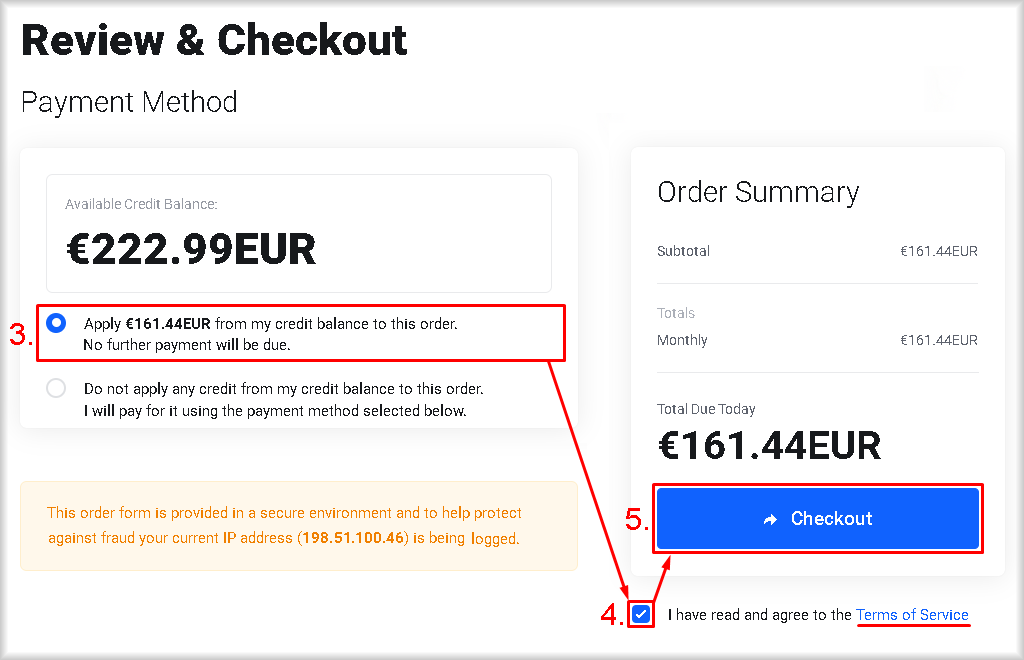
The amount for the cloud infrastructure will be charged from your account balance and the deployment of your project will start. If everything is successful, you will see the message "Order Placed".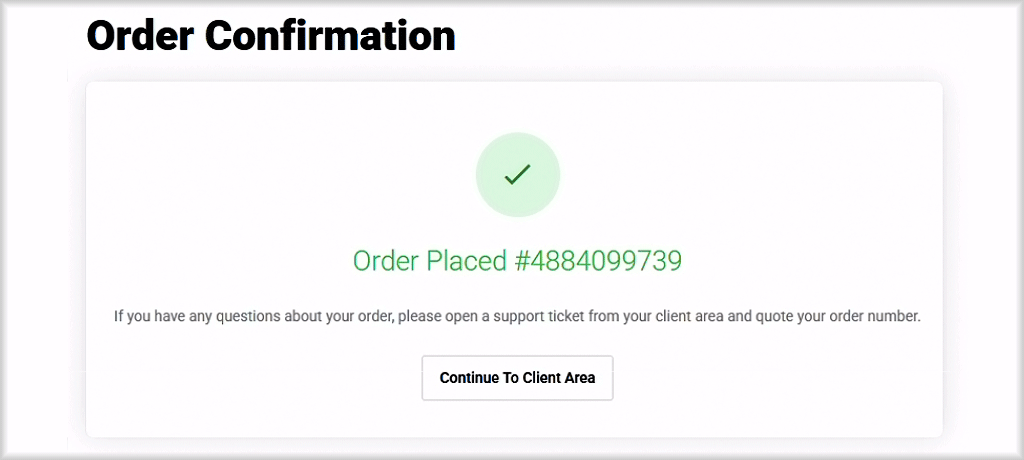
How to start working with your trial project is described in Section VII. How to change limits, extend or cancel the project is described in Section VI.
VI. Extending, changing configuration, and cancelling the project
Thirty days after the free trial for cloud infrastructure is granted, the trial period ends. Depending on the free trial type, two options are possible:
- If you have not linked a card, your project will be automatically stopped and deleted. Before deletion, you can contact Peerobyte Support and request a transition to a paid plan, which will allow you to continue working on the project without losing data.
- If you have linked a card, the amount required to extend your use of the cloud infrastructure will be charged automatically from your card. This amount will be equal to the cost of the cloud infrastructure configuration you selected during the trial period. Before any charges are made, you can contact Peerobyte Support to request cancellation of the project and its deletion in order to avoid charges for the next billing period.
In both scenarios, before the free trial ends, you can contact Peerobyte Support to request changes to the amount of project resources available. If you exceed the allocated resource limits or use bonus funds, additional payment will be required.
You can contact Support by submitting a ticket. The ticket submission process is described below.
Submitting a ticket to Support:
- Sign in to your Peerobyte account.
The sign‑in process is described in the "Logging in to the Control Panel" guide, and sign‑in with two‑factor authentication (2FA) is described in "Logging in to the Control Panel with 2FA". - Click the "Open Ticket" button.
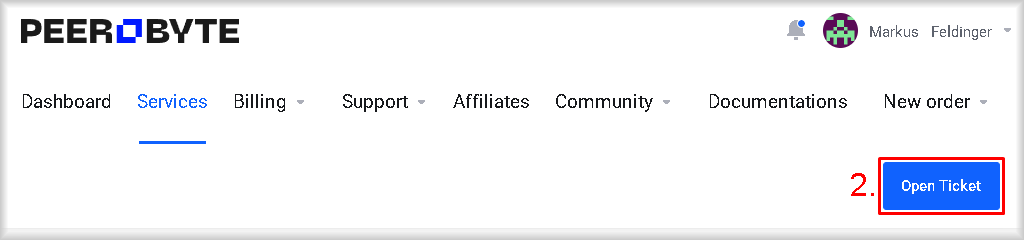
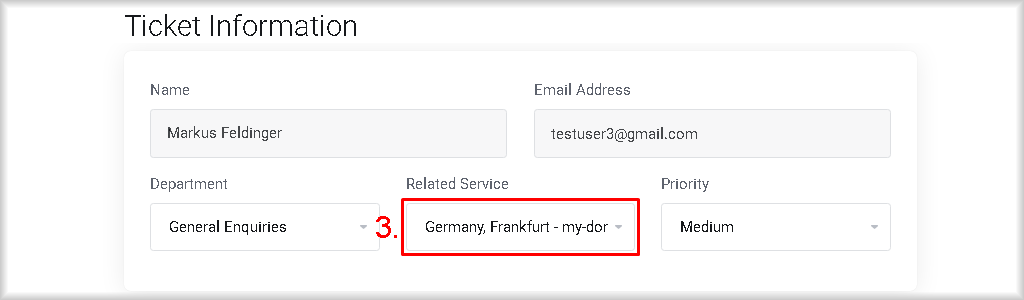
You will be redirected to the "Open Ticket" page. - Select from the "Related Service" list the service to which your request relates.
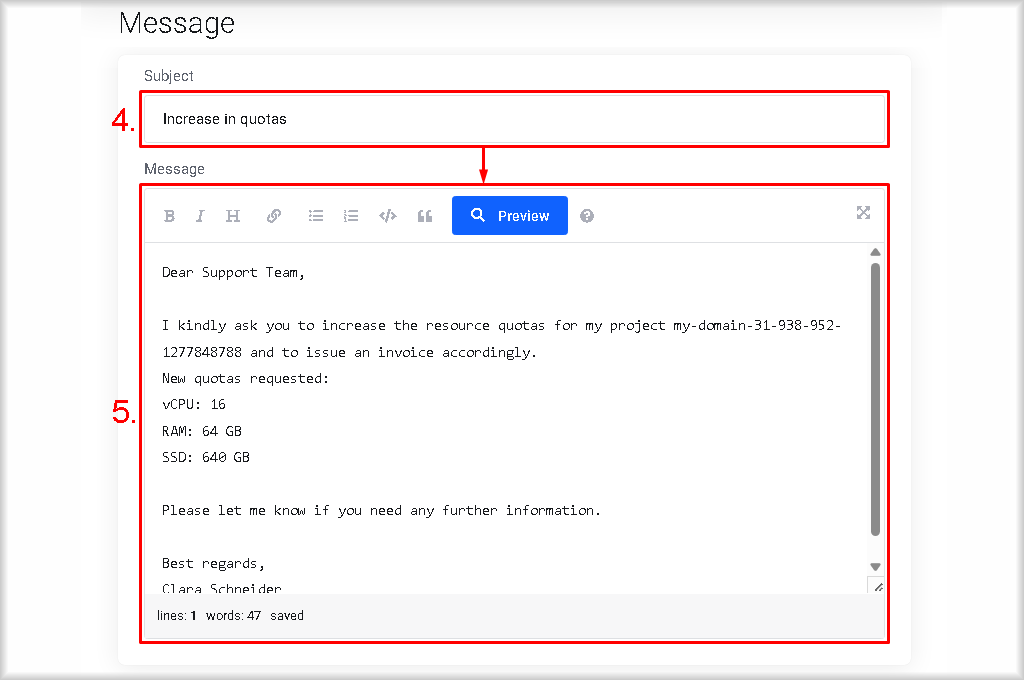
- Enter a brief subject for the request in the "Subject" field.
- Describe the reason for your request in the "Message" field.
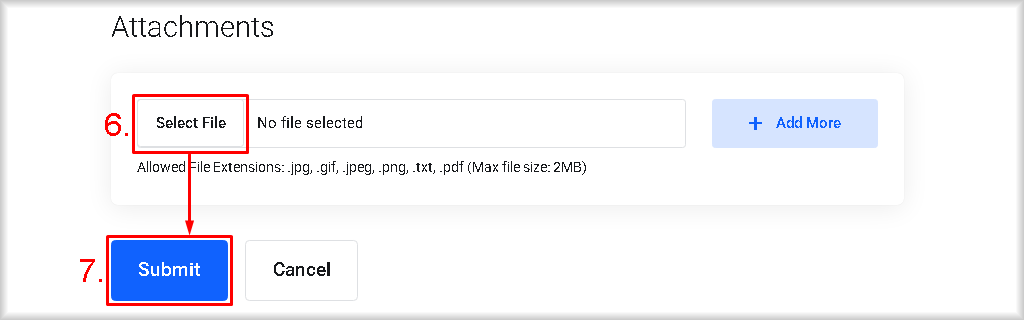
- If needed, attach files by clicking the "Select File" button in the "Attachment" section and selecting a file for upload. To add more files, click the "+ Add More" button.
- Click "Submit".
Your message will be sent to Peerobyte Support.
VII. What’s next?
After your cloud infrastructure project has been created, you can authenticate in the cloud infrastructure control panel according to the "Logging in to the Cloud Infrastructure Control Panel" guide.
After authentication, you can deploy your cloud infrastructure. How to do this is described in the "Quick Start in Cloud Infrastructure" guide.
In addition to the web interface, you can manage the project via the command line interface (CLI), use Terraform and deploy a Kubernetes cluster within the trial project. Detailed information about these capabilities is provided in the "Automation and IaC tools" section.
If you enjoyed using Peerobyte, tell your colleagues and friends about us and get rewarded! Join the referral program: share your personal link, and every time a customer you invite pays for Peerobyte services, you will receive 15% of their payments. You can activate your participation and read the terms and conditions in the “Referral program” section.