
Connecting to a Cluster Using Kubernetes Dashboard
This guide explains how to connect to Kubernetes Dashboard, the official web interface (GUI) for managing Kubernetes clusters. We show how to generate a new access token for Kubernetes Dashboard on the cluster control plane node and then use this token to connect. The connection process is shown using the example of a Kubernetes cluster in the Peerobyte cloud infrastructure.
I. Make sure you meet the prerequisites
To connect to Kubernetes Dashboard, you must meet the following requirements:
- You must have an account in the Peerobyte Control Panel. To learn how to register an account, see the guide: "Creating an Account".
- You must sign in to your account on the Peerobyte website:
- If 2FA (two-factor authentication) is not enabled, follow the sign-in guide "Signing in to the Control Panel".
- If 2FA is enabled, follow the guide "2FA Signing in to the Control Panel".
- You must order a Kubernetes cluster from Peerobyte. To order one, see the guide: "How to Order a Kubernetes Cluster".
II. Download the private key
To access the cluster control plane node, download the private key in the "Kubernetes Cluster" service control panel:
- In the main menu, select "Services". The "My Products & Services" page opens.
- In the list of services, select the cluster whose Kubernetes Dashboard you want to connect to.

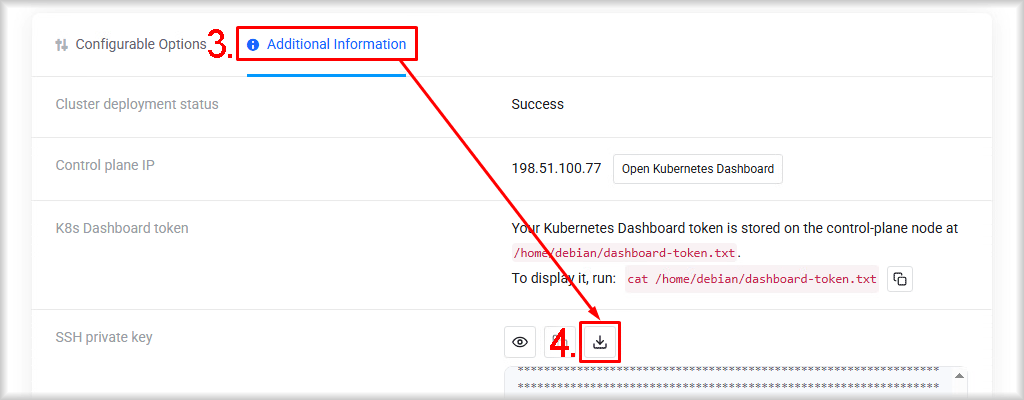
The "Kubernetes Cluster" service control panel opens. - Go to the "Additional Information" section.
- Download the private key used to access the cluster nodes by clicking the "Download Key (*.pem)" button.
- Do not store the private key on file systems that do not support user-based access permissions. For example, FAT32, which is often used on USB flash drives, memory cards, and external disks, is not suitable for storing private SSH keys.
- The private key must be accessible only to the owner. If other users can access it, OpenSSH will not use it.
- In Windows - store the private key only in a directory that is not accessible to other users. The recommended path is "%USERPROFILE%\.ssh\", for example "C:\Users\YourUser\.ssh\". Do not store the key in shared or arbitrary directories if they can be accessed by other accounts. When the file is copied, it may inherit the permissions of the destination directory, and OpenSSH will not use such a key.
- In Linux and macOS - we recommend using the "~/.ssh" directory or another directory that is accessible only to the owner.
- In Windows - store the private key only in a directory that is not accessible to other users. The recommended path is "%USERPROFILE%\.ssh\", for example "C:\Users\YourUser\.ssh\". Do not store the key in shared or arbitrary directories if they can be accessed by other accounts. When the file is copied, it may inherit the permissions of the destination directory, and OpenSSH will not use such a key.
Important:
III. Connect to the control plane node and generate a token
After you download the private key, connect to the control plane node:
- Open PowerShell or a terminal.
Depending on your operating system, start:- for Linux or macOS - terminal.
- for Windows – PowerShell or Windows Terminal.
- Connect to the cluster node.
Run the following command to connect to the cluster control plane node over SSH:
ssh -i <Private_Key> <Cluster_User_Name>@<Cluster_IP>Replace the following values with your own:
- <Private_Key> – the cluster private key (including the path) downloaded from the "Kubernetes Cluster" service control panel.
- <Cluster_User_Name> – the username for SSH connections. You can view its value in the "SSH username" field of the "SSH private key" section in the "Kubernetes Cluster" service control panel. In most cases, the username is "debian".
- <Cluster_IP> – the external IPv4 address of the cluster control plane. You can view its value in the "Control plane IP" field of the "Additional Information" section in the "Kubernetes Cluster" service control panel.
For example:
- for Windows:
ssh -i "c:\users\username\ssh-private-key-service-1420.pem" [email protected]
- for Linux and macOS:
ssh -i "/home/username/ssh-private-key-service-1420.pem" [email protected]
If you see the following message when connecting: "It is required that your private key files are NOT accessible by others. This private key will be ignored.":
Make sure the key is stored in a directory that other users cannot access, as described in the "Download the private key" section, and set permissions so that only the current user has access and everyone else is denied access.
Depending on your operating system, go to the directory that contains the key and run the following commands:- for Linux or macOS (terminal):
chmod 600 <Private_Key>Replace the following value with your own:
- <Private_Key> – the cluster private key downloaded from the "Kubernetes Cluster" service control panel.
For example:
chmod 600 ssh-private-key-service-1420.pem - <Private_Key> – the cluster private key downloaded from the "Kubernetes Cluster" service control panel.
- for Windows (PowerShell or Windows Terminal):
         icacls "<Private_Key>" /inheritance:r
icacls "<Private_Key>" /grant:r "${env:USERNAME}:(R)"
Replace the following value with your own:
- <Private_Key> – the cluster private key (including the path) downloaded from the "Kubernetes Cluster" service control panel.
For example:
         icacls "ssh-private-key-service-1420.pem" /inheritance:r
icacls "ssh-private-key-service-1420.pem" /grant:r "${env:USERNAME}:(R)"
- <Private_Key> – the cluster private key (including the path) downloaded from the "Kubernetes Cluster" service control panel.
- Generate the token.
Use the following command to generate it:
sudo kubectl -n kubernetes-dashboard create token admin-user --duration 1hThis command generates a new token with a lifetime of 1 hour. You can change the token lifetime by changing the value of the --duration parameter.
- Copy the token.
Copy and, if necessary, save the token generated in the previous step.
IV. Connect to the Dashboard
Kubernetes Dashboard is available at the external IPv4 address of the control plane node specified in the service control panel, on port 30007.
To sign in to Kubernetes Dashboard:
- Go to the "Additional Information" section of the "Kubernetes Cluster" service control panel.
- In the "Kubernetes Cluster" service control panel, click the "Open Kubernetes Dashboard" button.

Alternatively:Copy the value of the "Control plane IP" field from the "Additional Information" section and paste it into the browser address bar, adding the network port number “30007” (so that you get an address such as "https://198.51.100.77:30007"), then go to the resulting address.
- As the authentication method, select "Token".
- Enter the value of the token you received in the "Enter token *" field.
- Click the "Sign in" button.

You will be signed in to Kubernetes Dashboard.